Disclosure: Cutting Edge Stencils provided the Paint-A-Pillow kit featured in this post. All opinions, images and love of DIY fall pillows are 100% mine.
I have a slight obsession with throw pillows, and I love fall, so it was only a matter of time before I shared a DIY fall pillow project on the blog.
I was excited to be offered a chance to try out a Paint-A-Pillow set from Cutting Edge Stencils. I’d heard good things about their stencils, and the pillow kit didn’t disappoint.
And it was really easy to make!
I love this pillow and already want to make a million more for every room in the house.

A group of 15 bloggers tested out the Paint-A-Pillow sets. We all picked a fall or Halloween stencil to share.
You can see their pillow projects below – and enter to win a gift card to use for a pillow kit or stencil of your own!
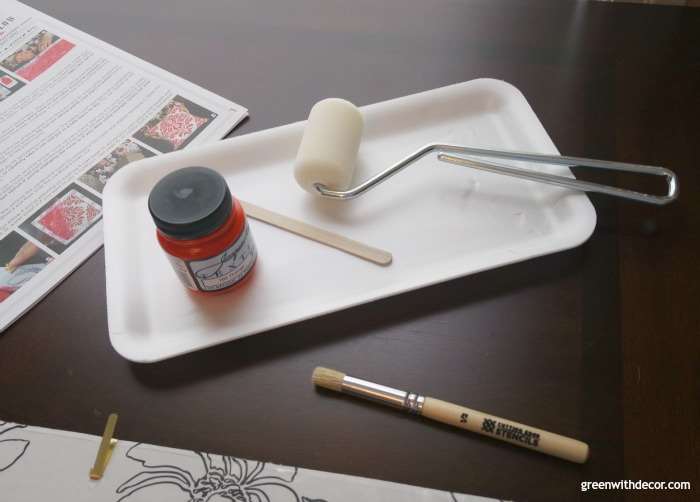
The Paint-A-Pillow set comes with everything you need:
- 17” x 17” pillow
- 17” x 17” pillow cover
- Stencil (and it’s reusable!)
- Jar of fabric paint (I got orange.)
- 2” mini paint roller
- Paint tray
- Stirring stick
- Brush for touchups
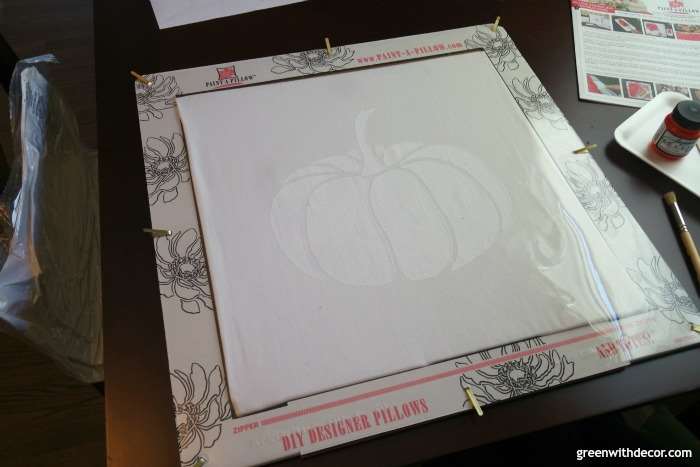
- Cardboard frame for you to easily paint the stenciled design onto the pillow cover
- Free mini stencil and small fabric swatch to practice on (I got a bird. You may see some stenciled birds popping up in some DIY projects around Easter!)
The pillow cover and stencil come in a cardboard frame all set up for painting.
I told you this was an easy project – you don’t even have to set it up!
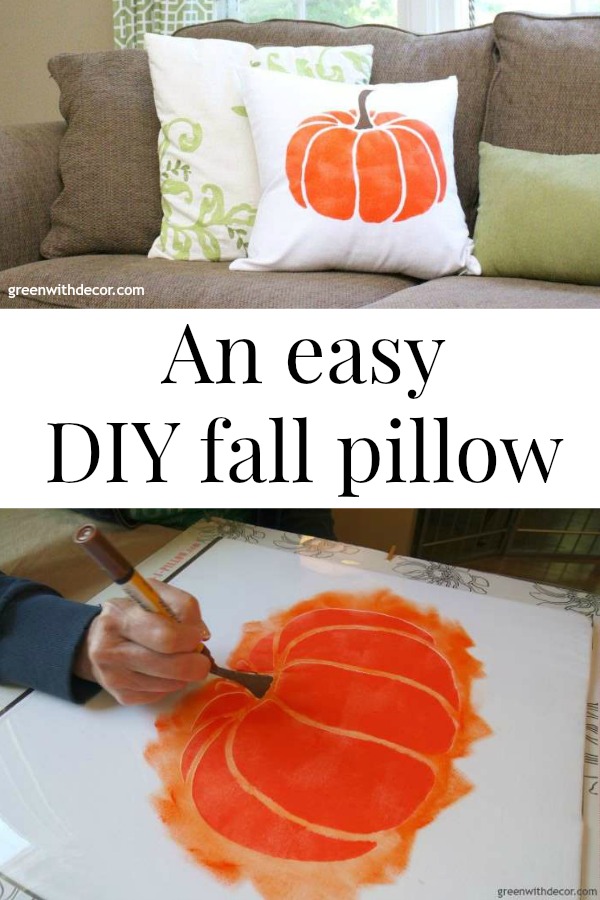
How to make a DIY fall pillow:
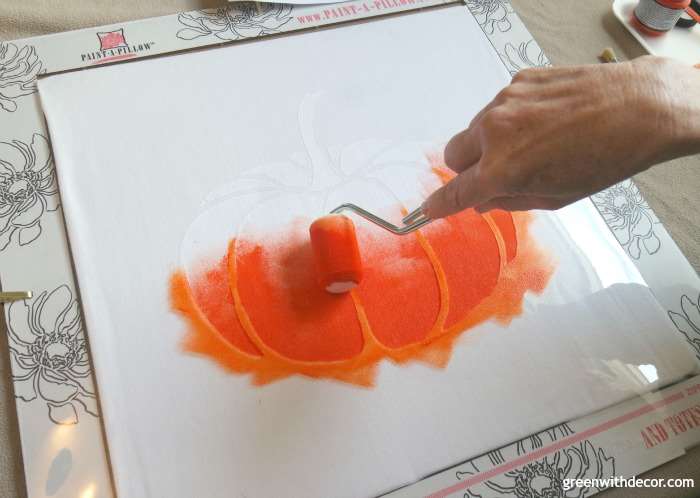
1. Get the fabric paint ready.
Shake the paint and stir with the stirring stick. Pour the paint onto the paint tray and roll the mini-roller over the paint.
Make sure the paint covers the roller evenly without getting too much excess paint on the roller.
The roller should look almost dry. The goal is really to use as little paint as possible so it doesn’t smudge.
2. Roll on the paint.
Lightly roll over the stencil.
I pressed a bit harder in some places than others so the pumpkin isn’t bright solid orange everywhere but has a more textured look to it.
3. Optional: Touch up the edges with the paintbrush.
I didn’t do this. The pumpkin design on my pillow cover had such clean edges already, there was no need to touch it up.
4. Optional: Use another color fabric paint.
I picked up a brown fabric paint pen so I could give the pumpkin a brown stem.
Paint-A-Pillow offers extra fabric paint on its website, but, of course, I was already at Michael’s stocking up on other items, so I picked up my brown paint while I was there.
Just be sure if you get paint from somewhere other than Paint-A-Pillow that it’s fabric paint.
5. Let it dry.
I let it dry overnight just to be safe, but you can use a hair dryer if you’re in a hurry to speed up the drying process.
6. Remove the stencil from the frame.
Take the cardboard out from inside the pillow cover, and slip in the pillow.
7. Optional: Heat set the pillow
You can iron the (fully dried) pillow cover through a piece of cloth for about 30 seconds to heat set the pattern. This protects the pillow cover if you’ll be using it outside or throwing it in the wash.
All done!
You can easily wash the stencil, brush and roller so you can use them again and again. That alone makes the kit worth it! The roller is such a perfect little size. I’m excited to add it to my collection of craft supplies.
And everything fits in the Paint-A-Pillow box, making it easy to store. They’ve really thought of everything.
I’ve already had the pillow in both the family room and the living room.
I can’t decide where I want it. I think I’m just going to have to paint a second pillow (and maybe a third and fourth…).
This post contains affiliate links. This means if you click the link and buy something, I may receive a small percentage of sales at no extra cost to you.
GET THE LOOK:
Since a popular question I get is “Where’d you get that?!,” here are links to the same or similar sources:
- Green pillow
- Green + white pillow
- Couch
- Curtains, tablecloth from Target, no longer available
- Tan blanket
- Pig wall decor from local decor store, similar here
Or if you’re not in a DIY mood, head to this post for 25 affordable fall pillows. You can never have too many fall pillows!
You can check out the other bloggers’ pillow projects, too. Aren’t they fun!?
Refashionably Late – Paint your own Halloween pillow
Domicile 37 – DIY bleached out skull pillow
Green With Decor – A DIY fall pillow (you’re here!)
Tastefully Frugal – Glow in the dark spider pillow
Pocketful Of Posies – Painted pillows
Old House to New Home – DIY painted pillow with braided trim
Flourish and Knot – Poe-etic pillow
A Shade Of Teal – DIY jack-o-lantern pillow
Our House Now a Home – Spider pillow
Farmhouse 40 – DIY black cat pillow
Shabby Grace Blog – DIY Halloween throw pillow
Uncookie Cutter – Halloween paint a pillow
Casa Watkins – A non-traditional painted pumpkin pillow
Around the Watts House – Stenciled pillow
One Mile Home Style – Halloween crow pillow
What’s your favorite pillow pattern? I’m already plotting my next DIY pillow project!
Remember to bookmark or pin this post if you want to save it for later!
Pin it!
Want to read more posts like this?
Follow along: Get my emails | Facebook | Pinterest | Twitter | Instagram
Sara says
Awesome job Meg! Good idea on Easter with the bird stencil! 🙂
GreenWithDecor says
Thanks, Sara! 🙂
Jessica says
Nice. The color compliments your house very nicely.
GreenWithDecor says
Thanks, Jess!
Stephanie C. says
What a great little pillow for fall and Halloween!
GreenWithDecor says
Thanks, Stephanie!
Ruthie says
Meg I love how clean and beautiful yours looks! I love that it can be used all throughout fall! Great idea on the fabric pen!
GreenWithDecor says
Thanks, Ruthie! Yes! I’m excited to use it throughout fall!
Amanda says
I love the brown stem! And the pillow looks great on your couch with the green pillows!
GreenWithDecor says
Thanks, Amanda! Me, too 🙂
bonbon @ farmhouse 40 says
Meg…..your pillow is beautiful…. it really looks nice on your couch. Love the brown stem with the orange pumpkins. Perfect pillow for Fall.
GreenWithDecor says
Thank you! Gotta love fall!
Tiffany says
Hi, Meg ~ Your pillow looks beautiful! I love that you can use it for the entire fall season!
GreenWithDecor says
Thanks, Tiffany! Me, too : )
Sydney @ Tastefully Frugal says
I love how bright your pillow is! It just makes me happy 🙂 I got that little birdie stencil too and there are a few projects I am going to be using it for in the spring too!
GreenWithDecor says
Thanks, Sydney! Isn’t it perfect for spring!? It was a nice little surprise in the box!
Iris Nacole says
I love this Meg! It’s such a pretty pillow, and one that will span the season!
GreenWithDecor says
Thanks, Iris! I love that the pillow works for all of fall!
Sarah says
Great job! I love the colour of orange you used!
GreenWithDecor says
Thanks, Sarah!
Diane says
I am in love with that vibrant orange! 🙂 What a fantastic job
GreenWithDecor says
Thanks, Diane!
April R @Uncookie Cutter says
It turned out so cute Meg and you did a great job with the tutorial!
GreenWithDecor says
Thanks, April!
Stephanie @ Casa Watkins says
Meg! Great pillow and vibrant orange color! Perfect for fall and halloween. Thanks for participating in the Create and Share this month. Tweeted!
GreenWithDecor says
Thanks, Steph! And thanks for organizing such a fun Create and Share!
Chelsy b says
I love it! I would have chosen the pumpkins too it’s perfection!
GreenWithDecor says
Thanks, Chelsy!