Disclosure: This post is sponsored by Wagner. All opinions, images and love of DIY projects are 100% mine.
I’m back with another fun heat gun project today! This is a fun festive project perfect for Christmas.
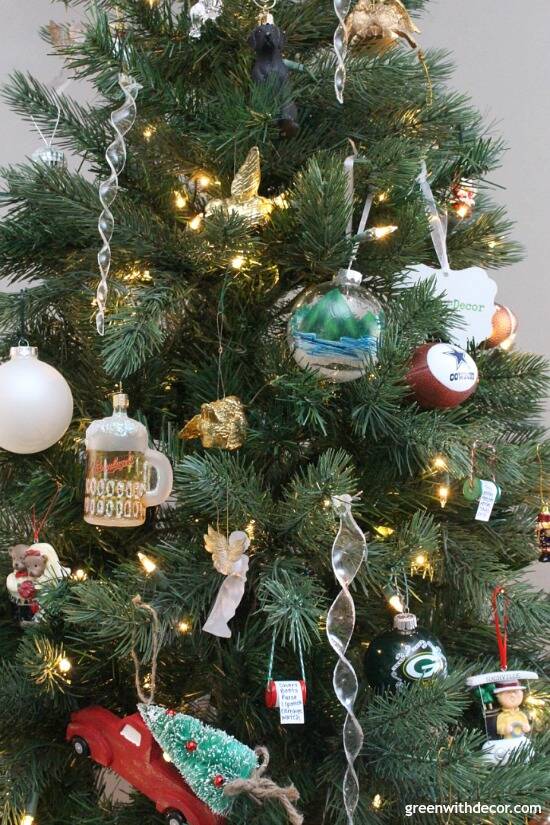
We turned sheets of plexiglass into these awesome DIY Christmas icicle ornaments using our Wagner heat gun:
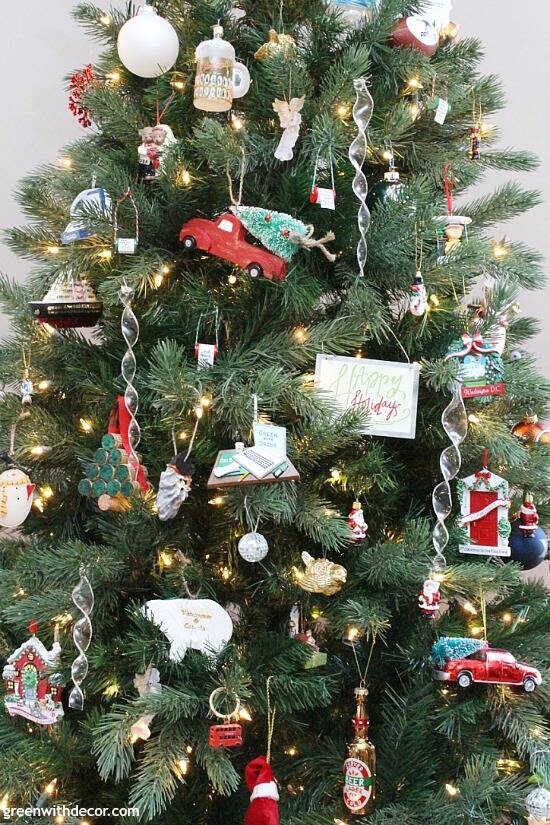
Don’t they look fab with all the tree lights surrounding them?
They were easy to make. As always, I’m amazed at all of the projects you can do with a heat gun.
We’ve cleaned our grill and crackled paint with the heat gun. And if you want even more heat gun projects, Wagner has a lot of projects on their website, too.
I’m still wanting to try using the heat gun to strip paint from a painted piece of furniture, but I haven’t found a furniture piece for that project yet!
This post contains affiliate links. This means if you click the link and buy something, I may receive a small percentage of sales at no extra cost to you.
Supply list:
- Wagner heat gun, FURNO 750 (also available here)
- Plexiglass
- Tape measure
- Plaskolite plastic cutting knife
- Clamps
- Heat resistant gloves
- 2×4 piece of wood
- Drill
- Clear wire
- Gold picture hooks
How to make Christmas icicle ornaments with a heat gun:
1. Determine the size you want your icicles to be.
We went with a variety of sizes, I wanted them to look cohesive but not identical. The longest size we did was 10 inches.
2. Place the plexiglass on a solid table (or workbench – or in our case a random bench in the basement) and use the clamps to secure the 2×4 and plexiglass.
This will make cutting the plexiglass waaaay easier.
3. Use your Plaskolite cutting knife and score the plexiglass along the piece of wood until you get just over halfway through the plexiglass.
This took about 30 seconds with a good amount of pressure.
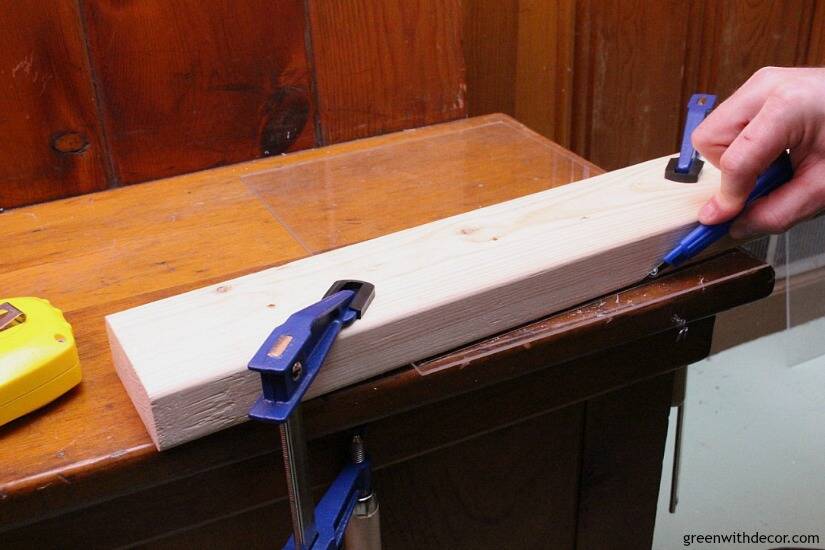
The first few scores need to pretty precise and in the same line. As you develop a line to keep scoring on, the knife will naturally follow that same line.
4. Re-clamp the wood on the plexiglass at a slight angle along the ten inch edge.
You will score it just like you did in step #3 to create a triangle-like piece that will give you the icicle look.
5. Pick the right attachment for the heat gun.

6. Put on your heat resistant gloves.
7. Turn the heat gun on (650F) and set the fan to high.
Press the power button in the upper left. The heat gun starts automatically at a default temperature of 650F.
The heat gun manual lists several uses for the heat gun and recommended heat settings for each, so you’ll have a good starting point no matter what your project. If you’re not sure what temperature to start at, start low and work your way up. It’s way easier to add heat than to start a project over because it was too hot!
8. Heat the plexiglass for about 5 seconds on both sides.
Start about a half inch below the top (at the widest part of your plexiglass piece).
9. Place the heat gun in its slot on top of its case (with the attachment piece pointing up).
10. Twist the plexiglass (holding it at the top and bottom, not right where you were just heating it) to begin creating your twisted icicle.
11. Repeat steps #8-10 until the entire plexiglass piece is twisted and finished.
The last time you’ve finished step #8, turn the heat gun off and slide it on top of its case to allow it to cool down.
12. Let the heat gun cool before putting it away.
Once the attachment and gun have cooled down, remove the attachment and put the heat gun away.
13. Attach the fishing wire and gold hooks.
Drill a hole at the top of the plexiglass (we used scrap wood underneath to catch the drill on the other side).
Loop the wire through the hole in the plexiglass icicle and the picture hook, and tie it. Then hang the icicles using the hooks.
And that’s it! Isn’t that fun?! You could paint them, too and use them throughout the year for different holidays or parties.
I was debating between hanging our DIY icicle ornaments from our Christmas mantel and using them as tree ornaments. I love them on the tree since they’re surrounded by lights. They just seem to shine up there!
I think they’d look fun hanging from a big window, too, similar to how we hung ornaments in our Christmas living room last year.
I started taking pictures of our tree and Oakley hopped off the couch to pose in front of the tree (weird, right?!) so I had to take a pic.
I got questions on the tree skirt when I posted the tree the other day. It’s from Pier 1 years ago and I don’t see anything similar online!
Those sheer white curtains are my fave. We have them throughout the first floor here and love them. We have these curtain rods, but they’re not always available for whatever reason – these are similar.
I love the tree as the sun starts to go down. The lights make the living room feel so cozy!
You can see more of the full Christmas living room here.
Have you made any DIY ornaments this year? They’re a fun way to add a personal touch to your tree.
Here are a few other DIY ornaments if you’re in the crafting mood:
Or you can get the inside scoop on my trip to Wagner’s headquarters earlier this year.
Remember to bookmark or pin this post if you want to save it for later!
Pin it!
Want to read more posts like this?
Follow along: Get my emails | Facebook | Pinterest | Twitter | Instagram
Christene Holder says
This is so cool!!!! I love this idea and now I really want to make some for our tree.
Also — I love your blog computer ornament — super cute!
>> Christene
Keys to Inspiration
GreenWithDecor says
Thanks so much, Christene! They were fun to make! I love that computer ornament, too. 🙂
Emily says
No way!!!! I had no idea you could use a heat gun to make icicle ornaments like this! This is seriously the coolest thing ever!
GreenWithDecor says
Aren’t they cool?! Such a fun project!
kim says
Love these – I have a heat gun and never would have thought to use it for this! We’ve used ours for stripping old painted over wallpaper – total life-saver. We’ve also used it to heat up an apple pie – just because we saw a commercial once that stated it could be used for that! ha!
GreenWithDecor says
Thanks, Kim! I’ve heard that about heating up food, too and haven’t tried it – it’s on my list!
Amy @ mylifefromhome says
What an awesome idea!! These turned out fabulous!
GreenWithDecor says
Thanks, Amy! We love them!
Roxanne says
That was a great idea! I love your tree, it’s really beautiful but your adorable puppy steal the show!
GreenWithDecor says
Thanks, Roxanne! Haha, she’s a cutie – and she knows it!