If you’re wondering what to do with an old TV stand, check out this DIY tutorial for turning it into nursery book storage using a paint sprayer!
Disclosure: This post is sponsored by Wagner. All opinions, images and love of DIY painting projects are 100% mine.
Happy new year! Hope everyone had a great holiday!
We managed to get some things done around the house, which is making me feel waaaaaay better. Something about not having piles of clutter and unpacked moving boxes hanging around feels so good!!
I even managed to sneak in some time to paint an old TV stand:

This started as one of those projects that was just another random find for a future furniture makeover … and it turned into such a fun project!
We found this TV stand on the side of the road last year, and it sat in the basement waiting forever.
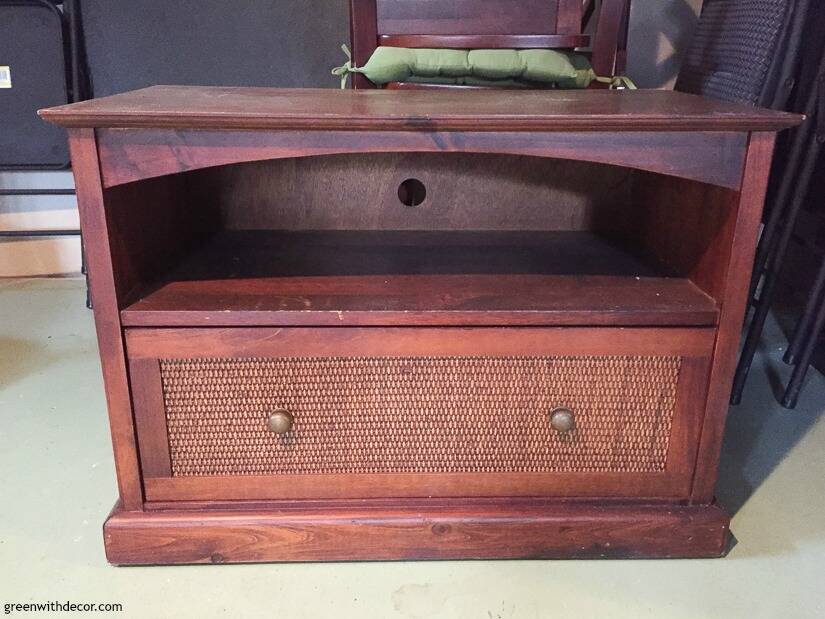
Meanwhile, I’d been trying to find something for toy or book storage along this wall in our daughter’s nursery. But nothing too big that would overpower the room or come out too far.

And then it came to me!
I don’t even know how I thought of this one.
But somehow the 100th time I saw the TV stand in the basement, I decided it would make the perfect reading bench and book storage!
Isn’t it so cute?! And such a fun idea for repurposing those old TV stands we always see sitting untouched at thrift stores!
I used a new paint sprayer on this project -Wagner’s Studio Pro sprayer. It’s always fun to try new paint sprayers, and it never ceases to amaze me how FAST painting goes with a sprayer. It’s crazy!

It’s actually designed with upcyclers in mind, which means it’s totally perfect for those of us who love painting furniture! But it of course works on smaller decor pieces or walls, too.
The handle/nozzle part is small, which makes it easy to handle and move around without getting too heavy! It was especially nice to use for this TV stand since I was painting inside the drawer and the shelf so I was moving around quite a bit.
Plus this TV stand has that weaving on the front drawer so painting with a brush would have been a huge pain and time suck with having to turn the brush every which way to get paint in all of those little nooks. No thank you!
A paint sprayer was definitely the way to go with this project!
And I finally used our Studio Spray Tent, which means I can paint furniture inside with a sprayer in the winter and not worry about paint overspray! If you love furniture painting, too, you need one of these.
This post contains affiliate links. This means if you click the link and buy something, I may receive a small percentage of sales at no extra cost to you.
Supply list:
- Wagner Studio Spray Tent (also available here – remember you can order online and pick up in store!)
- Wagner Studio Pro sprayer
- Extension cord (if needed)
- Painter’s tape
- Paint – we used Sherwin Williams’ Ryegrass
- Paint stir stick
- New hardware (we used these; similar here)
How to turn an old TV stand into nursery book storage:
1. Clean and prep your furniture.
We found this on the side of the road so it needed a good cleaning and wipe down.
I also took the hardware off. Even if you’re not swapping out old hardware for new, it’s easier to have it off while you’re painting.
If you’re painting a piece with a drawer like this one, tape off the metal hinges so you don’t cover them in paint and stop them from working! I typically pull drawers out of dressers/tables when painting, but sometimes with old pieces, it’s way more work than it’s worth.
So I just pulled the drawer out to be sure to get the sides painted.
(Then I painted the bottom piece below the drawer later, after the drawer was dry and I could push it back in without worrying about it drying shut.)
Do you love how big this tent is?! You can fit some good-sized furniture in here!
2. Prep your paint.
Shake and stir your paint, then pour it in your sprayer.
For reference, if you have a similar sized furniture piece, I poured enough paint in the paint cup to fill it up just over halfway.
I had just a little paint left over after painting that I poured back in my paint can when I was done.
3. Assemble the paint sprayer.
The nozzle parts are all put together already (bonus!) so there’s not much to do here.
Plug the suction tube into the opening on the bottom of the nozzle. Just like with any paint sprayer, the angled part of the tube should be facing forward if you’ll be painting downward or facing backward if you’ll be painting upward.
I took these quick cell phone pics so you can see what I mean:
Screw the paint cup back into the sprayer.
Grab the spray gun handle and line up the arrow on it with the arrow on the nozzle, twist toward the ‘lock’ button till it clicks into place.
Insert the air hose into the opening on the power box. I love that the power box also acts as a storage box for the whole sprayer – easy storage!
4. Adjust your paint sprayer settings.
You can adjust these as you’re painting, too, but it’s nice to get them close to what you need them on.
- X-Boost Power Dial (air power): The higher this is set, the faster coverage/smoother finish you’ll get. The thicker your paint, the higher you’ll want this setting.
- Material Flow Control: If you’re using thicker paint, start with this up high and slowly turn it down as needed. If you’re using thinner paint, start with it low and slowly increase as needed.
- Adjust Spray Shape: You can paint in a horizontal, vertical or diagonal pattern depending how you turn the air cap on the front of the sprayer.
I put together this quick diagram so you can see what I’m talking about:
Wagner’s manual goes into even more detail on the paint sprayer and its settings if you have more questions!
5. Start painting with the sprayer!
Hit the ‘on’ button on the power box, then pull your trigger on the nozzle and start painting!
A few things to remember when painting with a Studio Pro paint sprayer:
- Keep moving or you’ll end up with too much paint in one spot.
- You’ll want to be 3-6 inches or 6-8 inches (depending which of the two nozzles you use) from your furniture piece. It feels weirdly close even with how many paint spraying projects I’ve done, but it gives you the best paint coverage!
- The paint can look a bit splotchy coming out of the sprayer, but it will dry smooth. Just trust it! (But if it’s really splotchy, you may need to thin your paint. Check the ‘troubleshooting’ page in Wagner’s manual for more info.)
- Always keep your wrist parallel to the furniture piece so you’re spraying straight on. If you flick your wrist from side to side, the paint goes on at an angle and won’t give that beautiful smooth finish.
- Do a light first coat, then a second heavier coat after the first coat is dry.
- A few times during your project, wipe the front of the sprayer with a damp cloth to remove any dried paint.
Take the painter’s tape off once you’re done painting. It’s always easier to get painter’s tape off when the paint is still wet.
6. Clean the sprayer.
I know this is the part I always get the most questions on because we all dread cleaning, but it’s easy and doesn’t take much more time than washing out a paint brush would anyway.
Wagner’s manual goes through the cleaning process in detail, but here’s a quick summary:
- Dump any extra paint back in the original container.
- Flush your sprayer using warm, soapy water (if using latex paint).
- Unplug the sprayer and remove the air hose. Take the nozzle apart and clean each piece. Wagner gives you a little bristle brush to scrub dried paint off each piece.
- Let everything dry before you put it away. Which somehow always results in me leaving the paint sprayer pieces sitting out for about a week before I get back to it … whoops! 🙂
7. Screw on your hardware.
All done!
Isn’t this the cutest little reading bench you’ve ever seen?!?! I love it!
Our daughter isn’t exactly sitting up and reading on her own yet (ha!), but I see this being such a fun little reading spot for her in the future!
And I love that it will provide her great book storage as her library grows.
Her room feels so much more finished now that this wall has a furniture piece anchoring it. Much more finished than when there was just a random pile of stuff sitting there waiting to be put away … funny how that works, right?!
We still have some things to finish up in the nursery (like wall decor above this piece!), but we’re getting there. I’ll share more as we go, but for now you can see all progress on her nursery here.
Remember, the Wagner Studio Spray Tent (also available here) is perfect if you love painting furniture, too but the winter weather slows you down!
We contemplated just leaving the tent set up in the basement, but we have to get a bit more organized down there before we give permanent space to the tent … it’s on the to-do list!
GET THE LOOK:
Since a popular question I get is “Where’d you get that?!,” here are links to the same or similar sources:
- Wall color: Impatiens Petal by Sherwin Williams (You can read about how we painted the nursery walls with a Wagner paint sprayer here!)
- Bookshelf color: Ryegrass by Sherwin Williams
- Crystal hardware knobs (or similar here)
- Fur
- Flamingo pillow cover
- Flamingo pillows from Target Dollar Spot
- Door/trim color: Benjamin Moore White Dove color matched by Sherwin Williams
- Crystal door knobs
Have you painted any furniture lately?! Or come up with a fun idea for an old TV stand? Or done something fun for book storage?
If you want to see more furniture painting projects with a paint sprayer, check these out:
- A breakfast nook makeover with a paint sprayer
- How to paint metal patio furniture with a paint sprayer
- A quick end table makeover with a paint sprayer
Remember to bookmark or pin this post if you want to save it for later!
Pin it!
Want to read more posts like this?
Follow along: Get my emails | Facebook | Pinterest | Twitter | Instagram
Emily says
This turned out perfectly, Meg! What a creative way to re-use an old TV stand! I love the color you chose, and those super cute bookends, too!
We’ve had our spray tent set up in our basement for a year now, haha! It is so convenient to have it there and not have to set it and take it down after each project.
GreenWithDecor says
Thanks so much, Emily! I love how it turned out! It’s such a fun addition to our daughter’s room. I’m jealous you have the spray tent set up year round, that’s my motivation to get our basement organized so we have room to do the same, haha!
Maria says
I love how you converted this into a book shelf for the nursery. The color green looks great with pink
GreenWithDecor says
Thanks, Maria! It’s such a fun little reading bench for our daughter!