Transform a thrift store sled into a fun winter decor piece or play piece for doll. This DIY project gives overviews for using clay paint and dark wax.
This is a fun little DIY that started with a trip to the thrift store.
Don’t a lot of good makeovers start with a trip to the thrift store?!
I found this little sled and thought it could be Christmas / winter decor or a fun little sled for a doll in the future playroom.

The sled started like this:

In need of a makeover, yes?
Today’s post is part of the Thrift Shop Challenge series I’m doing with a few blogging friends. You may remember my blog post on how to paint candlesticks I shared back in the fall to kick off the series?
You can see all of the other bloggers’ fun thrift store transformations listed at the bottom of this post so be sure to hop around and check them out! I always love seeing what people do with thrift store finds!
This post contains affiliate links. This means if you click the link and buy something, I may receive a small percentage of sales at no extra cost to you.
Supply list for a mini sled makeover:
- Drop cloth
- Sanding sponge
- Painter’s tape
- Paint (I used Country Chic Paint: Vanilla Frosting for the top and Driftwood for the sides)
- Paint brushes
- Clear wax (I used Country Chic Paint’s Natural Wax)
- Dark wax (I used Country Chic Paint’s Antiquing Wax)
- Wax brush
- Clean lint-free cloth
How to give a mini sled a makeover:
1. Clean off any dirt and dust.
2. Sand the sled.
The sled I found had lots of ridges, plus I didn’t want the ‘welcome’ letters showing through after I painted so I made sure to sand heavily over the letters to smooth the paint lines from back when those letters were stenciled on.
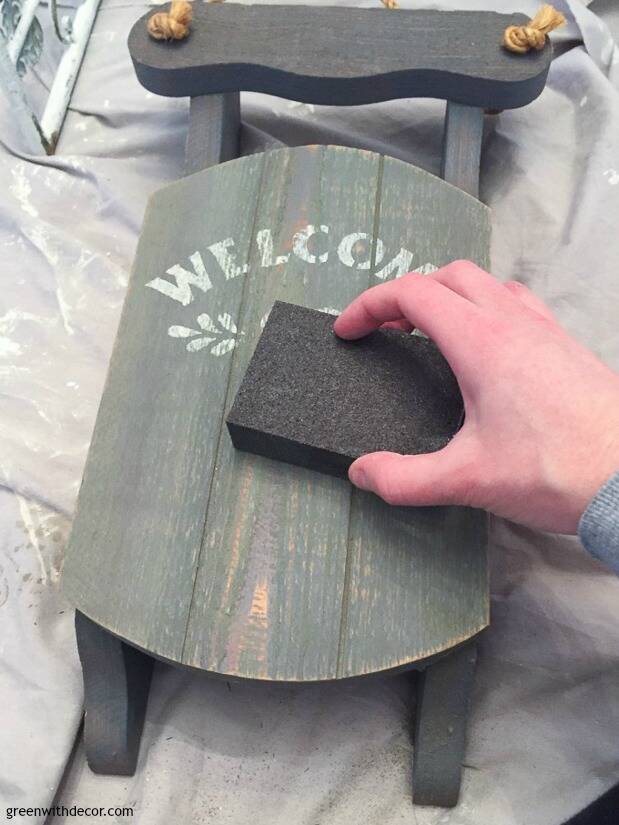
Wipe the piece down again to get rid of all the sanding dust.
3. Paint the sled.
I used Country Chic Paint, which I love and use for a lot of my furniture makeovers and craft projects! The paint is really easy to use and gives great coverage.
I used painter’s tape to protect the rope from getting paint on it.
Do two coats of paint, applying your brushstrokes in the same direction. It’s always amazing the difference in paint coverage between one coat and two.
Let your last coat of paint dry for at least 48 hours before applying the wax.
4. Do a coat of clear wax.
Use a wax brush to apply the wax in a circular motion, then wipe any excess off with a clean, lint-free cloth.
Even if you’ll be using dark wax like I did, do a coat of clear wax initially. Otherwise, the dark wax can be too dark, and it’s hard to remove.
5. Do a coat of dark wax.
I’m usually a clear/natural wax gal. I usually don’t like changing the look of paint colors by adding different colored wax, so I just use the clear wax to seal a piece and call it a day.
But I thought dark wax could add a bit of an aged/rustic look to this sled. Plus since I don’t often use dark wax, I figured best to practice the technique on a small piece like this sled that I wasn’t totally attached to rather than a big furniture piece!
It’s a little trickier than clear wax since you can obviously see any perfections pretty clearly, whereas the natural wax doesn’t show those since it’s clear. But still definitely do-able!
Apply the dark wax in the same way. I like the texture the dark wax gives the sled, especially since parts of the wood are raised so it really accents those ridges.
Here’s a closeup so you can see the final finish:
I feel like it’s the perfect size for a doll, so I’m thinking our daughter will claim this as hers in a couple years!
Have you tackled any thrift store makeovers lately?
Remember to check out the other bloggers’ Thrift Store Challenge makeovers here:
Love & Renovations – File cabinet makeover
Home Beautifully – DIY picture frames
Small Stuff Counts – Painting furniture with chalk paint
Green With Decor – A mini sled makeover (you’re here!)
Making Manzanita – White farmhouse pitcher makeover
A Crafted Passion – Stoneware jug makeover
Love Create Celebrate – The easiest DIY lumbar pillow
Amber Oliver – DIY lampshade from an upcycled sweater
Remember to bookmark or pin this post if you want to save it for later!
Pin it!
Want to read more posts like this?
Follow along: Get my emails | Facebook | Pinterest | Twitter | Instagram
Leave a Reply