Follow this easy tutorial to use a heat gun to thaw your outdoor spigots.
Disclosure: This post is sponsored by Wagner. All opinions, images and love of DIY projects are 100% mine.
I have a fun winter heat gun project to share today that’s helpful for those of us in cold climates.
If you’ve ever had frozen pipes or frozen outdoor spigots, you know it can quickly turn into a huge mess.
To solve this problem, we use our Wagner FURNO 750 heat gun to thaw the ice inside our outdoor spigot.
This prevents the ice from continuing to freeze/expand inside the spigot as it gets colder and colder out, which can lead to broken spigots and a big mess. No thank you!
I’m always amazed at how many projects you can do with a heat gun! (I’ll link to a bunch at the end of this blog post – the possibilities really are endless!)
This post contains affiliate links. This means if you click the link and buy something, I may receive a small percentage of sales at no extra cost to you.
Supplies to thaw your outdoor spigots:
- Wagner FURNO 750 heat gun (also available here)
- Extension cord (if needed)
- Heat resistant gloves (wear while the heat gun is on)
How to thaw your outdoor spigots:
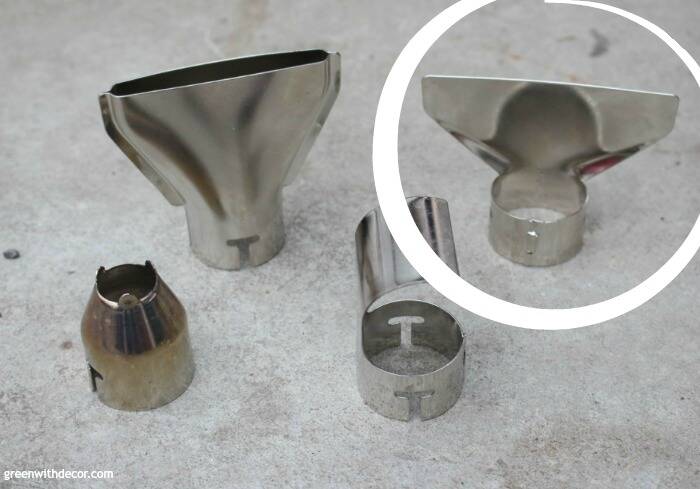
1. Pick the correct attachment.
The FURNO 750 comes with four attachments. The Glass Protector Nozzle is best for thawing your outdoor spigots.
2. Turn on your heat gun and set the temperature.
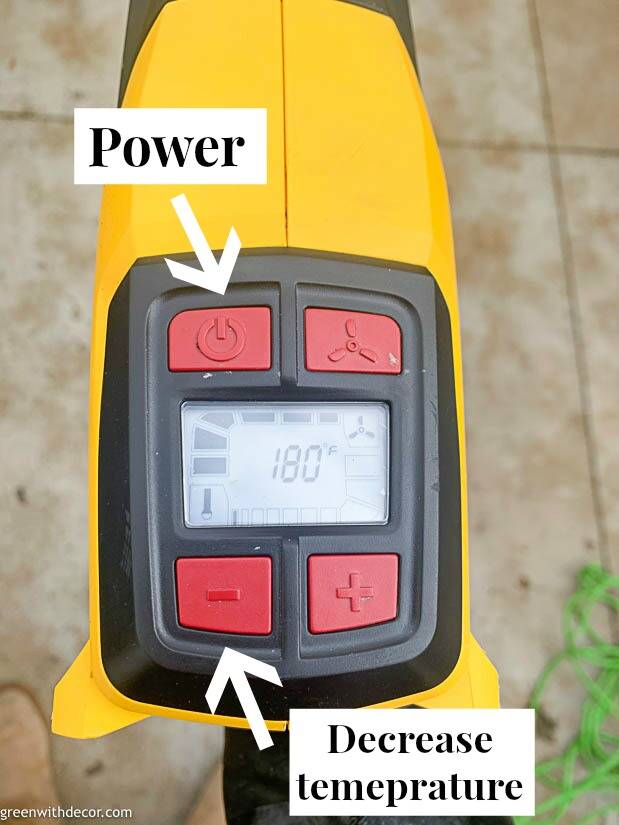
Press the red power button in the upper left.
The heat gun turns on to its default temperature of 650 degrees F. Press the red “-” button in the lower left to decrease the temperature to 180 degrees F.
Let the heat gun warm up. I love propping the heat gun on top of its case since then you know it won’t fall over and accidentally burn anything.
The FURNO 750 manual lists various uses for the heat gun and the recommended heat settings for each, so always consult that if you’re using the heat gun for a project but aren’t sure of the temperature!
Also keep in mind, if you’re not sure what temperature to set your heat gun at, start lower. It’s easier to slowly increase the temperature and add heat than it is to start a whole project over because you used too much heat!
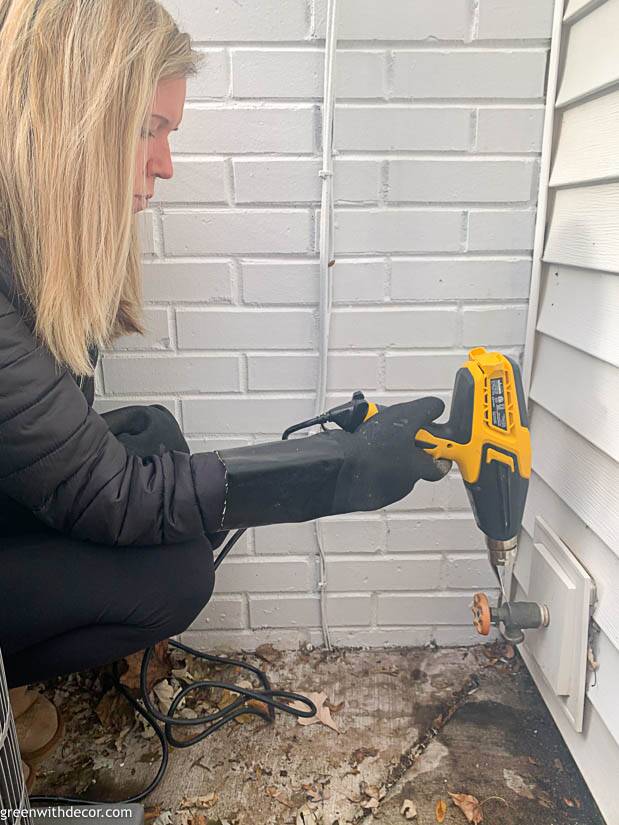
3. Hold the heat gun perpendicular to your outdoor spigot.

Be careful not to point the heat gun at your siding or you’ll risk melting your siding.
(We actually had our grill too close to the siding once and melted it – not the best look! At least it’s in the backyard!)
Keep the heat gun there for a couple of minutes to ensure you’re melting all of the ice inside of your outdoor spigot. You’ll see drips of water coming out.
Depending on the placement of your spigot, you can also point the heat gun at the spigot from the side. Just don’t hold it there too long and risk melting your siding!
As you can see, our spigot is in a corner, but we can still point the heat at it from one side, which is nice just to be sure we get all of that ice/water out of there!
4. Let your heat gun cool.
I love that the FURNO 750 has a cool down feature. Press the red power button again.
Then place the heat gun back in that slot on top of its case.
The heat gun will automatically turn off in 30 seconds.
5. When your heat gun is cool, unplug it, take the attachment off, and put the heat gun and attachment away.
And that’s it! Such an easy winter project, but oh so important for preventing outdoor spigots from freezing and bursting!
Be sure to head to my Instagram account, too for a quick video of this project in action! Just click on my Story to watch it.
For more heat gun project ideas, check these out:
- DIY Christmas icicle ornaments with a heat gun
- How to crackle paint with a heat gun
- How to clean a grill with a heat gun
- How to burn wood with a heat gun (DIY Christmas trees)
- Or check out even more ideas on Wagner’s website!
Remember to bookmark or pin this post if you want to save it for later!
Pin it!
Want to read more posts like this?
Follow along: Get my emails | Facebook | Pinterest | Twitter | Instagram
Leave a Reply