A table makeover is an easy way to update the look of a room. Just follow this easy tutorial for how to paint a round table.
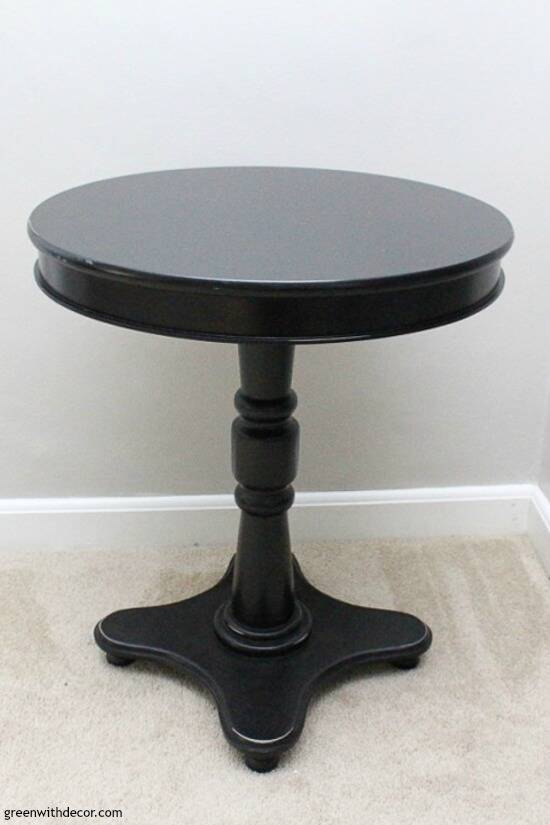
This little table was a TJ Maxx find waaaay back from when we lived in Cincinnati. It used to be black.
You may recall it in our Milwaukee house family room between two red chairs? Funny how decorating styles change over time.
The red chairs are long gone (thank you, Facebook buy and sell groups!), and I’d been thinking about painting this table white for way too long before I finally got around to it.
This was a quick furniture makeover, so there’s really no excuse for me staring at the dark table for almost a year thinking I should paint it for our foyer, but hey it happens. Better late than never.
The round table started like this:
It’s fun to repurpose pieces you already have sometimes. Especially if you like the size/shape of a piece, just not the color.
This post contains affiliate links. This means if you click the link and buy something, I may receive a small percentage of sales at no extra cost to you.
Supply list to paint a round table:
- Drop cloth or an old sheet
- Stir stick
- Paint brush (2)
- Primer
- Paint – I used Country Chic Paint’s Vanilla Frosting
- Wax brush
- Wax – I used Country Chic Paint’s Natural Wax
- Lint-free cloth
How to paint a round table:
If your table is dusty or dirty, give it a quick wipe down with a damp cloth, and let it dry.
1. Prime your table. (optional)
If you’re painting a light color over a dark color (like we did) or if your table has a bit of a shine to it (ours did), do a quick coat of primer.
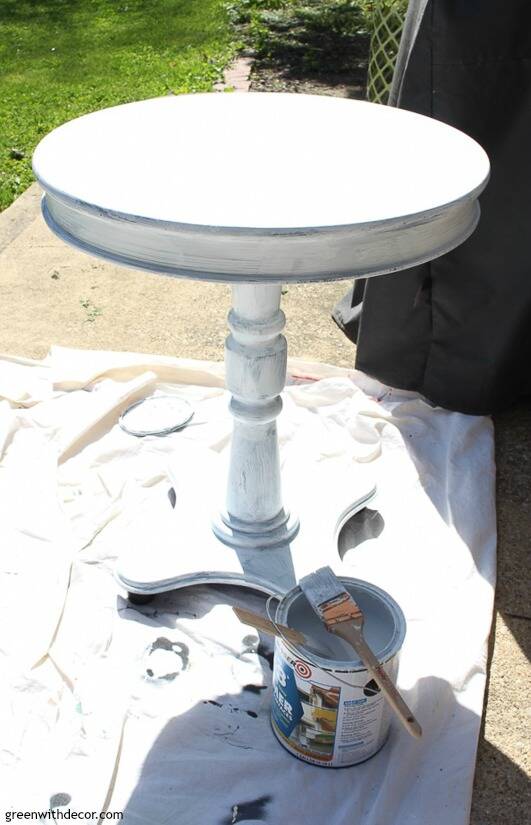
You’ll save on paint (it takes a lot of white paint to cover a black piece), plus the paint will stick a bit better to the ‘shine’.
If neither of these things apply to you, skip the primer.
2. Paint your table.
Shake and stir your paint before opening. Then apply brush strokes in the same direction as the wood grain of your piece, moving in a curve around the round edges.
You can see how much better the paint coverage is (on the right) versus where the coat of primer is (on the left).

I flipped the table upside down to paint the base and bottom of the table (once the top was dry, of course!) instead of trying to crouch/crawl around the table to get paint everywhere.
3. Let the first coat dry, and do a second coat.
Let it dry for 48 hours before sealing.
4. Seal your table with wax.
Stir your wax brush in the wax and apply the wax to your table in a circular motion. A table top sees a lot of action so be sure to apply good coverage on the top. The base doesn’t matter as much since you’ll probably rarely touch it.
Wipe off excess wax with a clean, line-free cloth.
And that’s it! Another table makeover in the books!
GET THE LOOK:
Since a popular question I get is “Where’d you get that?!,” here are links to the same or similar sources:
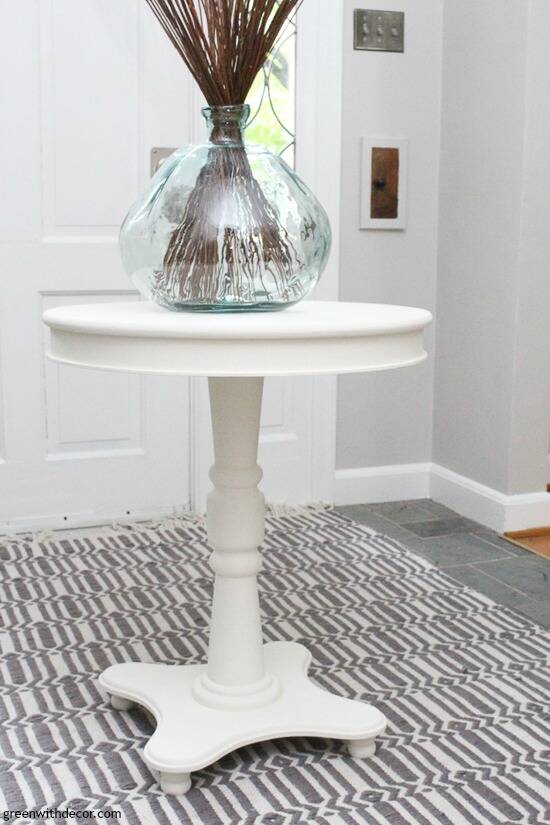
- Wall color: Agreeable Gray by Sherwin Williams
- Rug from Marshall’s (similar here, here or here)
- Aqua vase
Now that the table makeover is done, this foyer is just about done, too. I’ll share the rest of the space soon – and then we can check another room off the list!
Have you painted any furniture lately? I always find it so relaxing!
You can see more painted table makeovers here:
- How to paint a table with a lot of detailed trim
- A two-toned round table makeover
- How to paint table legs
Remember to bookmark or pin this post if you want to save it for later!
Pin it!
Want to read more posts like this?
Follow along: Get my emails | Facebook | Pinterest | Twitter | Instagram
Leave a Reply