Disclosure: This post is sponsored by Country Chic Paint. All opinions, images and love of painting projects are 100% mine.
When we decided to build a dining room table, painting the table legs was definitely the part of the project I was looking forward to the most!
We’d never built any furniture or stained anything before, but painting? I can handle that in my sleep.

Somehow, it still took me a while to find time to paint the legs during this busy time of year, but it’s officially all done!
Really, the whole project wasn’t hard, but painting was one of the easiest steps!
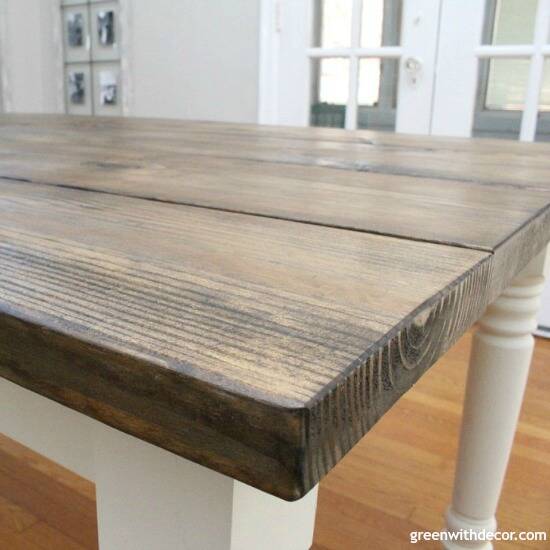
You can see how we built our farmhouse dining table here and how we stained the wood top here.
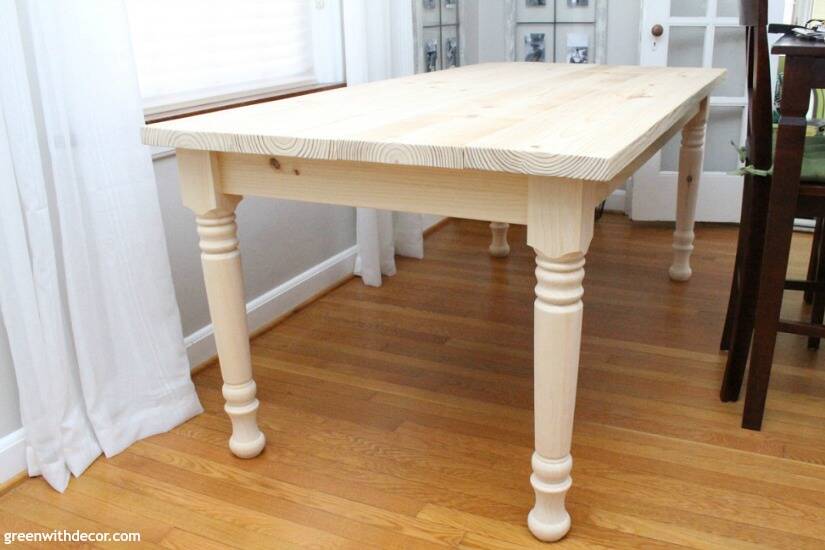
Here’s how the table looked after we finished building it:
This post contains affiliate links. This means if you click the link and buy something, I may receive a small percentage of sales at no extra cost to you.
I love the look of the stained wood with the white legs!
Supply list for painting table legs:
- Country Chic Paint, Vanilla Frosting
- Country Chic Paint’s Natural Wax
- Drop cloth (or an old blanket)
- Paint brush – I used one of these
- Paint stir stick
- Lint-free cloth
- Wax brush (I love Country Chic Paint’s wax brush. Local Milwaukee folks – I bought it at Harvest Home in Pewaukee.)
How to paint table legs:
1. Tape off any part of your table you don’t want to get paint on.
We stained the top of the table. You can see the tutorial for how to stain wood here.
2 Paint!
Shake and stir your paint, then start painting.
Apply brush strokes going in the same direction as the wood grain.

When you get to the tops of the legs with all of the grooves, it’s easier to just turn your brush sideways so you’re sure to get paint everywhere.
Then go back over the space with vertical strokes so all of the paint is going in the same direction.
3. Let the paint dry and do a second coat of paint.
The second coat always makes such a difference in coverage, it’s crazy.
Here’s a shot after one coat of paint so you can see the difference:
Since I’m guessing our table legs will get kicked or scuffed since this is our everyday table, I did a third coat of paint for solid coverage.
If you’re painting a more occasional-use piece of furniture, this is definitely not necessary.
Let your final coat of paint dry 24-48 hours.
Note: If you want to distress your table legs, do it before you apply the wax (step #4). I didn’t distress the legs because we were going for a clean look, but you can see how to easily distress furniture in my blog post about this chippy dresser makeover or this desk makeover.
4. Wax your table legs to seal them.
I use Country Chic Paint’s Natural Wax a lot since it protects your piece without changing the original paint color. If you want more of a color with your finish, you can see all of Country Chic Paint’s waxes and glazes here.
Swirl the wax brush around the table legs in a circular motion, then wipe off excess wax with a clean, lint-free rag.
And with that, our farmhouse dining table is officially done!
You can see all centerpiece and tablescape decorating ideas here.
You might want to see these projects, too:
Remember to bookmark or pin this post if you want to save it for later!
Pin it!
Want to read more posts like this?
Follow along: Get my emails | Facebook | Pinterest | Twitter | Instagram
Leave a Reply