If you’re wondering how to paint flat doors, it’s a quick project. Just follow this easy DIY tutorial for painting doors.
Basement progress! We have doors!

I was already excited about the light blue paint color (Tradewind by Sherwin Williams) after I painted the trim, but after I painted the doors, I was even more excited.
I LOVE the blue down here! It really adds the best pop of color to the white walls and black gym flooring down here without being too in-your-face color.
This post contains affiliate links. This means if you click the link and buy something, I may receive a small percentage of sales at no extra cost to you.
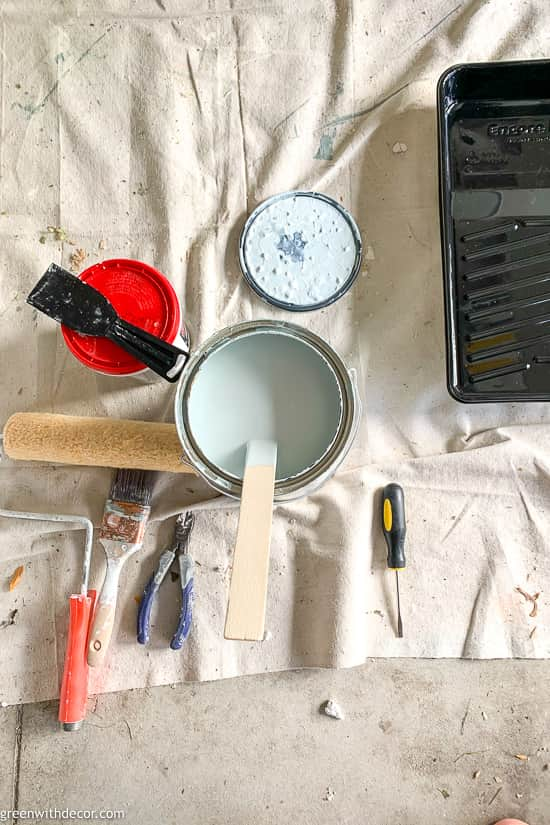
Supply list for painting flat doors:
If you’re painting new doors like I did here, you can skip a lot of the prep work like filling any scratches and sanding. But if you’re painting an existing door, you’ll have to do these (ugh I know, but prep work is always worth it!).
- Drop cloth
- Sawhorses
- Screwdriver (if needed to remove existing hardware or hinges)
- Wood filler (if needed to fill any scratches / dents)
- Sandpaper or sanding block, 220 grit (if needed)
- Tack cloth (if needed)
- Paint stir stick
- Primer (if your doors don’t come primed or if you’re painting existing doors)
- Paint (we used Sherwin Williams’ Tradewind in ProClassic Interior Acrylic Latex paint for trim and doors in a Satin sheen)
- Paint tray
- Paint tray liner
- Paint roller handle
- Paint roller cover
How to paint flat doors:
If possible, set up new doors on sawhorses. It’s a quick way to paint, and bonus, no crouching around painting a door laying on the floor.
1. Remove any hinges and hardware.
You can leave hinges or hardware on and use painter’s tape to block them off, but taking them off is easier.
Set everything in a plastic resealable bag so you don’t lose any screws, which I swear have a way of wandering off otherwise!

2. Fill in any scratches or dents with wood filler, sand and clean.
If you’re also painting new doors, you’re probably good to go on this.
Existing doors are probably banged up a bit. Use wood filler to fill them in, sand the entire door with 220 grit sandpaper and then wipe it down with a tack cloth to get rid of the sanding dust. (Tack clothes are seriously AMAZING for getting rid of dust!)
3. Prime your flat door (if needed).
Again, if you’re painting a new door, just buy pre-primed doors, and you’re good to go!
Do you have to prime a door?
You need to prime a door if:
- It’s a new, unprimed door
- You’ll be using a latex paint on a door previously painted with oil-based paint
- If you’ll be painting your door a dark color, use tinted primer to help save on overall coats of paint later on.
No need to prime a door if:
- It’s a new, pre-primed door (this is what we bought)
- You’ll be using a latex paint on a door previously painted with latex paint
4. Paint your flat door!
Whew, all the prep work is DONE. Time to paint.
The best order to paint a door is:
1. Edges
2. Paint the front side (one half then the other, either top half then bottom half or left half then right half)
3. Paint the back side (one half then the other)
The edges are easy to paint. Run your roller along the edge.

Just be sure you catch any drips of paint that dribble over onto either side of the door while the paint is still wet. Otherwise, you’ll have some annoying dried paint drips/lines along the sides of your door.
Then think of your door as in two parts: either top and bottom or left and right. Start with painting one half. This ensures you aren’t painting all over the place and jumping around, mixing fresh paint with paint that’s starting to dry.
Cover about half the door, being sure you’re getting full coverage, then slightly overlap and continue with painting the other half.
Once the paint starts to dry, leave it. Don’t go back over semi-dry paint with wet paint. You’ll catch any spots that need touch up with your second coat.
5. Let it dry.
6. Do a second coat.
Follow the same order you used in step 4.
7. Let it dry.
8. Flip your door.
Wait at least 24 hours (48 is best!) to flip the door on your sawhorses.
Ideally, lay a blanket without any texture across the sawhorses for your door to sit on so you don’t get any sawhorses indents or weird blanket texture indents on the paint.
Even when paint feels dry, it takes up to 30 days to cure, and you can end up with weird marks if the paint is leaning against something before it’s cured.
This will be especially noticeable on flat doors since there’s not any paneling or anything else that will distract you from any marks.
9. Repeat steps 4-7 for the second side of the flat door.
10. Reattach any hardware and hinges.
11. Install your doors!
And all done!
Hope this is helpful if you’ve been wondering how to paint a flat door. It’s so easy!
Isn’t the blue SO good?! I just love it down here! (Please ignore the dirty floors, ha! They need a wipe down after all the projects in here.)
If you want to catch up on any basement progress, check out these posts:
- Kid-friendly basement makeover plans
- How to paint a room with a paint sprayer
- Easy basement flooring idea
- How to paint trim
Still on the to-do list down here is organizing the toy closet, adding some painted wall mural to the long wall, adding some other wall decor and then adding allllll the fun toys down here. You can see more details in the ‘basement plans’ post linked above.
Can’t wait to see this room come together. We love it already!
Remember to bookmark or pin this post if you want to save it for later!
Pin it!
Want to read more posts like this?
Follow along: Get my emails | Facebook | Pinterest | Twitter | Instagram
Leave a Reply