This DIY tutorial walks through how to paint trim, the best paint for trim and how to paint trim over carpet or flooring.
Time for another basement update!
This is an easy DIY that adds such a fun pop of color down here: How to paint trim.
I was debating a neutral trim color down here but decided to go for it and have some fun.
I looked at about a billion light blues trying to decide which paint color would be best before picking Sherwin Williams’ Tradewind for the trim and doors. (See my tips for picking paint colors here!)

I love the pop of blue against the white walls and black flooring!
At some point, I’m going to do some fun painted wall treatment on one of the walls down here, and I figured light blue is a safe choice to go with even though I haven’t decided on a design yet. It’s colorful but still neutral enough.
This post contains affiliate links. This means if you click the link and buy something, I may receive a small percentage of sales at no extra cost to you.
Supply list for painting trim:
- Drop cloth
- Sawhorses
- Paint stir stick
- Best paint brush for trim
- Best paint for trim: After chatting with the guys at the paint store, I went with Sherwin Williams’ ProClassic Interior Acrylic Latex paint for trim and doors in a Satin sheen. (Color is Tradewind)
- Plastic resealable bag
- Paper towel
- Primer (if your trim doesn’t come primed)
- Painter’s tape (if painting existing trim)
- Putty knife (if painting existing trim)
- Packing tape (if painting existing trim over carpet – see below)
- Wood filler (if painting existing trim in need of it)
- Sanding block (if painting existing trim)
- Tack cloth (if painting existing trim)
How to paint trim:
Prep work / if you’re painting existing trim:
Since we were painting brand new trim, we could easily paint it before it was installed. But a few tips if you’re painting existing trim …
You can either (1) remove it and paint it on sawhorses like we did or (2) use painter’s tape to tape off the area above and below it.
Tape off the wall above your trim so you can paint it in place. Use a putty knife to press against the painter’s tape down to ensure you don’t get any paint on your wall.
If you’re painting trim over flooring: Use painter’s tape to tape off the flooring below your trim, and again, use a putty knife to press the painter’s tape down. You can also use a drop cloth to protect your floor.
If you’re painting trim over carpet: Lay a strip of packing tape along the carpet right next to your trim, leaving a little bit of overlap with your trim. Use a putty knife to press that edge of the packing tape below the trim to protect your carpet.
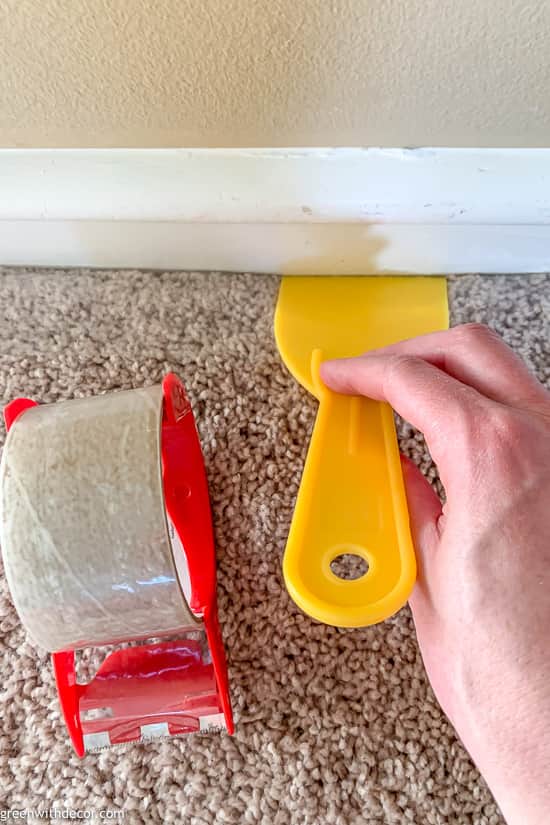
Then lay a second strip of packing tape next to the first one to be sure your carpet is protected. Use a drop cloth to cover the rest of your carpet so you don’t get any paint splatters on your carpet.
Prepping existing trim: If you have any dents or holes in your existing trim, use wood filler to fill them in.
You’ll also want to use a sanding block to sand it down and then use a damp cloth or tack cloth to get rid of any dust and dirt.
(If your house is old and you’re worried about lead paint, don’t sand your trim. Time to call in the professionals!)
Priming trim:
We bought new primed trim so we didn’t have to worry about priming it. Otherwise, you’ll want to prime before you paint your trim, especially if you’re painting a light color over a dark trim.
Okay, whew, now your trim is ready for painting! Some projects require so much prep work, but it’s worth it!
Painting trim:
1. Set up your trim on sawhorses.
This is way easier than crouching down to paint, believe me! (But obviously, if you’re existing painting trim in place, you’ll have to crouch and crawl around your room to paint!)

2. Stir your paint.

3. Paint!
Paint a few short strokes on your trim to cover it with paint, then cover that section with one long stroke. Work your way along the trim until it’s all painted.
Don’t go back over any trim sections that are starting to dry, or the combination of drying / fresh paint will mess up your smooth finish.
You’ll catch any spots that may need more paint with your second coat. Your first coat doesn’t have to be perfect, and it probably won’t be!
Remember to paint the top edge of your trim. Don’t have to worry about the bottom edge since it will be against the floor.
4. Let it dry.
You can dip your brush in some paint, wrap it in a damp paper towel and place in a plastic resealable bag in the fridge so you don’t have to wash it out between coats.
5. Do a second coat.
Stir your paint again before you start painting. The second coat always makes paint coverage look so full and finished!
6. Let it dry.
Then you’re ready to install.
(Or ready to remove your painter’s tape if you painted the trim in place. Remember to pull your painter’s tape off at a 45-degree angle while paint is still wet to avoid peeling paint!)
I love that pop of blue with the black and white! What do you think?
GET THE LOOK:
Since a popular question I get is “Where’d you get that?!,” here are links to the same or similar sources:
- Wall color: Extra White by Sherwin Williams
- Trim color: Tradewind by Sherwin Williams
- Subfloor
- Gym floor
Hope this is helpful if you’ve been wondering how to paint trim. It’s easy and can make such a difference!
More to come on the basement! Meanwhile, you can catch up on the rest of the basement progress here:
Remember to bookmark or pin this post if you want to save it for later!
Pin it!
Want to read more posts like this?
Follow along: Get my emails | Facebook | Pinterest | Twitter | Instagram
Leave a Reply