Learn to give a dresser a chippy farmhouse look. Transform any dark dresser into a white chippy farmhouse piece with this easy clay paint tutorial.
Disclosure: This post is sponsored by Country Chic Paint. All opinions, images and love of painting projects are 100% mine.
I went through a phase where I painted everything black. Everything! This dresser, this dresser, this nightstand, the ladder shelf in our living room … you get the picture.
Well, I’ve gone the complete opposite now. I’m painting everything white.
It started with my desk and went kinda crazy from there … this Queen Anne table, this bookshelf, these rockers, these two-toned nightstands …
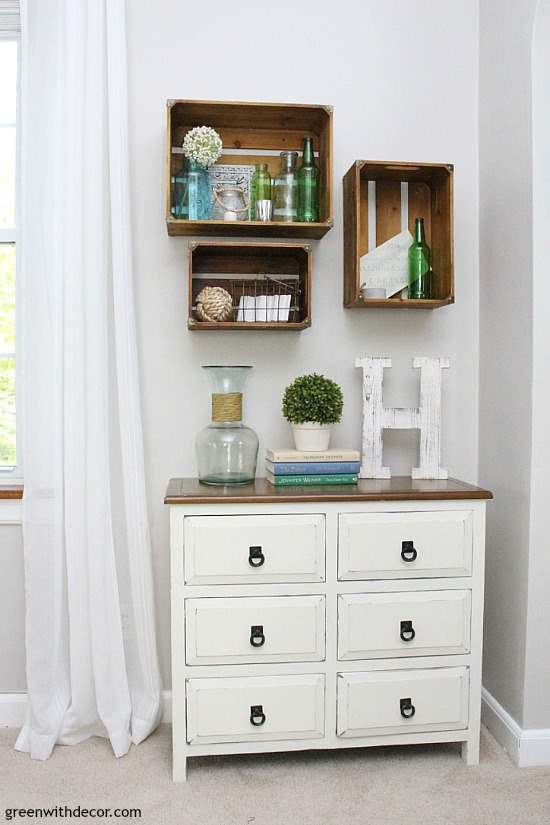
I have another fun white furniture makeover to add to the list today: this dresser.
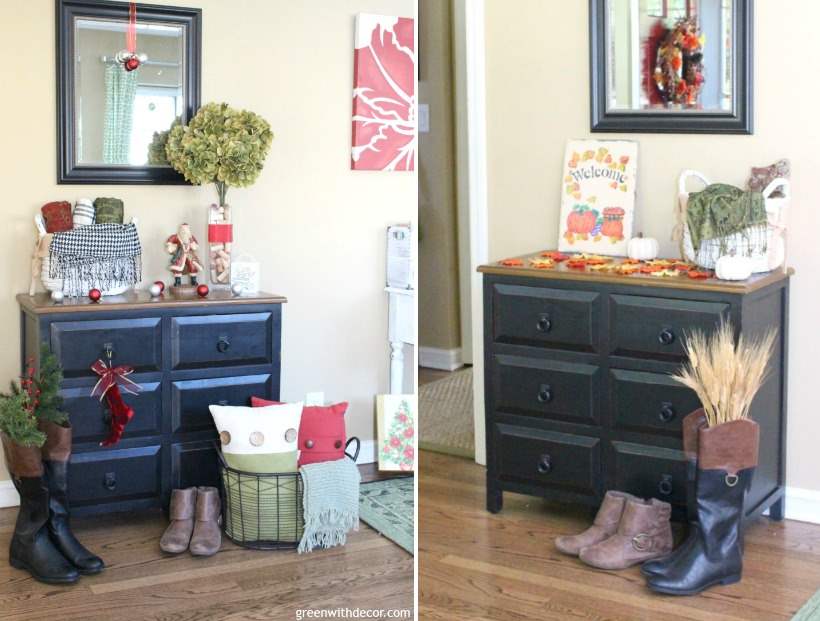
This dresser might look familiar. We had it our small foyer in our Milwaukee house.
This post contains affiliate links. This means if you click the link and buy something, I may receive a small percentage of sales at no extra cost to you.
It worked well for us for a long time, but I was ready for a change.
So big surprise, I’m busting out Country Chic Paint’s Vanilla Frosting – the perfect white farmhouse paint color!
Supplies to give a dresser a chippy farmhouse look:
- Country Chic Paint, Vanilla Frosting
- Country Chic Paint’s Natural Wax
- Primer (optional)
- Drop cloth (or an old sheet)
- Paint brush
- Painter’s tape
- Screwdriver
- Paint stir stick
- Sanding blocks
- Ultra Flexible Sanding Sheets
- Lint-free cloth
- Wax brush
- New hardware (optional) – these and these are similar to what we have on this piece
How to give a dresser a white farmhouse look:
1. Prep the dresser.
Take the drawers out and remove the hardware. I loved the black metal drawer pulls on the original piece and knew they’d really pop against some new white farmhouse paint, so I was excited to reuse them.
The top of the dresser was wood, and after these two-toned white and wood nightstands for my mom that we painted earlier this year, I decided I needed a white and wood piece at our house.
This dresser was obviously the perfect choice. I used painter’s tape to mark off the wood top to avoid any stray brush marks.
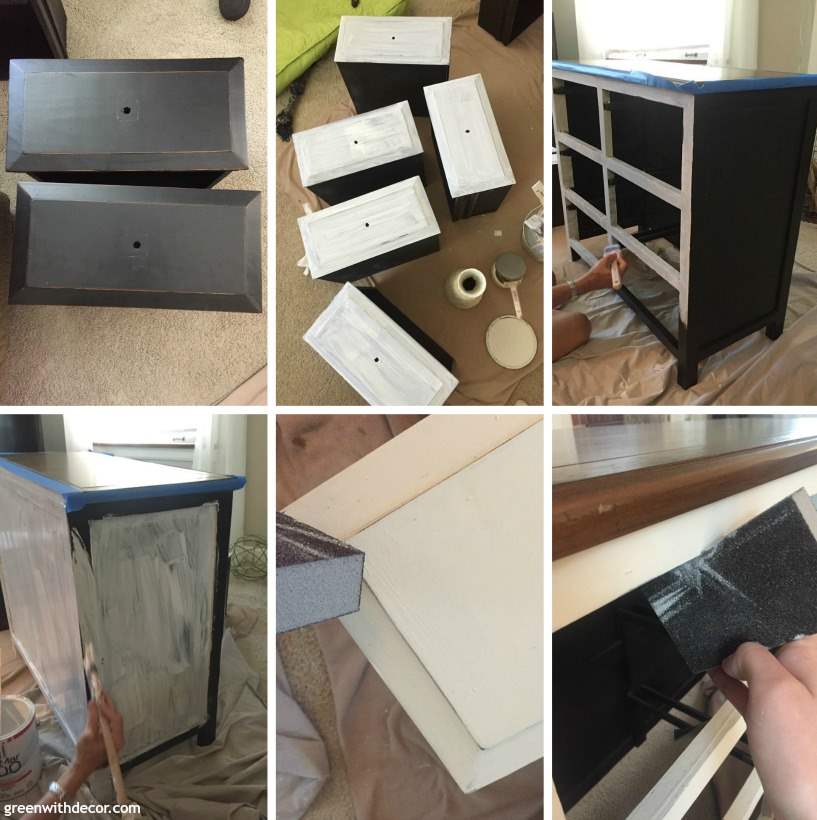
2. Prime your dresser (if it’s dark originally).
I don’t typically prime furniture when I’m using clay paint because the coverage goes on so well.
But since this dresser was a dark black, I primed it so I wouldn’t have to do as many coats of the Vanilla Frosting.
When I painted this bookshelf with clay paint, I didn’t prime it first, and it ended up taking a lot of white paint to go over the black. If you’re priming, make sure to stir the primer first, then apply the primer in the same direction as the wood grain of your piece.
If you’re painting a light-colored piece or using darker-colored clay paint, you can skip the priming.
3. Paint.
Be sure to shake and stir your paint so it’s mixed well before you paint.
Then just start painting! Apply the brushstrokes in the same direction as the wood grain. Let it dry overnight.
Then apply your second coat and let it dry for a couple of hours.
4. Distress your dresser.
This step is optional depending on if you want the chippy farmhouse look or not. If you want to see what furniture looks like with the Vanilla Frosting color without distressing, you can see my painted bookshelf makeover.
Since the drawers had such great trim detail, I used these Ultra Flexible Sanding Sheets to wrap them around my finger and sand the edges without taking the paint off the rest of the drawers.
I used my favorite sanding blocks to sand the edges of the drawers and dresser frame.
Start by applying light pressure and rubbing the sanding sheets or sanding blocks across the surface, then apply more pressure depending how much of a distressed farmhouse look you’re going for.
If you take too much paint off, don’t panic. You can always repaint any mistakes.

5. Wax your dresser.
Let your dresser dry for 24-48 hours then apply wax to seal your piece.
I love Natural Wax since it doesn’t change the color of the piece, and I’m pretty obsessed with this Vanilla Frosting color. (Just take a look at my furniture makeovers gallery – yep, obsessed.)
Swirl your brush in the wax and apply to your dresser in a circular motion. Wipe off excess wax with a clean, lint-free cloth.
Reapply the wax every 6-12 months to keep your piece protected.
With a dresser like this where we kept the original wood top, we can go on the longer edge of that since we don’t have anything sitting on top of the paint.
6. Put the hardware back on.
All done!
I have a confession. We were planning to use this dresser as our TV stand, as you can probably tell from this before pic.
Well we moved it over to the other side of the living room for placement as we hung up these wood crates. (Side note: aren’t these awesome?! I love them.)
Then we both decided we really loved the white dresser under the wood crates so it stayed there.
Now we’re on the hunt for an old piece of furniture to paint and use as a TV stand. We’re currently using our outdoor coffee table – just keeping it classy.
I’m okay with it, because this little corner of the living room is looking so good.
Have you given a dresser a chippy farmhouse look? Have any painting projects planned?
Or are you using anything funny as a TV stand while you stalk local Facebook groups for an old dresser? Just us? 🙂
GET THE LOOK:
Since a popular question I get is “Where’d you get that?!,” here are links to the same or similar sources:
- Wall color: Agreeable Gray by Sherwin Williams
- Rope sphere
- Metal basket from local home decor store
- Concrete candle holder (similar)
- Painted/glazed tile (DIY)
- Wood painted pieces were small DIYs when I was just playing around with different paint colors
- Glass/bead lantern from Kirkland’s, can’t find it online anymore
- Mercury glass votives
- Boxwood planter (similar)
- Books (all awesome books for you fellow readers): Jane Green – Summer Secrets, Elin Hilderbrand – The Rumor and Jennifer Weiner – Then Came You
- Curtains
You see all living room decorating and DIY projects here:
- Coastal rustic modern design plan for the living room
- Agreeable Gray paint in the living room
- Wireless outlets to make life easier
- How to plan a gallery wall when you don’t know where to start
- How to distress a dresser for a chippy farmhouse look (you’re here!)
- How to hang heavy wall decor when it doesn’t line up with studs
- Make a throw pillow from placemats
- The TV stand furniture makeover
- An end table makeover with clay paint
- The coastal rustic living room reveal
Remember to bookmark or pin this post if you want to save it for later!
Pin it!
Want to read more posts like this?
Follow along: Get my emails | Facebook | Pinterest | Twitter | Instagram
Susie says
Lovely makeover! The new color made such a difference. And I love the chippy look. Great job, Meg! Susie fromThe Chelsea Project
GreenWithDecor says
Thanks, Susie! I love the color, too!
Jasmine Syljebeck says
Can’t find those pulls anywhere?? Where did you originally get them? I’m redoing a dresser this weekend.
Love your style!!
GreenWithDecor says
Hi Jasmine! Thanks so much! These pulls were originally on the dresser so I don’t know exactly, sorry! But I did find some on Amazon that look really similar – scroll back up in this blog post and under “Supplies”, I have links to two similar hardware sets! Good luck with your dresser makeover!!
Cheryl Atkinson says
It turned out so good I love country chic paint. It leaves a soft finish. Thank you for sharing. I must find some wooden crates like those you bought at Marshalls. I love them.
GreenWithDecor says
Thanks, Cheryl! I love Country Chic Paint, too – I use it often! I love the crates, too. Such a fun display.
GG Downey says
I HAVE THE SAME FIXATION. I PAINT EVERYTHING IVORY & GOLD BECAUSE OF FRENCH PROVENTIAL LOOK,OR PURE WHITE. FEAR; OF NEW TRENDY COLORS.
GreenWithDecor says
Haha! Gotta love a good white painted piece.