If you’re wondering how to paint an exterior door, follow this simple DIY tutorial full of tips for the best way to paint a door.
Let’s talk about how to paint an exterior door. I shared our gorgeous new exterior door hardware a few weeks ago and just love our pretty new door color!
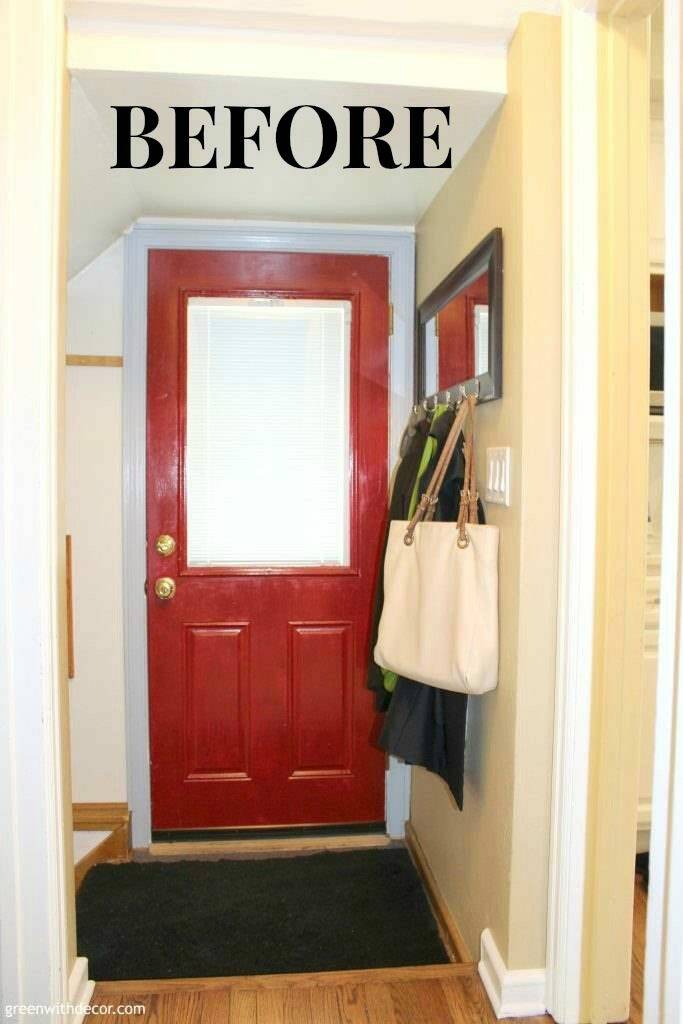
You guys, I hated this door (red with a BAD paint job) since we first moved into this house SIX YEARS AGO.
That’s how long I put off this project, and it took me one day (one long day, but still, just one day) to paint it. I totally should have jumped on it sooner instead of procrastinating forever on it!
And now:
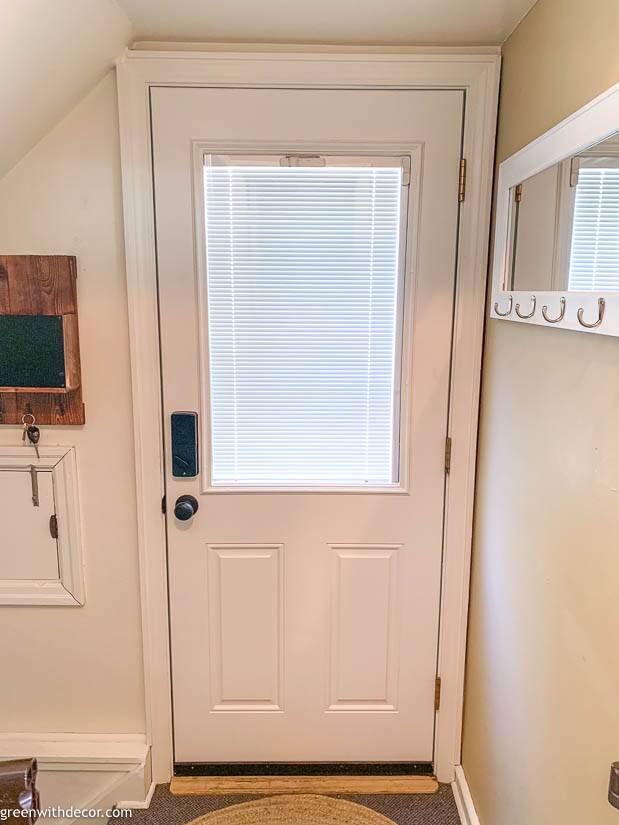
It really looks like a new door. It’s just amazing what paint can do!
I also decided to paint our front door (which took about half a day – much less prep work).

If you recall from the exterior door hardware post, I was holding off for a bit on the front door to make sure I really liked the pop of color on our side door. I just love it and decided I needed to get our front door painted before fall weather really sets in and this project got put off till next spring.
Plus the interior needed to be painted anyway. Our front door is new and while it was white, it was a much more grayish white than our trim color, and the contrast was really starting to bug me.
It’s much better now with everything the same white color!
(Seriously, why are there so many white paint colors?! I shared the best white paint colors here if you’re currently struggling with that debacle!)
After chatting with our painters and the awesome guys at the paint store, and painting two exterior doors, I figured I’d share all I learned about painting an exterior door.
This post contains affiliate links. This means if you click the link and buy something, I may receive a small percentage of sales at no extra cost to you.
Supply list for painting an exterior door:
- Drop cloth or tarp
- Wood filler
- Sandpaper or sanding block (220 grit and 320 grit)
- Tack cloth – these are amazing, and I can’t believe I’ve never used them before.
- Painters tape (if needed to cover hardware, hinges, window, etc.)
- Door wedge (if painting door in place)
- Rubbing alcohol
- Cotton ball
- Primer (maybe – see details below in step #6)
- Paint – I’ll go into details on paint below.
- Paint stir stick(s)
- Paint brush – a 1 1/2″ angled brush is best. I love this one.
- Painting trays – You can use a mini roller tray to match your mini roller, or if you already have other regular sized trays on hand, those work, too.
- Paint tray liner
- 4″ rollers and roller handle
The best paint for exterior doors:
This definitely depends on your door material. Our side exterior door is fiberglass, and our new front door is steel, so if you have a wood door, I’d ask at the paint store. For the exterior sides of the doors, the guy at Sherwin Williams recommended their Resilience line, which is exterior acrylic latex paint.
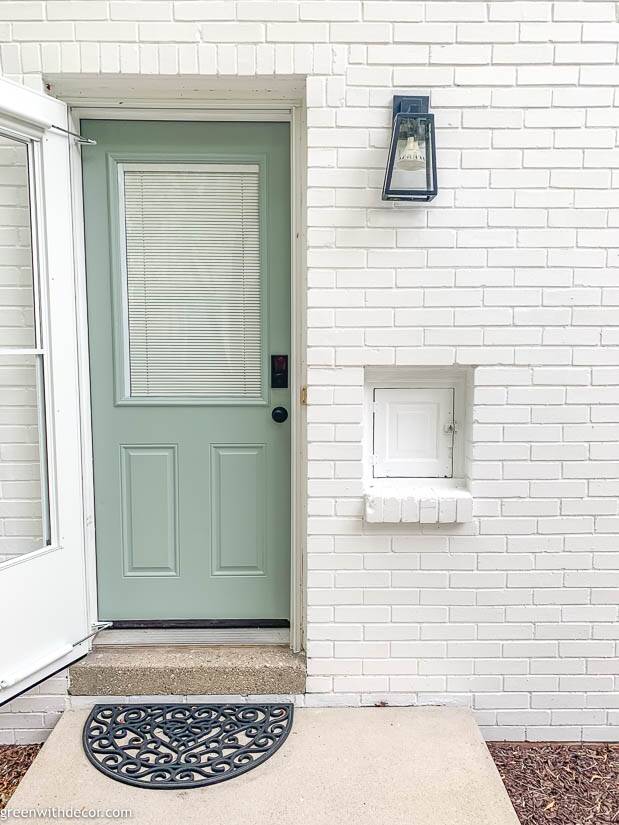
I wanted a pop of color on the outside against our white brick and tan shutters (more on that project here: how to paint shutters), so I went with my current favorite shade of blue (which can also lean grayish or greenish in certain lighting), Country Chic Paint’s Dune Grass, color-matched in Sherwin Williams paint.
I also used it on our barstools earlier this year, which you can read about here: How to paint barstools.
Like I said above, I wanted the interiors of our exterior doors to be the same white as our trim and all of the interior doors in our house (Benjamin Moore’s White Dove color matched in Sherwin Williams).
I used the same interior paint (ProClassic, an interior acrylic latex paint, which is part of their contractor paint line) for the insides of the doors. I was happy to hear I didn’t have to buy more exterior paint just for two (interior sides of) doors so now the paint will also work for any inevitable touchups on our trim and doors around the house. (I LOVE white trim, but it does get banged up over time.)
How to paint an exterior door:
Note, if your door is old and previously painted with lead paint, it’s time to bring in the experts instead of doing this as a DIY.
1. You can either remove your door (and the hinges) or paint it in place.
If you leave it, tape off the hinges, using a razor blade to get a clean tape line around the curve of the hinges.
We took our side door off to paint it since it needed a lot of sanding and prep work, but I took the easy route with the (new) front door and left it in place to paint.
The new front door was pre-primed and ready for painting so I didn’t have to sand it at all, which meant no sanding dust in the house by leaving it in place to paint.
If you’re also painting a door in place, use a door wedge to keep the door in one spot (instead of swinging back and forth) while painting. Or you could also use something else – the container that painters tape comes in was the perfect height for our front door so I just used that!
2. Remove your hardware or tape around it.
We took the hardware off both doors – it’s just easier than taping around it and ensures you get clean paint lines.
3. Tape off any windows with painters tape.
4. Use wood filler to fill in any scratches, holes, gouges, etc.
This wood filler is the best and SO easy to use!
5. Sand the entire door with fine grit (220) sandpaper.
Then use a tack cloth to remove all of the sanding dust. I’ve never used a tack cloth before (not sure why), but they are AWESOME, and I’ll definitely be stocking up for future projects.
Our side door was obviously painted at some point previously, and the paint job was just SO bad. There were brush marks in every direction, dried paint drips, paint on the old hardware and window, you name it. It felt so good to sand a lot of those imperfections out and then finally paint over them!
6. Prime your door (if needed).
How do you know if you have to prime a door?
You’ll need to prime your door if:
- It’s a new, unprimed door
- You’re using a latex paint on a door previously painted with oil-based paint
- If you’re painting your door a dark color, you can use tinted primer to help save on overall coats of paint later on.
You don’t need to prime your door if:
- It’s a new, pre-primed door (like our front door)
- You’re using a latex paint on a door previously painted with latex paint
How do you know if your door was previously painted with latex or oil-based paint?
Pour some rubbing alcohol on a cotton ball and rub it on your door. If the paint comes off, it’s latex paint. If not, it’s oil-based. If you have an oil-based paint, do NOT skip priming or sanding or you’re going to have a huge mess to deal with and have to re-do the whole project later.
7. Paint your exterior door!
This order is the best way to paint a door:
- Edges
- Middle panels
- Center vertical strips
- All horizontal strips
- Side vertical strips
1. Edges
What color should you paint the edge of a door?
I was debating painting our door edges blue or white and ultimately painted the edges blue since that’s the side of the door you’ll see when the door is open. Basically, paint the edges the same color as the side of the door that opens into the room.
The edges are easy to paint with a roller.
2. Middle panels
Paint the middle panels. Use a brush (this is my favorite for a smooth finish) for the recessed portions, feathering the ends so you don’t get a hard brush line.
Then paint the panels with a roller.
3. Center vertical strips
Use a roller.
4. All horizontal strips
Use a roller.
5. Side vertical strips
Use a roller.
Be sure to check for any paint drips and smooth them out before the paint dries.
Let your paint dry.
8. Resand your door with 320 grit sandpaper.
Wipe down again with a tack cloth to remove all sanding dust.
9. Do a second coat of paint.
You should wait 24 hours before flipping a door over on sawhorses. (Definitely, a reason to leave the door in place if you can – easier to paint both sides!)
However, I was determined to get our side door painted in one day since we had to get it back on the house to, you know, sleep safely at night.
So I started painting the door on the sawhorses and then ended up leaning it against the garage wall so we could easily flip it back and forth so I could paint each side.
This isn’t recommended since we were moving it a bit during the ideal drying/curing time, but if you have an exterior door that you need to get back on the hinges before you go to bed, this is the next best thing!
Be sure whatever you’re leaning your door against isn’t textured (like a blanket or tarp), since it could leave the pattern indented in the wet/drying paint.
Follow the tips above for the best way to paint a door as you apply your second coat.
10. Remove the painters tape while your paint is still wet.
This helps prevent peeling paint or getting painters tape stuck in weird places from dried paint.
11. Put your door back on the hinges (if you took it off) and put the hardware back on.
12. Be careful to not bang into/against your door for the next 48 hours and ideally for the next 30 days to really let the paint cure.
We have a rope knot doorstop (so cute – you can see it in the picture below) I use near our front door, and I haven’t been using it again yet since I painted our front door. I want to be sure the rope pattern doesn’t mess with the paint curing so I’m going to wait the full 30 days.
After the paint has a month to harden, the paint should be cured and ready to stand up to everyday life.
Whew, and that’s the best way to paint a door! Hopefully, these tips are helpful if painting an exterior door is on your to-do list! Don’t put it off for six years like I did – totally worth it to knock it out sooner!
One more before/after of each door because those are the best:
It’s kind of crazy this exterior makeover was mostly a dream in my head for the past six years and somehow all came together this summer while we were chasing a toddler around. It feels SO GOOD to have it done.
I love our house every time I walk by our doors and pull in the driveway! And just maybe waiting so long makes it all that much sweeter?!
I also bought new rugs for both foyers – this cute striped one for our front foyer, and this circle one for our side entry. Our side door enters onto a landing so it was a trick to find a rug the perfect size for the space. I talked about our side landing waaaay long ago in this post if you want to see more.
GET THE LOOK:
Since a popular question I get is “Where’d you get that?!,” here are links to the same or similar sources:
Front door:
- Front door is from Menards
- Wireless doorbell
- Door hardware
- Rug
Side door:
- Smartlock
- Rug
- Message center
- Mirror/hooks – ours was an old one I painted, but this one is similar
- Exterior black door mat
- Exterior light fixture
If you missed any of our previous exterior projects this year, catch up here:
- How to paint shutters (and a sneak peek of our painted brick!)
- The best way to clean concrete + siding
- How to paint a metal railing (which also meant a new roof)
- Our new exterior door hardware
Remember to bookmark or pin this post if you want to save it for later!
Pin it!
Want to read more posts like this?
Follow along: Get my emails | Facebook | Pinterest | Twitter | Instagram
Debbie says
can you please tell me what that little inset door is to the right of the door?
think you said side door so not mail??? is it
GreenWithDecor says
It’s a milk crate door! Such a fun piece of history.
Debbie says
love that! it is a great piece of history it’s cool