If you’re wondering how to paint a metal railing, it’s easy with a paint sprayer! Just follow this simple DIY tutorial.
Disclosure: This post is sponsored by Wagner. All opinions, images and love of DIY painting projects are 100% mine.
We have a second-floor patio /outdoor living space above our family room that I realize I’ve never really shared on the blog unless you count the sneak peeks in various patio posts over the years.
But I’ve been out there maybe 5 times since we bought the house 6 years ago (wow does time fly!). We just don’t ever use it. It seems like a lot more work to walk upstairs to get outside when we can just walk out the back patio doors.
(This picture is old, but it shows you the railing and flat roof area.)
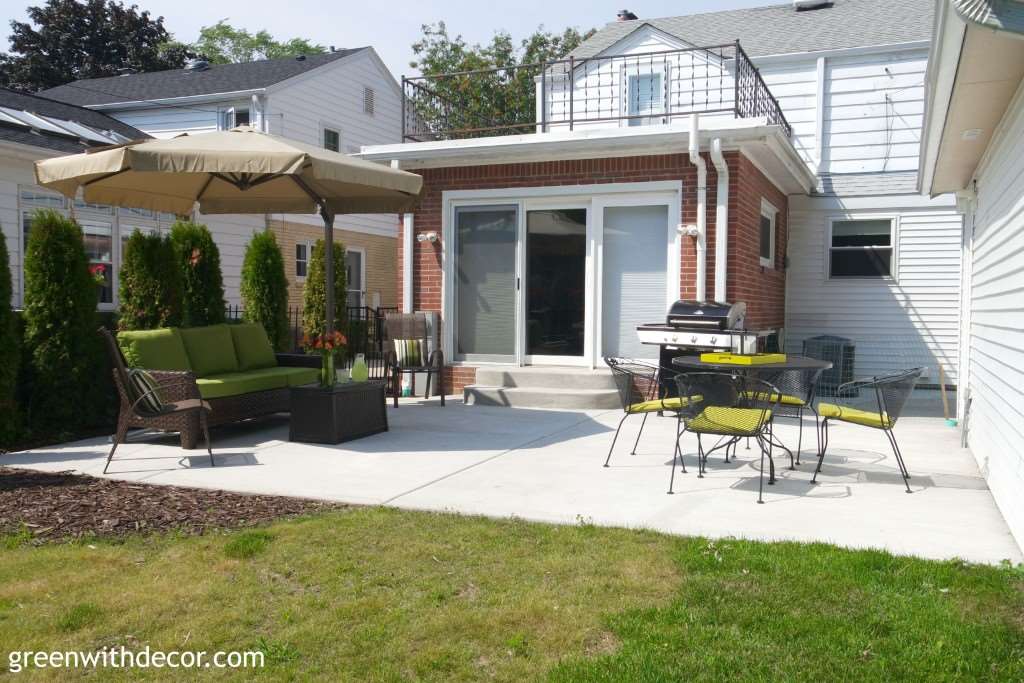
We have big plans at some point to turn the space into an owner’s suite and/or maybe add another bedroom, but we’re not there yet.
In the meantime, it’s a flat roof over our family room, and flat roofs only have so many years in them before they need to be replaced. When ours started leaking in the aftermath of this year’s polar vortex when ALL the snow and ice started rapidly melting at once, we knew it was time for a replacement.
I mean why spend thousands on a fun, tropical vacation when you could spend it on a new flat roof you’ll never really see? Homeownership is FUN.
The roofers took the railings off to do their job and before they put the railings back up, I figured they could use a coat of paint for a fresh look. Heaven forbid I miss an opportunity to paint something!
They started like this:
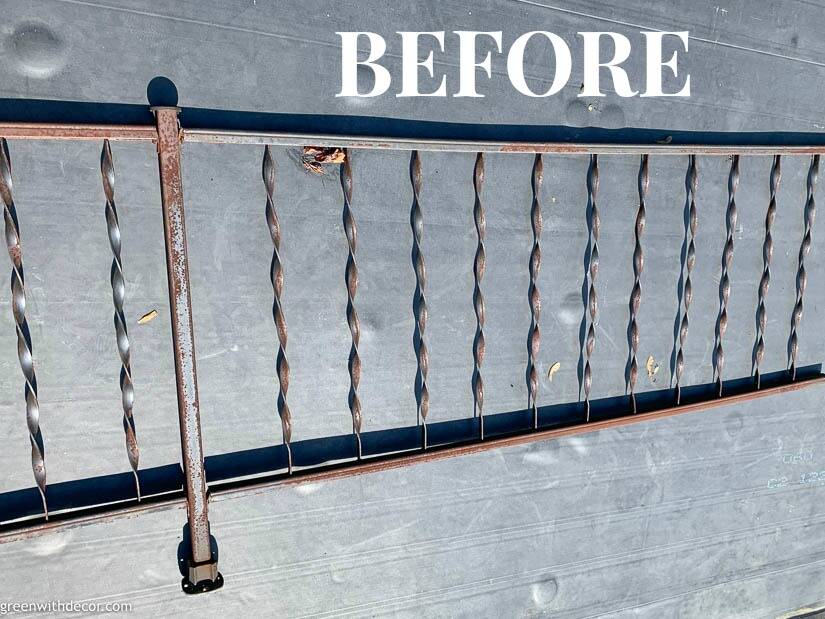
With all of those curvy (seriously, SO curvy!) spindles, of course, I busted out my Wagner paint sprayer yet again. I cannot even imagine attempting this project with a paintbrush. I’d be painting for years.
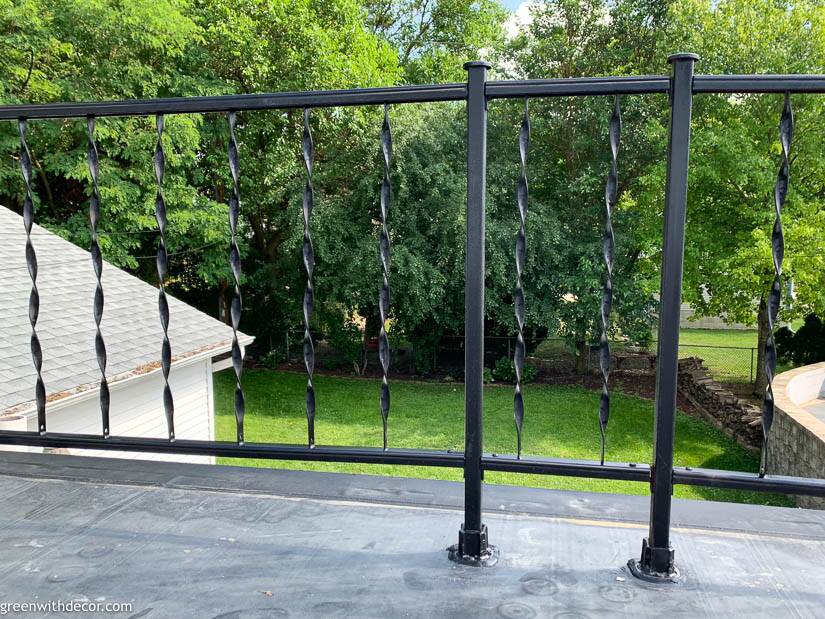
And doesn’t it look awesome now?!
This post contains affiliate links. This means if you click the link and buy something, I may receive a small percentage of sales at no extra cost to you.
Supply list for painting a metal railing:
- Drop cloth or tarp
- FLEXiO 3000 paint sprayer (also available here or here)
- Extension cord (if needed)
- Paint
- Paint stir stick
How to paint a metal railing with a paint sprayer:
1. Prep your paint.
Stir your paint and pour it into the paint sprayer’s paint cup.
2. Put your paint sprayer together.
You can pick between the FELXiO 3000’s detail and iSpray nozzles. The detail nozzle is perfect for smaller surface projects like a railing,
Your suction tube should be inserted into the paint sprayer depending which way you’ll be spraying – pointing backwards if you’ll be spraying upward and pointing forward if you’ll be spraying downward.

3. Set your paint sprayer settings.
Air power control: The thinner your paint, the lower you’ll set this to start. You can always adjust as you go. If you’re also painting a metal railing or other outdoor furniture, start at about a 3 or 4. Wagner’s manual is a great resource for where to set this.
Material flow control: This is based on what type of paint material you’re spraying with. Again, Wagner’s manual outlines this, but basically, if you’re not getting enough paint coverage, it’s probably too low, and if your paint is running, it’s probably too high.
Spray shape / air cap: This is the blue knob on the front of your sprayer. It determines the shape of the paint spray coming out of your sprayer. With painting a railing, the surface area of what I was painting was pretty much the same throughout the entire project so I didn’t have to adjust this too much.
(I move this around more throughout a project when doing something like painting barstools since you’re switching between chair legs and a chair seat.)
If you’re running into trouble spraying, check the manual. I know we all hate to read manuals, but it’s really helpful when you’re just starting out using a sprayer.
It has a troubleshooting section that outlines basically any issue you could run into and tells you which settings to adjust to fix it.
4. Paint!
If this is your first time using a paint sprayer, try it out on the practice sheet Wagner provides.
Here are my tips for painting with a paint sprayer:
- Keep moving so you don’t get too much paint in one spot, going up and down over your railing, overlapping a bit with where you just painted.
- Move with the sprayer rather than just flicking your wrist. You want to spray paint evenly and consistently.
- For the best paint coverage, your paint sprayer should be about 6-8 inches from what you’re painting.
- Do one coat of paint, let it dry and then do a second, slightly heavier coat for full paint coverage.
Because of the way this railing’s spindles twist around and around, I had to spray each spindle from about 3-4 different angles to get paint coverage everywhere, which meant a bit more overspray than I usually have when using the sprayer.
All worth it, because I don’t have the patience to ever do this project with a brush!
Painting with the paint sprayer goes fast. And if you have a railing with straight spindles, the project would have been even faster! As it was, I painted the railings during nap times one weekend so it was pretty quick.
It’s always amazing what the power of paint can do for anything, even super old railings!
5. Clean your paint sprayer.
This is easier than you might think!
Run warm soapy water through your paint sprayer, then unplug it. Take the paint sprayer apart and clean each piece. It’s easier to clean when the paint is still wet, but sometimes life happens, and you can always scrub bits of dried paint off of the sprayer if you don’t get to it right away.
The roofers put these beauties back on, and don’t they look good?! Way better than the before!
I’m so glad I was able to sneak in this project before they came back to wrap up here. Fingers crossed for no polar vortex this year, but at least we know if it hits, our new roof will mean no leaks!
Do you have any painting projects planned this summer? It’s finally warmed up here (happy July!), and we’re trying to cram in ALL the outdoor projects before that cold weather comes back!
I’ll be sharing our refreshed patio next week (still wrapping a few things up back there) and some fun plans for the exterior of our house soon (think lots of paint)! You may have also caught the sneak peek of our new smart doorknob in Monday’s blog post.
For more outdoor paint sprayer projects, check these out:
Remember to bookmark or pin this post if you want to save it for later!
Pin it!
Want to read more posts like this?
Follow along: Get my emails | Facebook | Pinterest | Twitter | Instagram
Lori Repinski says
Hi Megan!
I have a similar rail on a little outdoor staircase. It needs to be painted. Did you prep the rail before painting? Like taking a wire brush to it to remove any of the rust? Love your blog!
GreenWithDecor says
Hi Lori! Thanks so much for reading! Our roofer did recommend using a wire brush before we painted.
Emily says
I can’t imagine how tedious this project would’ve been if you were painting it with a brush! Paint sprayers all the way! The railings look great, Meg!
GreenWithDecor says
I can’t either!! I couldn’t have handled it with a brush, haha. Love that paint sprayer!