This post outlines all of the design details that go into white built-in bookshelves around a fireplace on a non-recessed wall, including shelving, wall detail above the fireplace, lighting and more!
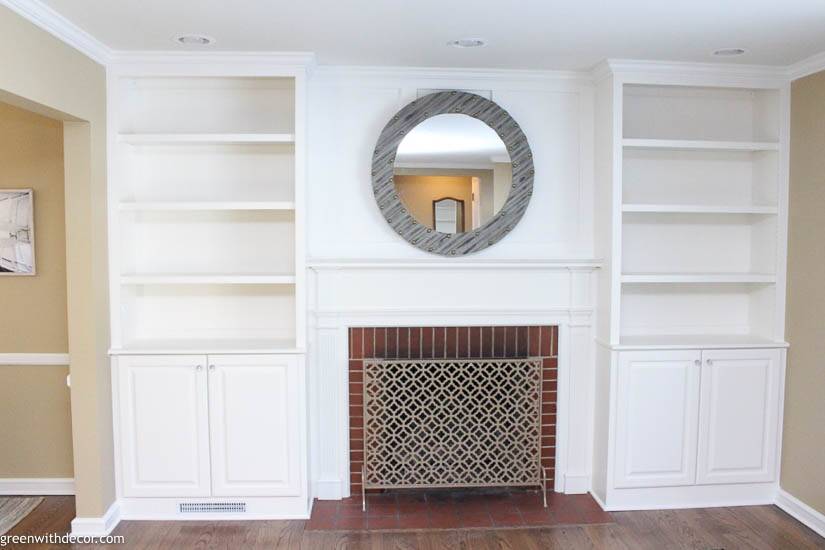
I am SO excited about today’s reveal: the white built-in bookshelves around the fireplace are DONE!
They look so good, I just love them every time I walk in the living room.
I meant to get this post up earlier this week, but as I started writing it, I realized A LOT went into the built-in bookshelf design, and it ended up taking me longer than I thought to get everything written in between baby naps!
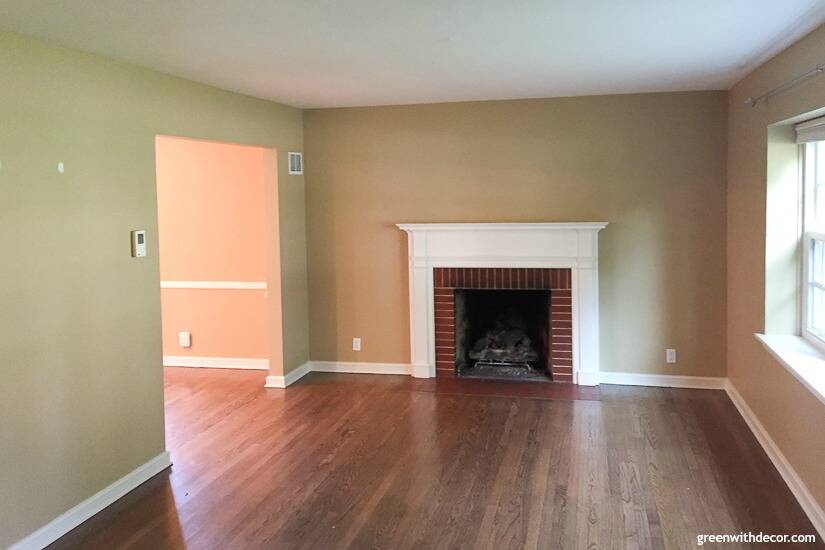
As a reminder, the wall started like this:
And now:
It’s so much brighter, right?! I just love it! This room doesn’t get a lot of natural light despite the huge window, and having this wall white instead of tan makes SUCH a difference.
Almost enough to get me thinking about painting other walls in our house white … but that’s for another day.
Today is all about our white built-in bookshelves around the fireplace and all the design details that went into them!
First off, in case you missed the living room design plans, we hired this project out.

We’d always thought it would be a DIY project down the road, but we had to move a heating vent, cut down the mantel and add lighting (funny how these projects always grow!). Plus given our lack of carpentry expertise and free time at the moment, hiring them out was one of the BEST decisions we’ve made.
I mean there is NO way they’d look this good if we’d done them ourselves.
A lot went into the design of these built-in bookshelves so this post is a bit long. But if you’re considering a similar project, this should hopefully be helpful in getting you thinking about all the details and design decisions ahead!
Built-ins around a fireplace on a non-recessed wall:
This was probably the hardest part of figuring everything out for the built-in bookshelves.
Often when you see built-in bookshelves around a fireplace, the bookshelves are recessed behind the fireplace. Our wall is flat, with the fireplace only coming out as far as a fireplace does.
We knew we couldn’t have our built-in bookshelves come out too far then or the fireplace would seem REALLY recessed and look off no matter how good the bookshelves looked.
Which means our cabinets / overall built-ins are not as deep as most.
I felt like we we were winging it without many examples to look at, but we love how our built-ins turned out! Our contractor was really helpful with these measurements, which is yet another reason we’re glad we hired this one out.
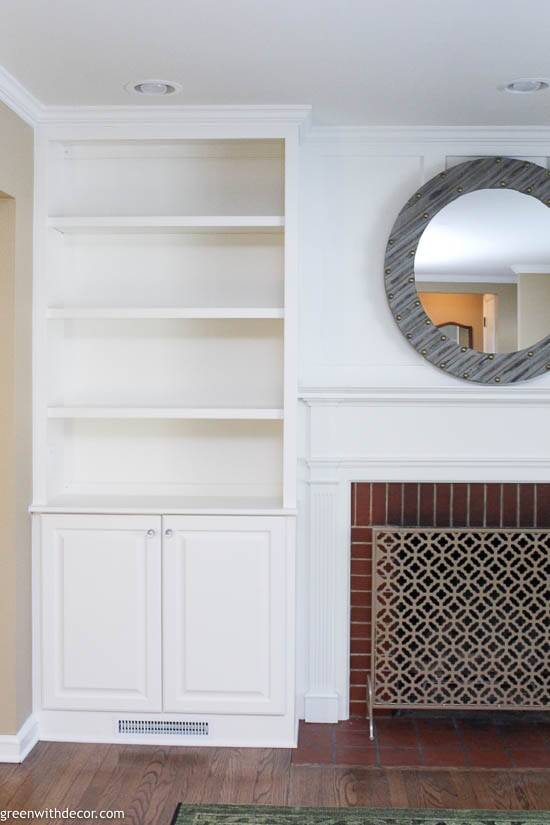
Our bottom cabinets are 13.25″ deep, which isn’t crazy big. The bottom open shelf / top of the cabinet is 16″ deep and the open shelves are 13″ deep. (I’ll list measurements for everything at the bottom of this post if there’s anything else you’re curious about!)
Ideally we’d have a bit more storage in the bottom cabinets, but we didn’t want to make them any deeper given the non-recessed fireplace. And it’s about a million times more storage in this room than we had in here before, so we’re good with it.
Shockingly, we don’t even have the cabinets all full yet so I’d say we’re doing okay on storage so far!
Cutting down the fireplace:
Our mantel is original to the house and while we loved it, we couldn’t leave it as is without it jutting into the built-in bookshelves and looking WEIRD.
A reminder it looked like this before:
Our contractor cut it down perfectly so that the fireplace and built-ins look like they were all built as one seamless project.
So don’t let a mantel stop you from doing built-in bookshelves around a fireplace!
Board and batten above the fireplace:
I had this vision in my head forever, and I LOVE how it turned out. I’m not sure I had anyone else convinced this would look great but now that it’s all done, I do. 🙂
I wanted a classic, timeless design so went with simple white board and batten. Our contractor put a solid piece of wood behind the batten pieces. (You could just leave the wall behind it, but I wanted the solid wood look.) We went with four wood batten pieces for three panels.
Here’s a look at it in progress before we hung the mirror up:
Odd numbers almost always look better, but again, measurements always depend on the size of your space! If you’re debating, I’d say it’s better to go with less batten pieces than more. Spaces look better when they breathe a bit rather than if you cram a bunch of panels in, but that’s just my opinion. It’s your house and sometimes what ultimately looks best just comes down to a gut feeling.
Brick / tile color with white built-in bookshelves:
I’m planning to paint the brick (can’t decide between all white or a whitewashed look – opinions please!) and stencil the red floor tile (either white/tan or white/light blue – again, opinions please!) so please look past the eyesore of red in the middle of this GORGEOUS wall for the time being.
Adjustable shelves / shelf trim:
The spacing between the shelving was STRESSING me out because it seemed like such a permanent decision. I mean sometimes I love tall glass vases and sometimes I want to decorate with books, and I always like to move things around. So how was I supposed to commit to shelving height FOREVER?!
Not to worry. Our contractor said he’d make the shelves adjustable. WHEW.
We have little holes along the sides of our shelves, which really aren’t noticeable (I was also worried they might be too noticeable!) because he built a bit of an overhang on the sides of the overall shelving cabinet for a nice clean look.
He also built the overhang along the front of each shelf, which I’d highly recommend.
You can see what I mean in this picture (in progress!):
Even the shelf brackets are white so you’re not catching a glimpse of silver or anything that shouldn’t be there.
Lighting above built-in bookshelves
I went back and forth on this one, too. I LOVE the look of gorgeous scones above a fireplace, but our house has 8 foot ceilings.
Sconces would mean we’d lose out on that top shelf of our bookshelves, and I felt like the shorter bookshelves with the scones would bring the whole thing down on you, and the room would feel even shorter than it is.
So we went with boring can lights. But I really do love them. Which I never thought I’d say about can lights because yes, they are boring.
I was worried I made the wrong decision on this one until I saw it all finished, but I know I made the right decision now. Plus we’ve never had overhead lighting in this front living room (old house problems) so just having these can lights in here for better lighting is AWESOME.
Our house always looked so dark at night since we rarely had lights on in this front room, and it’s so nice having lights in here now!
We went with three can lights – one over each bookshelf and one above the fireplace. So many decisions to make with this project! Again, the amount of lighting totally depends on the width of your room, but I’d try to do an odd number if possible.
And we put the light switch inside the bookshelf, which looks SO much better than having it on the wall next to it.
Heating vent:
We had a heating vent along the little wall on the left that juts out between our dining room and living room. Our contractor moved it to the bottom of the cabinet, and it looks great.
Crown molding above built-in bookshelves:
This is where the project really snowballed. Whoops.
We knew we wanted to do crown molding in the living room eventually so we had to do it above the built-in bookshelves as long as they were going in.
Which meant it made sense to do crown molding around the entire living room and foyer.
Which got us thinking, we might as well do it in the family room then, too …. and the dining room and kitchen. And that’s how we went from adding built-in bookshelves in the living room to getting crown molding in our entire first floor.
But hey it looks GREAT!
Built-in bookshelf measurements:
Everyone’s measurements will be different based on however your house/room is set up, but I figured I’d share our built-in bookshelf measurements as a good jumping off point if you’re also trying to figure out built-ins around a fireplace on a non-recessed wall.
- Fireplace:
- Floor to top of mantel: 54”
- 64” wide
- Board and batten above fireplace:
- Batten pieces: 3.5”
- Visible board pieces: 16 and 2/3’” (keep in mind this is actual one full piece with the batten pieces on top of it)
- Shelves:
- Open shelves: 13″ deep
- Shelf trim overhang: 1.5″
- Bottom open shelf/ top of cabinet: 16″ deep
- Cabinets:
- 5.25″ up from ground (we have a heating vent under one of them)
- Cabinet height: 30″
- Cabinet width: each door is 18″ / each cabinet set is 36″
- Width of shelf on top of each cabinet set: 40.25″
- Cabinet depth: 13.25″
This post contains affiliate links. This means if you click the link and buy something, I may receive a small percentage of sales at no extra cost to you.
GET THE LOOK:
Since a popular question I get is “Where’d you get that?!,” here are links to the same or similar sources:
- Bookshelf color: White Dove by Benjamin Moore
- Wall color: Camelback by Sherwin Williams
- Fireplace cover is no longer available, but this one is similar
- Cabinet door knobs
- Mirror is from a local home decor store and I can’t find anything similar online!
Okay this post got SUPER long but hopefully it’s really helpful if you’re considering white built-in bookshelves, too!
So much more went into the design of these than I thought when I first casually mentioned to Kalen I wanted built-in bookshelves in the living room, but I truly love every last detail in here!
Oh and let me know your thoughts on colors for the brick and fireplace tile, please!
Now for decorating the bookshelves! (Update: check them out in this post: How to decorate bookshelves.)
Remember to bookmark or pin this post if you want to save it for later!
Pin it!
Want to read more posts like this?
Follow along: Get my emails | Facebook | Pinterest | Twitter | Instagram
Lori Repinski says
Wow Meg! This and everything else you’ve done to your home look fantastic!
GreenWithDecor says
Thanks so much, Lori! I am so glad we did this, we love it!
Susanne M Murray says
Looks awesome – thanks for sharing!
GreenWithDecor says
Thanks so much, Susanne!
Ella says
Looks amazing! So much detail and functionality.
GreenWithDecor says
Thanks so much, Ella!
Valerie says
I like the look. Want to do something similar in my home but trying to decide if it would be less expensive to buy an entertainment wall unit (put it in front of the fireplace to cover it up, we don’t use it) or have a contractor do built in (around the fireplace)? The most expensive entertainment unit I was considrering is around $3500. Thanks for the input!
GreenWithDecor says
It’s such a pretty look! An entertainment unit could work, too if you find one the right size. Good luck!
Mel says
I’m planning to do the same for my family room. Just for me to have an idea, how much did it cost for this beautiful transformation. Ballpark figure? Thanks
GreenWithDecor says
How fun! It’s really hard to estimate a cost. Contractor costs vary widely from city to city, and it will depend on the size, adjustable/non-adjustable shelving, open shelving vs. cabinets, moving any HVAC or electric, painting, etc. I’d get a few quotes from contractors! Hope the project goes well!
Julie says
Love it all! Maybe consider matte black for brick/tile🙂
GreenWithDecor says
Thanks, Julie! Good idea!
Wendi Huff says
How wide is your fire place and how wide are your bookshelves?
I have a 4.5’ fireplace but only have 29” on each side and trying to determine if I did a 29” bookcase would not look symmetrical or not.
Thank you 😊
GreenWithDecor says
The fireplace is 65″ wide and each cabinet is 36″ wide. I think 29″ is plenty of room for a bookcase, but you know your space best! I’m a big fan of built-ins, clearly. 🙂
Stephanie Mason says
how tall are your ceilings??
GreenWithDecor says
8 foot!