It’s easy to paint a Christmas village house for a brand new look! What a cheap, easy Christmas decoration.
This project has been on my to-do list for hmmm 3 or 4 years. I’ve lost track.
I’ve been asked a few times recently how I get all my projects and blogging done while being home with our daughter. The short answer is, I just don’t get it all done anymore. This project is a prime example of that!
The house started blue:
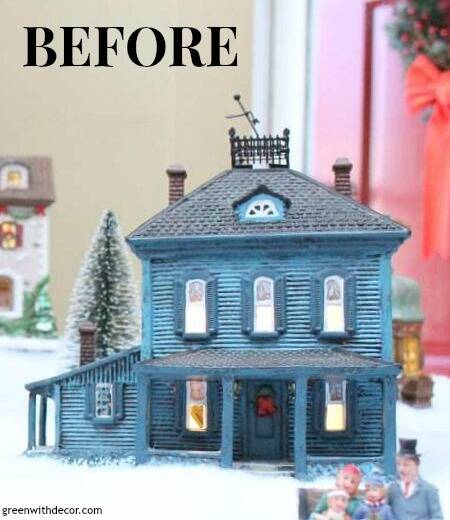
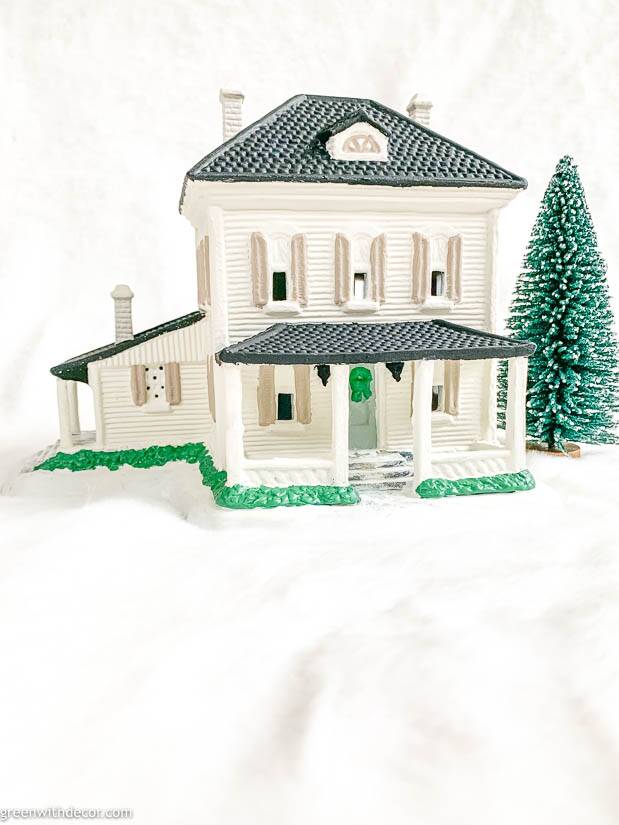
And now:
But it took a while to get here. I painted it white two years ago without touching the shutters or any other details … and then it sat in our basement until last week.
Today’s post is part of the quarterly Thrift Shop Challenge I do with some of my blogging friends. You can see their awesome thrift store projects linked at the bottom of this post.
And if you missed any of my previous Thrift Shop Challenge posts, catch up on them here: how to paint candlesticks, a mini sled makeover, nursery artwork with a thrift frame and a repurposed plant stand.
I’d actually planned on doing a furniture makeover for our ongoing family room makeover for this quarter’s post but — again, see above — I didn’t quite get around to getting that project done. Hopefully by the next Thrift Shop Challenge post!
Which led me to our basement, which basically looks like a thrift store bomb went off and desperately needs some organization.
(The basement is also on the list of projects I’m not getting done at the moment. Have I made you feel better about not getting ALL the things done yet? Yes? Good!)
So in our mess of a basement, I found this little Christmas village house I started to paint before I was pregnant (!!) and decided it was time to finish it so we could actually display it for Christmas in a few months. (How in the heck is it really going to be Christmas soon?!)
This post contains affiliate links. This means if you click the link and buy something, I may receive a small percentage of sales at no extra cost to you.
Supply list for painting a Christmas village house:
- Drop cloth or scrap paper (Since this project is so small, I just set it on a piece of paper we had sitting on the counter to avoid getting any paint drips on our counters. Easier than getting out a big drop cloth for such a small project!)
- Paint brush (regular size)
- Small paint brushes
- Painters tape (I used this to tape off a few places but then decided it was easer to just freehand it. Again, keeping things easy!)
- Paint – here are the colors I used:
- DecoArt’s Black
- Country Chic Paint’s Vanilla Frosting
- Country Chic Paint’s Dune Grass
- Sherwin Williams’ Tony Taupe
- Martha Stewart Crafts’ Pesto
So the paint colors may look familiar, huh?! I totally copied the colors from our house since we finally finished painting the brick, shutters and door this year.
(If you missed those posts, check them out: how to paint shutters and our new exterior door hardware. You’ll get a pretty good sneak peek of our painted house and side door in those posts!)
And a little side note, do you think I have enough paint?! I was looking for green to give those bushes a fresh coat, and I found all of these in my paint stash! (And this isn’t even including the handful of green spray paint cans I have … I may a have a problem.)

How to paint a Christmas village house:
1. Clean off your house first to get rid of dust and dirt.
2. Paint the whole house.
This is just the order I painted everything in. Obviously, you can do it however you want! But this order made the most sense to me.
By painting the bigger pieces first, you can make sure you like it before you have to redo it all. (Even so, I redid a few things after painting a bit – see below.)
I used a big brush for this part since I basically just spread white paint everywhere. I used small artist paint brushes for all of the detail pieces.
3. Paint the shutters.
I originally started to paint the shutters black, but it was waaaaaaay too dark. You couldn’t see any of the detail work, they just looked like black blobs.
I also started to paint the window frames, too, and it was still too much. So I settled on painting only the shutters with the tan/taupe color.
These shutters were definitely the most tedious part of this project! There are just so many!
4. Paint the doors.
Again, I started using painters tape and then ended up just free handing it.
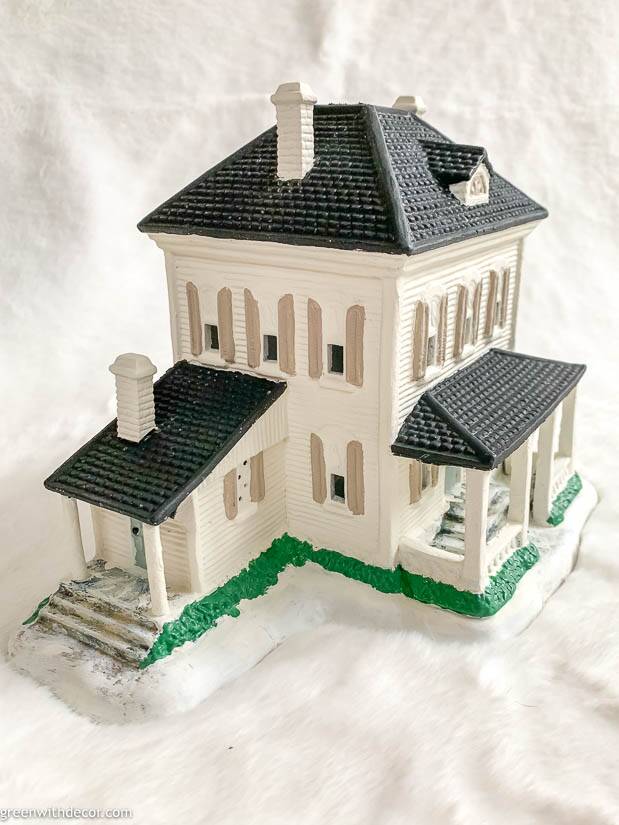
I also started to paint the porch posts, but decided again that the black was too dark.
I rubbed the black off with a wet paper towel after it had started to dry, and it left this cool textured look. I thought I’d share just in case anyone wants a look like this!
I liked it but not for this house so I painted it white again.
5. Paint the roof.
If your roof is in good shape, you wouldn’t have to, but this one had some green and brown flecks. The fresh coat of black paint made the whole house look better!
I tore that weird balcony railing thing off the top roof and painted the door knobs and light fixtures, too. Actually, the front door didn’t even have a door knob so I just painted a little black dot. Whatever works.
6. Paint the bushes.
I also touched up some of the ‘snow’.
Why is everything miniature sooo cute?! I want to find more Christmas village pieces to paint now. I promise it won’t take me 4 years!
By the way, how cool would this house be in real life?! I would just love it!
I also painted a bunch of miniature Christmas village pieces all white a couple years ago (see that project here: A DIY Christmas village), and now I’m kind of wondering if I go back and paint those in color, because this project was so much fun. Decisions, decisions!
Remember to check out the other ladies’ Thrift Shop Challenge projects here:
And if you want more thrift store project inspiration, check out my post on the 10 pieces not to skip at the thrift store! It’s amazing what you can find and then fix up with paint!
Remember to bookmark or pin this post if you want to save it for later!
Pin it!
Want to read more posts like this?
Follow along: Get my emails | Facebook | Pinterest | Twitter | Instagram
Amanda says
It looks so cute! I never would have thought to paint one of those – what a genius idea!
GreenWithDecor says
Thanks, Amanda! I love Christmas village pieces!
Emily says
This turned out so cute, Meg! I like that you painted it to match your house—it’s a cool idea to personalize your Christmas village to your own home, town, etc 🙂
GreenWithDecor says
Thanks so much, Emily! We usually buy village pieces that mean something to us, so it’s fun to have a house that looks like ours!
Jessi says
I’m a bit obsessed with this post!
My MIL and I just started to collect Christmas village buildings for next year – our catch…. they can only be from goodwill!
I will now not think twice about an ugly building…. I can just paint it! How FUN!!
GreenWithDecor says
Isn’t it SO fun?! I just bought 2 more from Goodwill the other day! Can’t wait to paint them!