Building a DIY bench doesn’t have to be hard! Follow this tutorial for how to build a bench to create a custom piece for your home.
Disclosure: Osborne Wood Products provided a discount on the bench legs and apron/skirts featured in this blog post. All opinions, images and love of pretty DIY benches are 100% mine.
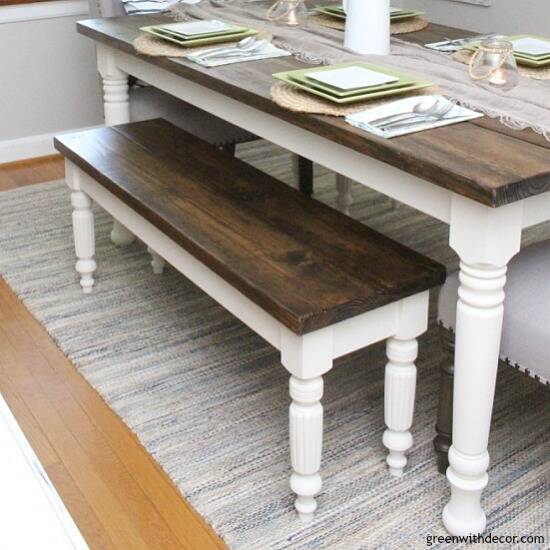
OMG we did it! We built a bench! Two of them, actually.
Which means this coastal dining room makeover is DONE! I’ll have pictures of the whole room next week, but today’s let’s ooh and ahh over this DIY bench that took us umm a WHILE to finish.
I’m blaming the cold spring which made building/DIYing anything outside basically impossible plus the pregnancy has slowed down the DIYs around here.
Let’s dive in, shall we?!
This post contains affiliate links. This means if you click the link and buy something, I may receive a small percentage of sales at no extra cost to you.
Supply list for a DIY bench:
We built two benches for our table. To avoid any confusion, this tutorial is for building one bench.
Our benches are each 50.125″ x 14.5″, but you can adjust the size and follow these steps to build a bench. As for height, Osborne recommends using their coffee table/bench legs for benches to pair with a standard dining table.
- (1) 2″x8″x10′ treated board
- (1) 2″x4″ board
- Multiple 2″ wood screws
- Miter saw (we used our RYOBI miter saw)
- Drill
- Safety glasses
- Belt sander
- Orbital sander
- Sanding discs
- 80 grit
- 120-grit
- 220 grit
- (2) 24″ clamps
- Tape measure
- T-square (optional)
- Coffee table/bench legs (we used these.)
- Table apron set (I go into detail on exactly what we picked in step #11 below.)
- Drop cloth
- Sawhorses
- Painter’s tape
- Stain, color of your choice
- We used Dark Walnut by Minwax (also available here – you can order online and pick up in store)
- Paint stir stick(s)
- Rags to apply stain – we used these
- Sanding sponge
- Caulk
- Sealant – we used polycrylic
- Paint (optional)
- Paint brush
How to build a bench:
1. Determine the size you want your bench to be.
If you’re also building benches for your dining table, the table will pretty much determine how long the benches will be. (For reference, our table is 37″ x 72″.)
Be sure you have enough clearance that the bench legs, table legs and head chairs aren’t going to be bumping into each other as you pull the benches in and out for meals.
2. Select boards for the tops of your bench.
We got our at the local home improvement store. Be sure the boards you choose aren’t banged up or warped.
3. Cut your 2″x8″x10′ in half so it’s 5′ long. Line up the two pieces next to each other lengthwise, pushed up against a wall.
Place the sides of the boards you want as the top of the bench face down.
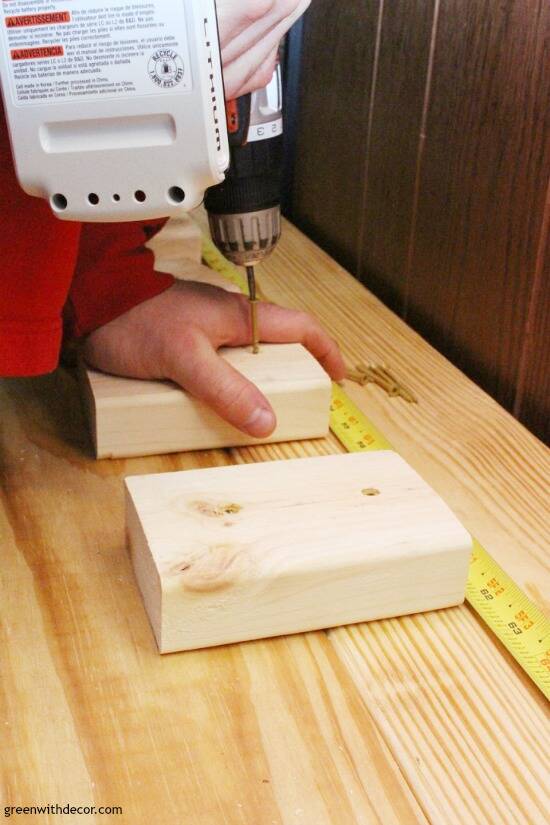
4. Place your 2″x4″s on each end, standing vertically. Use the 48″ clamps to draw the boards together to get as small of a gap as possible.
5. Cut two 2″x4″s to the desired width of your bench.
We cut our 2″x4″s to 5″ given our bench size and bench overhang choice (1″ – more on that in step #11).
Use wood screws to attach these boards to your newly created 2″x5’s. Be sure these boards are centered between the two boards so they don’t end up getting in the way of the apron later on.
6. Flip the bench top over and put it on two sawhorses.
7. Cut the bench top to the size you want it.
Make sure the board is square to the bench top. you can either use a T-square to measure this or measure with your tape measure on each end to ensure it’s even.
Put the 24″ clamps on each side and cut the bench top on each end at this measurement.
8. Sand the sides of the bench.
Sanding takes awhile and can be a bit brutal, but it’s worth it! Use a belt sander to sand the sides of the bench.
Apply pressure in areas where you need to sand out some imperfections or make subtle changes to the length if the boards aren’t quite even.
9. Sand the top of the bench.
Use an orbital sander, starting with 80 grit sanding pads. For each board, we went back and forth, back and forth (almost like creating four horizontal lines across the board) to ensure we covered each part of the surface.
Repeat this step with the 120 and 220 grit sanding pads. This will get you a smooth finish on the top of the bench.
It’s amazing how much smoother the wood gets as you sand.
10. Sand the corners of the bench.
Using the orbital sander, lightly sand the edges of the bench to create a rounded edge so your bench doesn’t have sharp corners.

11. Stain and seal the bench top.
When we built our farmhouse dining table, we stained the top and painted the legs after steps 13-17 below. This involves a good amount of painter’s tape to avoid getting stain and paint in places you don’t want it, so we decided to go a different route this time and stain the bench top/paint the legs before we put everything together. It’s really just personal preference which order you’d rather follow.
Staining our table was the first time I’d stained anything, and I was pleasantly surprised how easy it was. You can read all about how to stain wood here.
12. Stain or paint and seal the bench legs.
To paint the bench legs, follow these same steps I used to paint the table legs.
These legs did take longer to paint than our table legs since they had all of the nooks and crannies. I love the look of them, and it was worth the extra painting time but wanted to mention it in case you don’t want to spend a lot of time painting.
Oh, and be sure you, ya know, paint ALL of the pieces of the apron (two long and two short per bench) before you assemble the benches … I’m going to blame that one on pregnancy brain. I totally spaced and didn’t paint the short sides of the apron before we put everything together so I still had to get out the painter’s tape to paint them later.
Make sure all stain and paint is dry before you start assembling your bench.
13. Attach the apron to the bench legs.
You can order the coffee table apron set (including the legs) here.
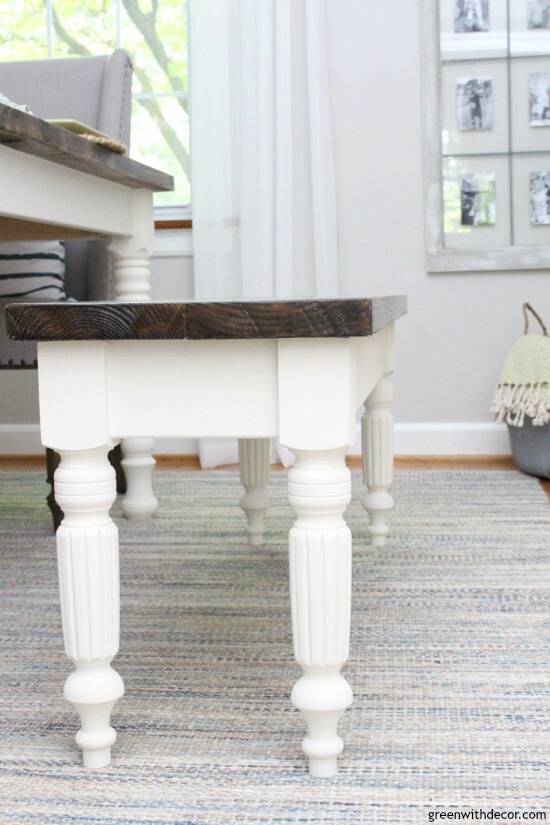
I really debated about which bench legs to order. Really really. Ultimately, I wanted to go with something different than our table legs (they’re the Husky Farm Dining Table Legs).
I also debated painting the bench legs a different color than the table legs but decided to go with the same white paint color and just do different style legs. It’s really personal preference – spend some time on Pinterest looking around at tables and see what you like!
Osborne’s online form walks you though each step, which makes it really easy, especially if you’re not quite sure how to build a bench!
Here’s what we chose if you want to get the same look:
- Type of apron kit: Normal 4-sided apron set
- Table type: Coffe table/bench
- Table leg: Osborne Part #1312 (Old World Coffee Table Leg, 18″ x 2.75″)
- Wood type: Knotty Pine
- Tabletop size: 50.125″ x 14.5″ (needed so they can build the apron specific for your bench)
- Tabletop overhang: 1″
- Apron profile: Round over
Here’s how it all came:
(See that big knot in the one bench leg? It’s nothing you can’t paint over! If you have really dark knots or a lot of them, use a coat of primer first.)
Connect your apron to the bench legs using the mortise and the tenon joint (pre-drilled by Osborne). This makes it super easy to start this process. Use the screws provided to fasten the apron to a bench leg.
14. Attach the wood corner block to the bench leg using the washer, hanger bolt and nuts.Then use the wood screwed provided to further attach/secure it.
Be sure the hanger bolt is tight but is not bowing the apron out. The apron has to be at a 90-degree angle coming off all four bench legs.
A T-square would be useful for this step, too.
Note, if you also paint your legs prior to putting the bench together, be sure you don’t have any dried paint on the tops of the bench legs or your bench top won’t sit flat. If you do have dried paint drops, use a sanding sponge to sand the excess paint off.
15. Place the bench top on top of the base.
16. Measure all four corners of the bench to make sure you have the same bench overlay length in all four directions.
If you have to, apply pressure to the apron to get the distances correct. (You’ll need two strong people.)
17. After the bench is squared and evenly spaced, screw the wood screws through the pocket holes in the apron into your bench top.
18. Caulk between the bench top and apron. (if needed)
And there you have it! A DIY bench that will will make you happy every time you see it because you MADE it, ha!
I really love the bench legs and am so glad I decided to go with something different than our table legs for a unique look.
I just LOVE how they look with our dining table. And the fact that this room is officially DONE. Can’t wait to share it with you guys next week!
GET THE LOOK:
Since a popular question I get is “Where’d you get that?!,” here are links to the same or similar sources:
Have you done any building projects lately? Or have any planned? Ready to go build a bench now? I thought so! 🙂
For more furniture building fun, check out these projects:
Remember to bookmark or pin this post if you want to save it for later!
Pin it!
Want to read more posts like this?
Follow along: Get my emails | Facebook | Pinterest | Twitter | Instagram
Lindi says
Your bench looks soooo good!! I’ve always wanted a bench at the table like yours! Looks sooo good!
GreenWithDecor says
Thanks so much, Lindi!
Vicki and Jenn 2 Bees in a Pod says
WOW – you did build a bench, and it’s gorgeous! Loved the tutorial and your easy-to-follow directions. Pinned for later 🙂
GreenWithDecor says
Thanks so much, ladies!
Amanda says
They look amazing! I love those adorable little legs!
GreenWithDecor says
Thanks, Amanda! We do, too!
Amy @ mylifefromhome says
What a great project! Turned out beautifully!
GreenWithDecor says
Thanks, Amy!
Emily says
Your benches are fantastic! I love how they turned out, and how well they pair with your table!
GreenWithDecor says
Thanks, Emily! I love how they look with the table!
Roxanne says
I love this table and bench, it looks perfect in this space! Great job!
GreenWithDecor says
Thanks, Roxanne! I love how this room came together!