I’m back with an update for week two of the One Room Challenge (ORC), a design challenge where bloggers makeover a room in just six weeks. There are so many great rooms planned, I’m having fun following along with them!
Thanks to Calling It Home for hosting the ORC and letting all of us guest participants share our progress each week!
If you missed last week’s post, we’re making over our home office, which is obviously in need of a little something ….

You can see the fabulous design plan for the office makeover here.
I’ve been busy in the office painting the bookshelf. It’s the biggest piece I’ve painted by hand, and it’s taking awhile, but it looks so pretty already!
It’s amazing the difference between one coat of paint and two. I can’t wait to share it. I did my first (!!) Instagram story last week while I was painting. Be sure to follow me over there for more behind-the-scenes updates.
I’ve been working on organizing all my craft and DIY supplies in the closet, too. Not the most fun process but knowing it will all be organized makes me oh so happy!
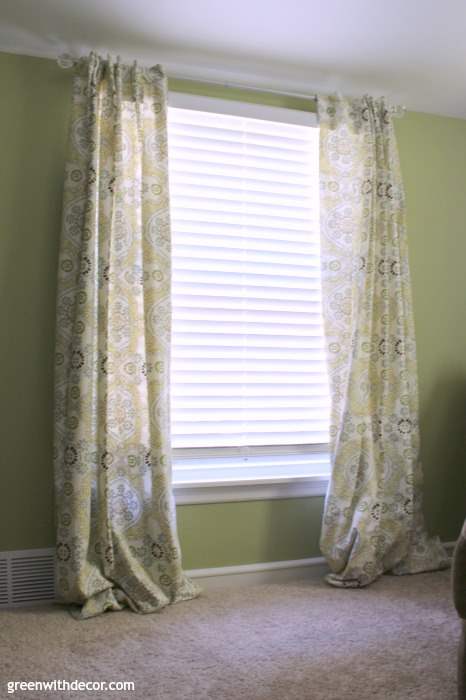
My mom (The Hand Model because her nails are always done and mine rarely are) helped me hem the curtains this week. I’m not so much into sewing, and she’s much better than I am, so it only made sense she’d help with this project.
This post contains affiliate links. This means if you click the link and buy something, I may receive a small percentage of sales at no extra cost to you.
Supply list for hemming curtains:
- Curtains: I love the curtains we (okay, I) picked! And they look great with our curtain rods.
- Pins
- Seam ripper
- Scissors (for fabric)
- Tape measure
- Sewing machine
- Thread
- Needle
How to hem curtains:
1. Hang up the curtains and determine the length you want.
One panel at a time, fold the curtain under to the desired length. I folded mine so the bottom was just brushing the top of the carpet.
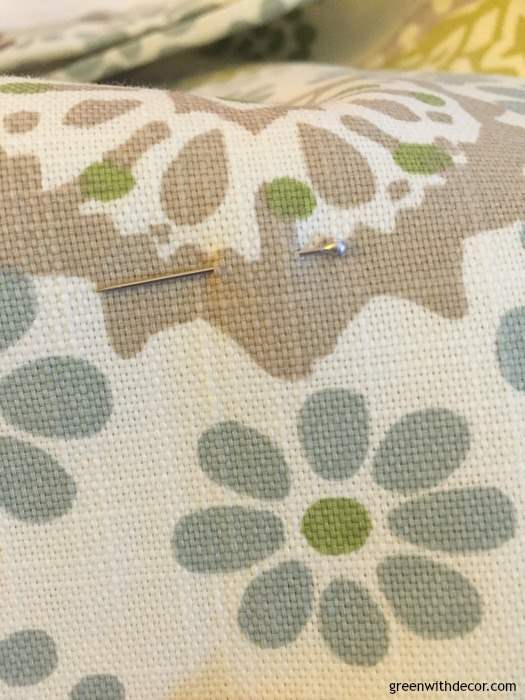
Put pins along this fold line. Take the curtains down.
2. Use a seam ripper to pull the threads to separate the lining from the curtain.
Pull the threads until just above where you want the lining and curtain to end. In this case, four inches above the hem line on the lining.

3. Measure four inches down from the fold line you pinned in step one so you’ll have two inches to fold under and a two-inch hem. This allows you to have a finished edge on your hem.
Cut along the pin line.
Discard the fabric below this point. We actually kept the fabric and used it for a little throw pillow.
4. Measure two inches up from the new bottom of your curtain, and folder under. Pin it and iron.
Fold the curtain up two inches again so you’ll have a finished edge on the hem.
5. Give the corners a finished look.
Fold the fabric on a diagonal to form a triangle and fold over again.
Pin it. (I can’t not think of Pinterest whenever I say “pin it!”)
Iron.
6. Use a straight stitch on the sewing machine to secure the hem.
It’s a straight line so even if you’re not a seamstress (hello, I’m not), you can do it.
Be sure to use a thread color that coordinates with your curtains. We went with cream thread.
How to hem the curtain lining:
7. Measure the lining so it will be about two inches shorter than the curtain.
8. Measure four inches down from that spot to allow for the hem. Cut along this line and discard the extra lining.
9. Measure two inches up, pin and fold under for the hem. Iron.
10. Fold up another two inches and iron. Stitch a straight line across to secure the hem on the lining.
How to attach the curtain and the lining:
11. Use a needle and thread to sew the curtain and lining together, where you ripped out the thread in step two.
I’m always amazed how quickly curtains can make a room feel more ‘done.’
Even though there are supplies and a painting project going on in the middle of the room (no way we were going to move that big bookshelf downstairs to paint and then drag it back up), the curtains make the room look great!
Here’s a teaser iPhone pic of the finished curtains. More to come (and better pictures!) as the room gets finished (and isn’t full of stuff!):
You can see all of the home office makeover progress here:
- The home office ‘before’
- 10 pretty silver light fixtures
- How to organize a craft closet without spending a dime
- How to make a throw pillow from extra fabric
- How to paint a bookshelf
- The home office makeover reveal
Remember to bookmark or pin this post if you want to save it for later!
Pin it!
Want to read more posts like this?
Follow along: Get my emails | Facebook | Pinterest | Twitter | Instagram
Amanda says
The curtains look great! Such a fun pattern – I love it!
GreenWithDecor says
Thanks, Amanda!
ashley@biggerthanthethreeofus says
They look so good!
GreenWithDecor says
Thanks, Ashley!
BonBon says
Love the curtain design and colors. Great job so far.
GreenWithDecor says
Thanks, bonbon!
Sarah says
Anything involving sewing scares me but this doesn’t seem so bad. The curtains look so pretty in the room, and you’re right, the curtains to make the room seem more done.
GreenWithDecor says
Haha, simple sewing only over here! 🙂
Kyla @HouseOfHipsters says
I need to do this with most of my curtains!
GreenWithDecor says
Ha!
Iris Nacole says
I’m pretty sure I’m going to need to do this in my space, however I’m hoping I can manage to avoid it with a little trickery, but if not, I’m so going to use your method. Thanks for the tips!
GreenWithDecor says
Good luck!
Katy {ashadeofteal} says
I love the fabric you chose for your curtains. I still need to tackle curtains for my space, but I need to do the opposite and make them longer. I just hope it goes as smoothly as yours!
GreenWithDecor says
Thanks, Katy! Good luck with your curtains, can’t wait to see!
Crystal Fox says
I’m in love with that fabric! Wow!
GreenWithDecor says
Thanks, Crystal! Me, too 🙂
Vicki and Jennifer 2 Bees in a Pod says
Meg – we love your curtain fabric! Great tips for hemming too! Your space is coming together beautifully!
GreenWithDecor says
Thanks, ladies!
Jenny @ Refresh Living says
Ooo, I love your new curtains, too!! I can’t wait to see the room come together!
GreenWithDecor says
Thanks, Jenny!
jen says
Thanks for sharing! finally a hemming tutorial that makes sense.
GreenWithDecor says
So glad you find it helpful!