An easy DIY tutorial for quickly painting a bathroom with a paint sprayer
Disclosure: This post is sponsored by Wagner. All opinions, images and love of DIY painting projects are 100% mine.
I don’t know what’s happening around here lately, but I painted over another green room!
I used to never decorate with blue, which is funny, because now I’m putting it all over the house. So big surprise, but I bet you can guess I painted our bathroom blue!
We went with Krypton by Sherwin Williams, which you may recall from the rental house bathroom. I loved the color and wanted to use it somewhere in our house. This bathroom seemed perfect!
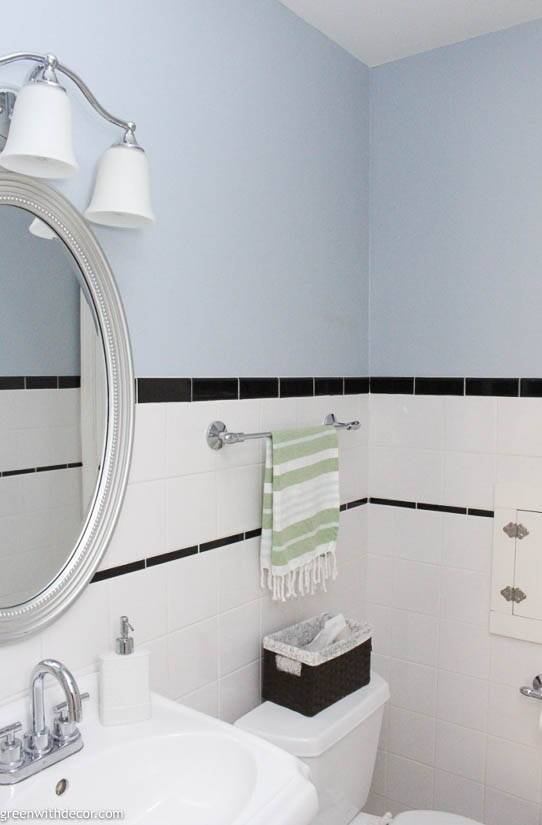
I really love the blue with the white and black tile. It seems so coastal and classic all at once.
And somehow the room seems brighter. With no natural light in here, I’ll take it.
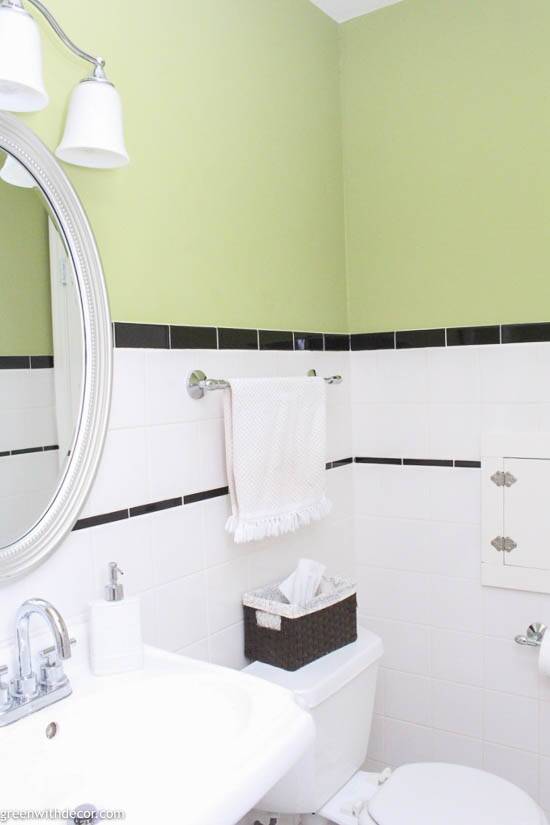
Here’s a shot at the before. (Paint color is Ryegrass by Sherwin Williams.)
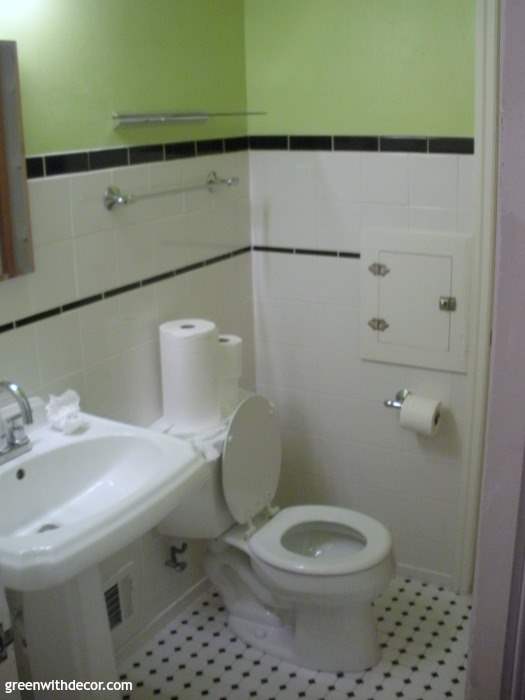
And here’s the bathroom way back from when we bought the house. Pictures don’t even do the bright lime green justice!
We used our handy Wagner paint sprayer to paint this room. As always, it’s crazy how fast you can paint something with the sprayer!
This post contains affiliate links. This means if you click the link and buy something, I may receive a small percentage of sales at no extra cost to you.
Supply list for painting a bathroom:
- Drop cloth
- Pre-taped masking film (here or here)
- Scissors
- Painter’s tape
- FLEXIO 3000 paint sprayer (also available here or here)
- Extension cord (if needed)
- Paint – we used Sherwin Williams’ Krypton
- Paint stir stick
How to paint a bathroom with a paint sprayer:
1. Prep your room.
Pre-taped masking film is a serious MUST if you’re using a paint sprayer inside. It’s painter’s tape with plastic attached so you can tape along the edges of the room (floor, ceiling, doors, tile, etc.) like usual and then pull out the plastic to cover everything up so you don’t get any paint overspray on anything.
It’s amazing, and I wish I’d known about it sooner! I use painter’s tape to connect the pieces of plastic then – such as in the corners.

This video from Wagner walks you through masking a room if you want more info.
I used a drop cloth to easily cover the floor, and you can easily use painter’s tape to cover up any outlets or light switches.
2. Get your paint ready for spraying.
Stir your paint and then pour it into the sprayer’s paint cup.
I’ve used various brands of paint (Sherwin Williams, Behr and PPG Paints) in the FLEXiO 3000, and all have worked great. And you don’t need to worry about thinning the paint!
3. Put your paint sprayer together.
Put the suction tube into the paint sprayer.
If you’ll be spraying upward, the angled end should point toward the back of the sprayer (like pictured below), and if you’ll be spraying downward, the angled end of the tube should point toward the front of the sprayer.
Screw the paint cup into the paint sprayer. Twist the nozzle toward the ‘lock’ symbol.
4. Adjust the settings on your paint sprayer to fit your specific project.
These are a few settings you can adjust.
Wagner’s manual goes into really helpful detail on every thing you’d ever want to know about the paint sprayer from settings to troubleshooting, but I’ll do a quick overview of the main settings here:
Paint speed (red dial on top): Start low. You can always adjust as you go. For interior walls, a 6 is usually perfect.
Material flow (red knob near the trigger): When using thin paint, start with the material flow on a lower setting and slowly increase it. When using thick paint, start on a higher setting and slowly decrease it.
If the material flow is set too high, your paint may run. If it’s too low, you probably won’t see enough paint coverage.
One of my favorite things about Wagner’s paint sprayers is the awesome, full coverage they provide so if you’re not seeing enough paint, turn this up.
Spray width (red lever near front of sprayer): A wide spray is best for painting walls, and a narrower spray is best near edges and corners.
By the way, how nice is it that with the sprayer you can just spray right into the corners instead of having to cut back in with a brush?!
Air cap (yellow dial on the front of sprayer): You can twist this depending if you want to paint using horizontal or vertical strokes.
5. Start painting with your paint sprayer!
If this is your first time, practice on the practice sheet Wagner provides or a piece of cardboard or something. It’s easy, it can just seem a little intimidating to use a paint sprayer for the first time!
Then go for it! Stand 6-8 inches from the wall, which feels super close, but it’s the best distance for using a paint sprayer.
Start at one side of the wall and pull the trigger, moving across your wall at a consistent speed.
Most importantly, move with your sprayer! Don’t stand still and flick your wrist or the paint won’t hit the wall consistently, and it will look splotchy.
Then come back across your wall, overlapping a bit with the paint streak you just sprayed. Go back and forth across the wall until you’ve painted the whole thing.
You’ll see the stripes at first as the paint dries, but it will dry solid. Not to worry!
When you’re painting a large room, wipe the tip of the paint sprayer with a damp paper towel every once in a while to grab any bits of dried paint that could mess with your paint flow.
6. Clean your paint sprayer.
This is definitely where I get questions! Like is it really worth using the paint sprayer to save all that time if you have to clean it afterwards?!
Um, yes!
Unplug your paint sprayer. If you clean it right away, all of the paint is still semi-wet, which means it pretty much comes right off with warm soapy water. Be sure not to ever submerge the whole paint sprayer under water.
Take the sprayer apart and wash the small parts. The paint sprayer comes with a little scrub brush you can use to get rid of any bits of paint that have dried already.
Let everything dry and then put it away. Easy!
7. Take down the masking film and painter’s tape.
I like to do this right away, because if you made a taping mistake and accidentally got paint somewhere you shouldn’t have, it’s easy to wipe off before the paint is really dry.
Then smile and enjoy your beautiful new painted room!
I really love the blue in here, it’s just perfect! I think it really helps the tile shine.
I swiped that striped towel (a souvenir from our trip to Magnolia Market) from the kitchen. I can’t decide which room I like it better in – should have bought two!
I’m thinking about swapping out the light fixture in here now, too. I also may switch out the tissue basket or give this one a coat of paint. Paint the room and next thing you know … give a mouse a cookie and all that. 🙂
Here’s another before and after from another angle just for fun. I love a good before and after!
GET THE LOOK:
Since a popular question I get is “Where’d you get that?!,” here are links to the same or similar sources:
- Wall color: Krypton by Sherwin Williams
- Floor tile here
- Door knobs
- Garbage can
- Basket
- Towel bar
- Towel ring
- White towel
- Soap dispenser
- Nightlight
- Mirror
Have you done any painting projects lately or have any planned? Now that it’s warming up, my painting to-do list is suddenly huge!
Check these projects out for more paint sprayer inspiration!
Remember to bookmark or pin this post if you want to save it for later!
Pin it!
Want to read more posts like this?
Follow along: Get my emails | Facebook | Pinterest | Twitter | Instagram
Kati says
Looks amazing! I love the blue.
GreenWithDecor says
Thanks, Kati! I love the blue, too!
Emily says
I love your new bathroom color, Meg! The green was pretty, but the blue is so nice and serene! Thanks for the tip about the pre-taped masking film—I’m planning to paint our laundry room soon (with my Wagner sprayer, of course!) and that will be so helpful!
GreenWithDecor says
Thanks, Emily! I really love the blue, too! And yes, pre-taped masking film is a MUST! Happy painting!
Amanda Dorich says
I love the blue against the black and white! Looks so timeless and classic! I have a paint sprayer but never used it indoors, I will have to try it!
GreenWithDecor says
Thanks so much, Amanda! I love the black and white with the blue, too!
Roxanne says
The blue you chose feels so fresh and pretty in here, love it! I’ll bet you were done in no time using the sprayer!
GreenWithDecor says
It was such a quick project with the sprayer! I love the blue!