This DIY tutorial reviews how to use Velvet Finishes to give an old chair a makeover.
Disclosure: This post is sponsored by Velvet Finishes. All opinions, images and love of painting projects are 100% mine.
I’ve had this chair forever. It was my desk chair in my bedroom growing up, and my mom had it even before that.
It’s been painted quite a few times over the years, but that never stops me from painting it again.
When Velvet Finishes came out with their new color palette recently, I knew I wanted to try their new dark green, Lush.
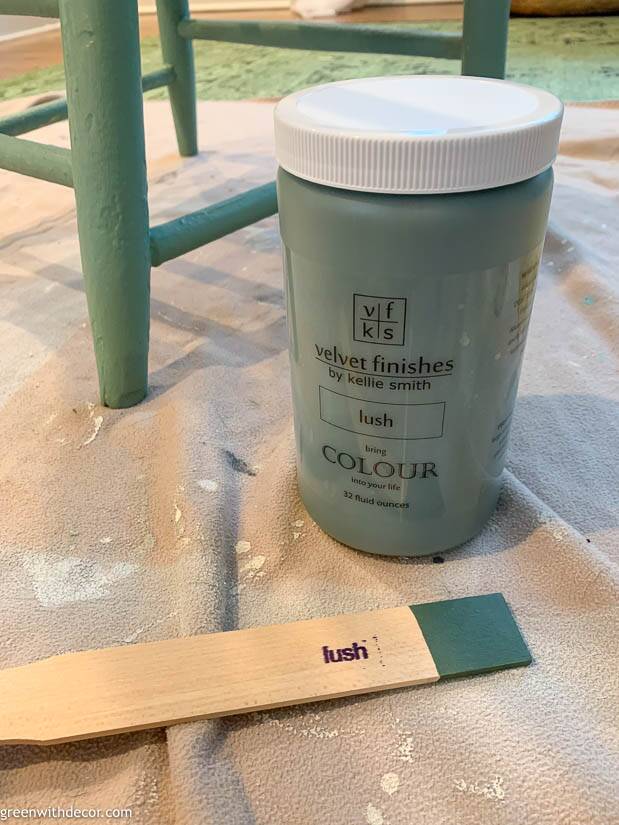
It’s such a pretty, moody shade, right?!
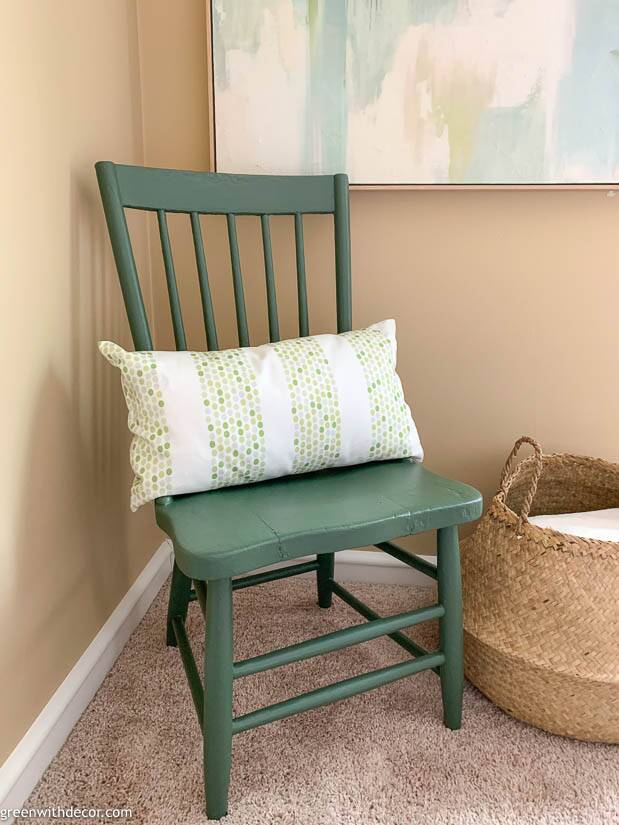
I’ve had to slow down on the number of furniture makeovers I do since our daughter was born, but it felt so good to have some time to paint again! And I love this new chair color with the artwork in our bedroom.
Here’s what the chair looked like before:

And way before … told ya I’ve painted it a few times! (Clearly my photography has improved over the years!)

My friend Kellie owns Velvet Finishes, and they have the prettiest paint colors! I’ve used Enchanting (bright green) on this nightstand and this lamp makeover if you want to see another one of their greens.
This post contains affiliate links. This means if you click the link and buy something, I may receive a small percentage of sales at no extra cost to you.
Supply list for a chair makeover:
- Drop cloth or old blanket
- Sandpaper
- An old cloth or tack cloth
- READY by Velvet Finishes
- A clean cloth
- Paint stir stick
- Paint brush
- Paint – I used Lush by Velvet Finishes
- PROTECT by Velvet Finishes
- A small, disposable container to mix the paint and PROTECT
How to paint a chair with Velvet Finishes:
1. Sand your piece. (optional)
Velvet Finishes doesn’t require any sanding prior to painting (yay for less prep!), but this chair had some dents and scratches I wanted to sand out. So I sanded down those little spots.
If your furniture piece is in good condition, skip the sanding when using Velvet Finishes.
2. Wipe your piece down.
Get rid of any dust or dirt before you start painting. A damp cloth or tack cloth is perfect for this.
3. Spray the READY mixture on your chair.
Velvet Finishes’ READY mixture is awesome. Spray it on your chair, leave it for 1-2 minutes, then wipe it down with a clean cloth.
If your chair still looks shiny or glossy, do this step again.
4. Paint your chair.
Shake and stir your paint.
One of the best things about Velvet Finishes (aside from the no prep work!) is that it doesn’t show brushstrokes! Meaning you can paint whichever way you want and it won’t matter in the end.
But keep in mind the paint does start to dry quickly, and once it has that tacky somewhat dry texture, if you go back over it with a brush, those brushstrokes will show. So apply your paint and keep moving around your chair until it’s all painted.
Velvet Finishes is self-leveling, so paint and move on to let the paint do its thing!
I wrap my brush in a damp paper towel and place it inside a plastic resealable bag in the fridge in between coats rather than spending the time to wash the brush out each time.
5. Do a second coat of paint.
I flipped the chair upside down for this coat to be sure I painted all of the bottoms of each rung of the chair.
Be sure your paint is dry before you flip a chair or any furniture over, or you could end up with indents from the drop cloth/blanket on the top edges of your chair.
If needed, do a third coat, but you’ll probably be good after 2. Velvet Finishes recommends not doing more than 3 coats of paint in a 24-hour period.
After your final coat, let your paint dry for a few hours before applying PROTECT.
6. Apply the PROTECT.
PROTECT is a non-yellowing polyacrylic that protects painted furniture.
With darker colors, Velvet Finishes recommends mixing a little bit of paint with the PROTECT. Use a disposable bowl or cup to mix it up.
Brush the mixture on with a paintbrush. If you’re seeing streak marks, apply more, which seems like the opposite of what you should be doing, but it works.
7. Let your paint cure.
Let it dry, and then let your chair sit for several days. This goes for anything you paint – cure time is everything! Let pieces sit and fully cure, and you’re way less likely to dent or scratch it.
If you have any questions about using Velvet Finishes, check out their FAQ section on their website. It’s super helpful.
It’s always amazing what paint can do to change the look of something! Painting a chair is easy, and I really do just love it with this artwork. (And bonus, this artwork is cheap for how big and pretty this piece is!)
GET THE LOOK:
Since a popular question I get is “Where’d you get that?!,” here are links to the same or similar sources:
- Wall color: Camelback by Sherwin Williams
- Trim color: White Dove by Benjamin Moore
- Artwork
- Seagrass basket
- Pillow
Have you painted any furniture lately?
If you want more painted chair makeovers, check these out:
- Painting an old chair from an estate sale
- How to use a paint sprayer to paint old rockers
- How to distress an old chair
Remember to bookmark or pin this post if you want to save it for later!
Pin it!
Want to read more posts like this?
Follow along: Get my emails | Facebook | Pinterest | Twitter | Instagram
b says
Such a pretty green, Meg. I too have a thing for green. It looks perfect in that corner especially with your artwork. Great color choice.
GreenWithDecor says
Thank you! Green is always a good choice.