Today is reaaaaaaaally special over here on the blog because, as I’ve been chatting about on Instagram and in some blog posts for weeks now, we built a farmhouse dining room table!! And here it is:
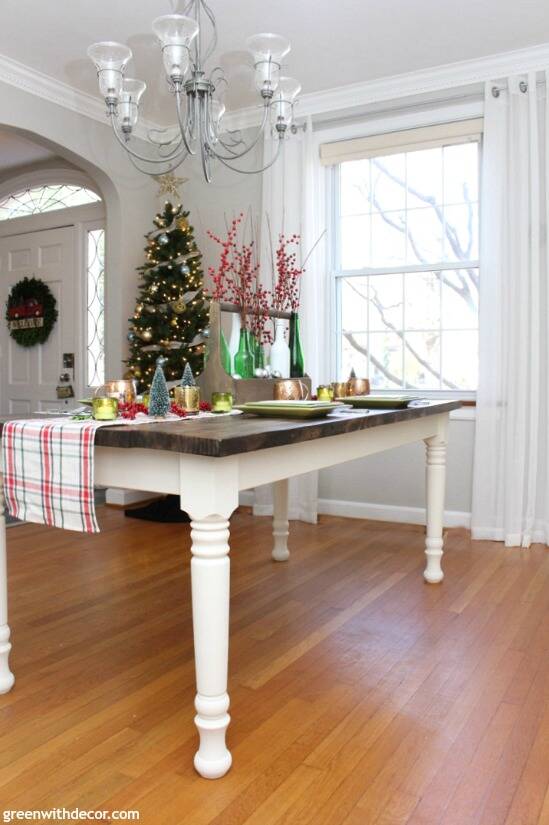
Swoon, right?! We are OBSESSED!!!
You can see the full tutorial on how to build a dining table here, but first let’s talk all about Christmas centerpieces and tablescapes, because this is the first time we’ve had a real dining room table, and I can’t stop decorating it.
It’s way too much fun.
For even more Christmas tablescape goodness, head to the bottom of this blog post. My friend Krista from The Happy Housie gathered a group of us bloggers together to share Christmas tablescapes and centerpieces today! I can’t wait to check them all out and get more inspiration for our perfect new table!
If you’re hopping over from one of the other bloggers, welcome! I’m so glad you’re here. You can learn more about me and my blog here or tour our house here.
You may notice our table is missing chairs? We’re going to build benches and I’m still looking at dining chairs for the heads of the table. We’ve been using folding chairs but they didn’t do much for photos so they’re hiding around the corner.
I’m also looking at wood chandeliers and area rugs so basically ignore most of the room and just focus on the pretty table.
And the Christmas trees. 🙂

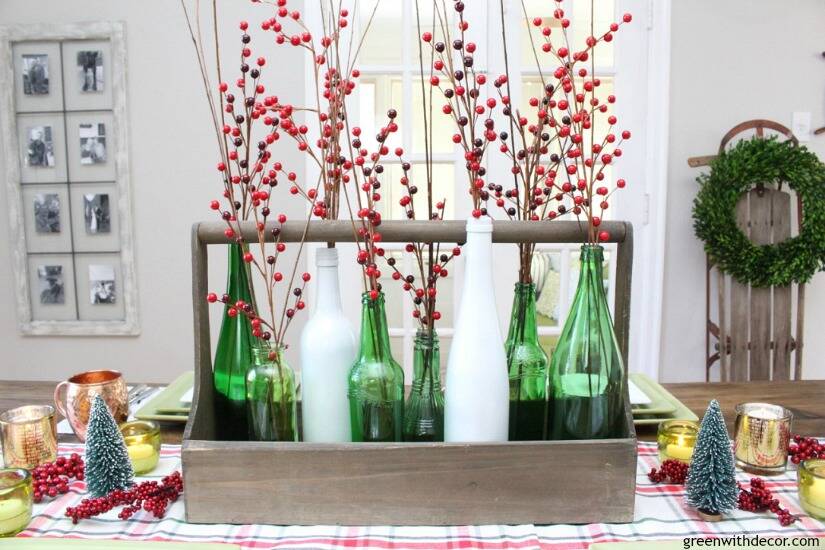
This centerpiece was easy – and inspired by the centerpiece from our patio over the summer. It’s amazing how many pieces you can use for all seasons with just a few small tweaks.
I took a bunch of random green glass bottles (wine bottles, beer bottles, one is from the Target Dollar Spot) and two wine bottles I’d spray painted white a while ago and arranged them inside that old toolbox I found at a local home decor store.
This post contains affiliate links. This means if you click the link and buy something, I may receive a small percentage of sales at no extra cost to you.
I put in some sticks and red berries (if they’re too tall, just fold the stems like I did for the shorter green bottles here) and dropped some matte and shiny silver ornaments inside the toolbox as filler. Easy enough, right?!
That plaid Christmas table runner is actually two (one was too short for our table) from the Target Dollar Spot.
They didn’t line up exactly, but I fudged it a little underneath the toolbox so you can barely even tell.
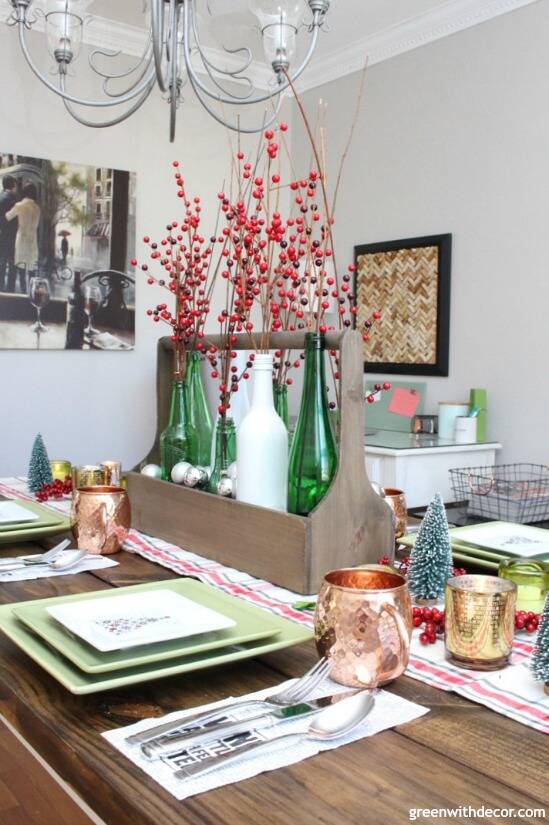
Then I took a bunch of candles, mini Christmas trees (another Target Dollar Spot find), red berries and boxwood clippings and started playing around. This tablescape stuff is fun!
The green glass and mercury glass votives are pretty much out year round but work perfectly for Christmas. I talked all about everyday decor pieces we use as Christmas decor here.
It’s amazing how many pieces can easily take on a Christmas-sy vibe.
The gold Merry Christmas votives were my grandparents’, I love to have little memories of them around our house during the holidays.
Have you heard to always use odd numbers when decorating? It’s totally true. I put an odd number of bottles in that wooden toolbox and an odd number of candles on either side.
Remember to put a little water in the bottom of your candleholder so the candle wax doesn’t harden and stick inside the votive so you can never get it out. (Been there!)
Or, I just bought these little votive candles with the silver bottoms so they don’t get stuck inside the votives.
I added the trees next and then placed the berries and boxwood clippings in between the candles and trees.
The boxwood clippings are faux, they’ve fallen off our boxwood wreathes over the years. Mostly when I was wrestling to get a glass shamrock tied in the middle for St. Patrick’s Day – such a struggle!
The green plates are our everyday plates, but work perfectly for Christmas. The little white Christmas appetizer plates are so cute! I have a platter with the same Christmas trees on it.
I’m looking for some placemats and/or chargers for our placemat but haven’t had much time to shop around yet so stay tuned for those!
Our pretty cloth napkins are actually in storage (who knew we’d be building a table?!) so I went with these cute “Wine a little” paper napkins. Hey, whatever works. It seems like a perfectly festive quote for the holidays.
Of course I had to use our Moscow Mule mugs because they are really perfect for any holiday and any drink! They’re too pretty to hide in a cabinet, I’m always putting them out on display in the kitchen or on top of our wine fridge.
And can we talk about this vintage sled!??!
I found it the other day at a local store for only $45! (This blog post is just exciting in so many ways!)
I’ve been looking for a vintage sled to use for Christmas decorating FOR YEARS, and I’m so glad I stumbled across this one.
Those windows turned picture frames in the corner are from the original built-in cabinet in our Milwaukee dining room. We’d painted them black originally, but I gave them a little paint/dry brushing update.
I had to decorate the wine fridge, too. Sometimes I don’t know where these ideas come from, but using a cozy scarf as vase filler felt perfect as we head into the colder months.
(Pro tip for fellow renters with small fridges: A wine fridge also makes a great beer fridge.)
How are you decorating your table for Christmas this year?
You can also see our blue and copper Christmas tablescape here if that’s more your color scheme! I just can’t stop decorating the new table.
GET THE LOOK:
Since a popular question I get is “Where’d you get that?!,” here are links to the same or similar sources:
- Wooden toolbox from a local decor store (similar here)
- Bottles were mostly from the recycling bin
- Red berries, tall and short
- Silver ornaments
- Plaid table runners from Target Dollar Spot
- Gold votives from my grandparents (gold mercury glass votives here)
- Mercury glass votives
- Green glass votives from Crate & Barrel, don’t see them online (similar here)
- Mini Christmas trees from Target’s Dollar Spot (these look similar)
- Green plates: dinner plates and salad plates
- White Christmas appetizer plates from Kohl’s, don’t see them online (we also have these plain white ones.)
- ‘Wine a little’ napkins
- Moscow Mule mugs
- Boxwood wreath
- Wine fridge
- Dark green hydrangeas
- Windows turned picture frames (DIY) with a dry brush paint treatment or these are similar
Remember to hop over to the other bloggers’ tablescapes and centerpieces for more pretty table inspiration!
The Happy Housie / Paint Me Pink / My Fabuless Life / Lemon Thistle
This is Our Bliss / Newly Woodwards / All Things With Purpose / Blue I Style
Elliven Studio / Lehman Lane / Fynes Designs / Green With Decor (you’re here!) / The Restless Arrow
Remember to bookmark or pin this post if you want to save it for later!
Pin it!
Want to read more posts like this?
Follow along: Get my emails | Facebook | Pinterest | Twitter | Instagram
Kim@NewlyWoodwards says
Your table is GORGEOUS! SO awesome. And I love your decor – loving all the plaids and greens this year.
GreenWithDecor says
Thanks so much, Kim! Plaid is so fun and cozy!
Julie says
What a clever (and beautiful!!!) idea for the centerpiece! This is just gorgeous!
GreenWithDecor says
Thanks so much, Julie!!
Tara @ Lehman lane says
Meg, your farmhouse table is FABULOUS! Amazing job and it looks perfect in your new dining room.
GreenWithDecor says
Thanks so much, Tara! We are so happy with how it turned out – and still can’t believe we built it, ha!
Diana Lopes says
It looks really reaaaaaaally good, I’m in love with that decor! Congrats on the creativity!
GreenWithDecor says
Thanks so much, Diana!
Colleen Pastoor says
I love how the votives look with the hammered copper cups – beautiful tablescape!
GreenWithDecor says
Thanks, Colleen! I love how it all came together!
Krista says
WOW! Your DIY table is gorgeous!! Congrats on that accomplishment! Pretty tablescape decor too -love the pops of red and sparkle. Thanks for taking part in this hop, Meg!
GreenWithDecor says
Thanks so much, Krista! We’re so happy with how it turned out! Thanks for hosting the hop!