If you’re wondering how to paint furniture, check out this DIY guide that covers everything from prepping furniture, painting furniture, adding special effects and sealing furniture. Happy painting!
This is a post I’ve been meaning to write for a while, and it’s finally time: How to paint furniture: A beginner’s guide!
I get a lot of questions about how to paint furniture, how to prep furniture for painting, how to distress, how long to let painted pieces cure and more.
Since I’ve painted a lot of furniture over the years, (see my furniture makeover archives here), I figured it was time to put this post together!
And let me say, if you think you can’t do this, you can.
You really can. There was a time I was afraid of messing something up with spray paint, and now I paint things with all kinds of paint ALL the time.
It’s just paint. You really can’t mess it up. (Okay you can, but you can always start over. No big deal! It’s fixable.)
First let’s chat about what you need to paint furniture.
This post contains affiliate links. This means if you click the link and buy something, I may receive a small percentage of sales at no extra cost to you.
Supply list for painting furniture:
You won’t use all of these for every furniture makeover, but in general, this is my overall furniture painting supply list:
- Prep work:
- Cleaner (like this) and old rag / paper towels
- Wood filler (if your piece has a lot of scratches / dents)
- Putty knife
- Sanding blocks
- Flexible sanding sheets
- Tack cloth
- READY
- Screwdriver
- Small plastic resealable bag
- Painter’s tape (if you’re taping over any freshly painted surfaces, use this painter’s tape)
- Painting:
- Drop cloth, tarp or old blanket
- Sawhorses (optional)
- Paint stir stick
- Paint brush
- 4″ rollers and roller handle (for bigger pieces with a larger surface area)
- Primer
- Paint – I love Sherwin Williams, Country Chic Paint, Velvet Finishes and Rustoleum
- Large plastic resealable bag
- After painting:
- Glaze (optional)
- To distress: Sanding blocks or flexible sanding sheets
- Sealer: Wax, PROTECT or Polycrylic
- If waxing: wax brush and lint-free cloth
- New hardware (optional)
How to prep furniture for painting:
Prep work is definitely not as fun as painting but totally necessary if you want your painted piece to last. There’s really no point to going through the effort of painting a piece if you don’t prep it first.
How much prep work you need to do will depend on what kind of paint you use and how rough your original furniture piece is.
If you’re painting outside, be sure to check the weather. Both high humidity and cold temps can mess with your paint dry time. (Most paints have a recommended temperature range for use right on the jar.)
1. Clean your furniture piece.
No matter what, almost all furniture requires some cleaning. Most old furniture is dirty, and I don’t think I’ve ever come across a piece that isn’t dusty. This is a good cleaner for most pieces.
(If you’re going to be doing a bunch of wood filler and sanding, you can also clean later since you’ll have to again anyway, see below.)
2. Take off any old hardware.
If you’re going to use it again after the piece is painted, keep the hardware and screws in a plastic resealable bag so you don’t lose any pieces. It’s amazing how those little screws just wander off otherwise.
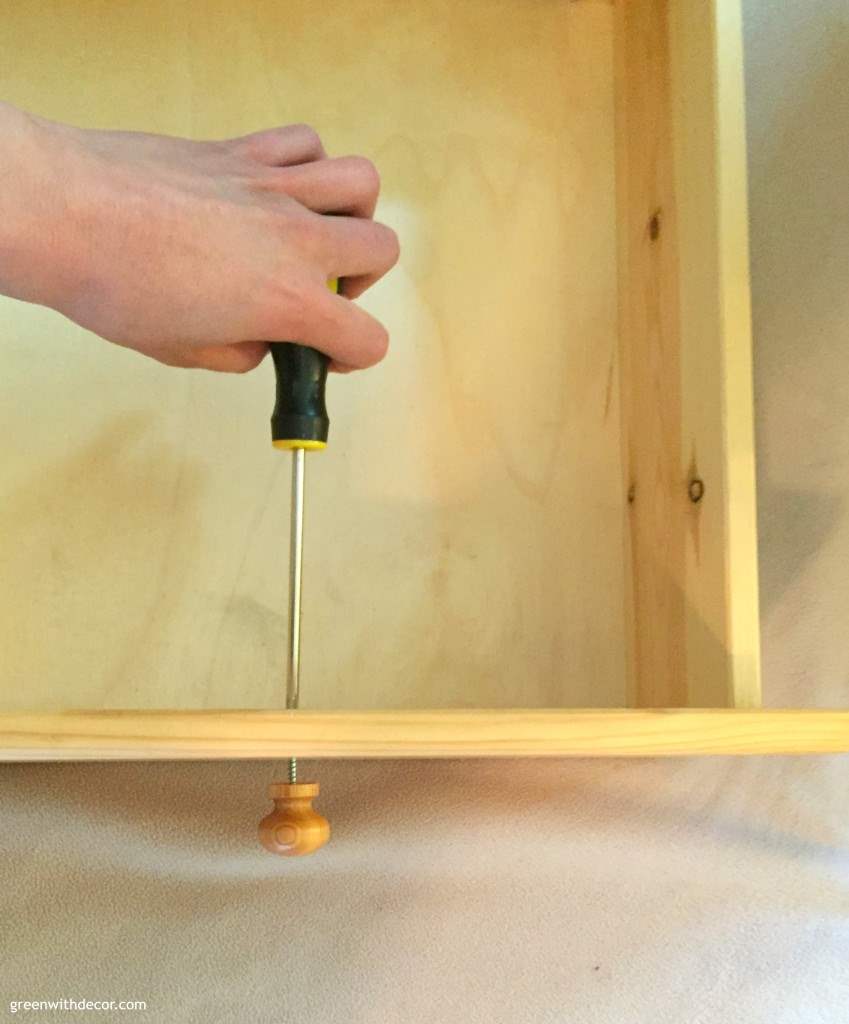
Keep any door hinges and screws in a plastic resealable bag as well.
3. Take out any drawers / take off doors.
It’s easier to paint furniture when all of the pieces are separate. Place doors and drawers face up for painting so you get a smooth, even finish.
4. Use wood filler to fill any scratches or dents.
Follow the directions on your wood filler. You’ll need a putty knife and sanding block.

Sand the area(s) to a smooth finish when you’re done with the wood filler. Once you cover the piece with paint, you’ll never see those previous imperfections.
5. Sand your entire piece.
By roughing up your piece a bit, you’re giving the paint something to adhere to. These sanding blocks are easy to grip as you sand a piece, and these flexible sanding sheets are perfect for pieces with any nooks or crevices.
But if you use READY by Velvet Finishes, you can skip sanding 99 out of 100 times. You just spray it on, let it sit for a minute and wipe it off. It eliminates the need for sanding, which keeps things really easy. (I use READY even if I’m not using Velvet Finishes paint – it’s amazing!)
6. Clean your pieces.
You’ll want get rid of any sanding dust before painting. Tack cloths are perfect for this and pick up basically every last piece of dust and dirt! I wish I’d discovered them sooner!
7. Tape off anything you want to protect.
If there’s any part of the furniture you don’t want to get paint on, use painter’s tape to cover it up. (Sometimes old pieces have something cool you won’t want to paint over.)
Do you need to use primer for a furniture makeover?
It depends.
If you’re painting a darker piece with a lighter paint color, do a coat of primer. This will save you from doing multiple coats of paint later to keep the original color from bleeding through.
If your original piece has a glossy feel to it, you’ll probably want to use primer, too. It will help your paint color then stick to the piece instead of sliding off that glossy finish.
If neither of these two things apply, you’re probably safe to skip primer and go right to painting.
If you’re debating priming or not, it’ usually best to just do a coat of primer. It often helps in the long run and won’t hurt anything if you didn’t actually need to do it.
What paint is best for furniture painting:
Like I said above, I love Sherwin Williams, Country Chic Paint, Velvet Finishes and Rustoleum.
These paint brands can be used on any normal furniture surfaces such as wood or metal, but always confirm before starting.
Paint color will also play a factor in which paint you choose to use, but keep in mind that you can have Sherwin Williams color match any paint color you’d like. Sherwin Williams’ paint is really durable so it’s a favorite of mine.
If you’ll be using a furniture piece outside, be sure to use a paint that protects against rust. I often use Rustoleum for outdoor pieces for this reason.
Country Chic Paint is clay paint (similar to chalky paint) that I’ve used on countless pieces in our home. They have a lot of pretty paint colors (see them here). Like any chalky / clay paint, brush strokes are easier to see on the finished piece, but often that’s part of the look you’re going for when using this type of paint.
I like Velvet Finishes because of the minimal prep work required and the fact that the paint doesn’t show brushstrokes, so you can paint any which way and not worry about how your end piece will look. They also have a variety of pretty colors (see them here).
How to paint furniture:
1. Set up a drop cloth, tarp or old blanket to catch any paint drips / keep your floor clean.
Sometimes I also set up pieces on sawhorses to prevent bending over and crouching around a piece, but it just depends on the piece and where you’re painting.
2. Stir your paint.
Always stir your paint before painting on a coat. This helps keep the paint color consistent across your whole piece.
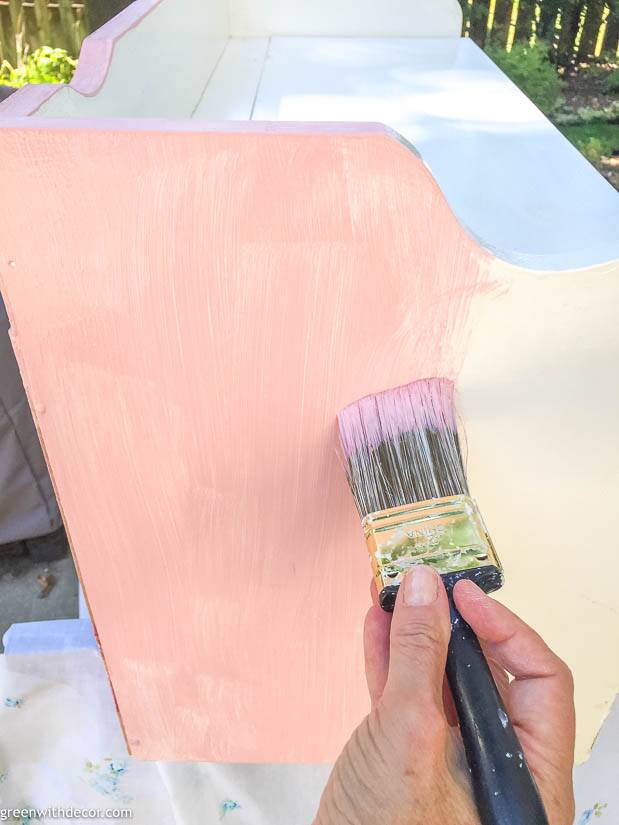
3. Brush on your first coat of paint.
These are my favorite paint brushes. I like that you can buy the set of 3 together so you have 3 different sizes depending on what you’re painting.
Smaller brushes are nice for something like chair spindles, whereas you can use a wider, bigger brush for something like a dresser or tabletop. (You can also use a small roller for something with a big surface area like that.)
Apply your brush strokes in the same direction as the wood grain of the piece for a smooth finish. Start on one side of the furniture piece and move across it until the whole piece is painted.
Once you’ve covered an area, keep going. Don’t go back over parts that have started to dry or you can mess up the paint with the combination of drying and fresh paint, and you won’t get a smooth finish.
You’ll do a second coat later, so you can always touch up any places that didn’t quite get enough paint coverage the first time around.
(Or if you’re spray painting, you obviously won’t need a brush. Check out this tutorial on spray painting: How to paint a dresser.)
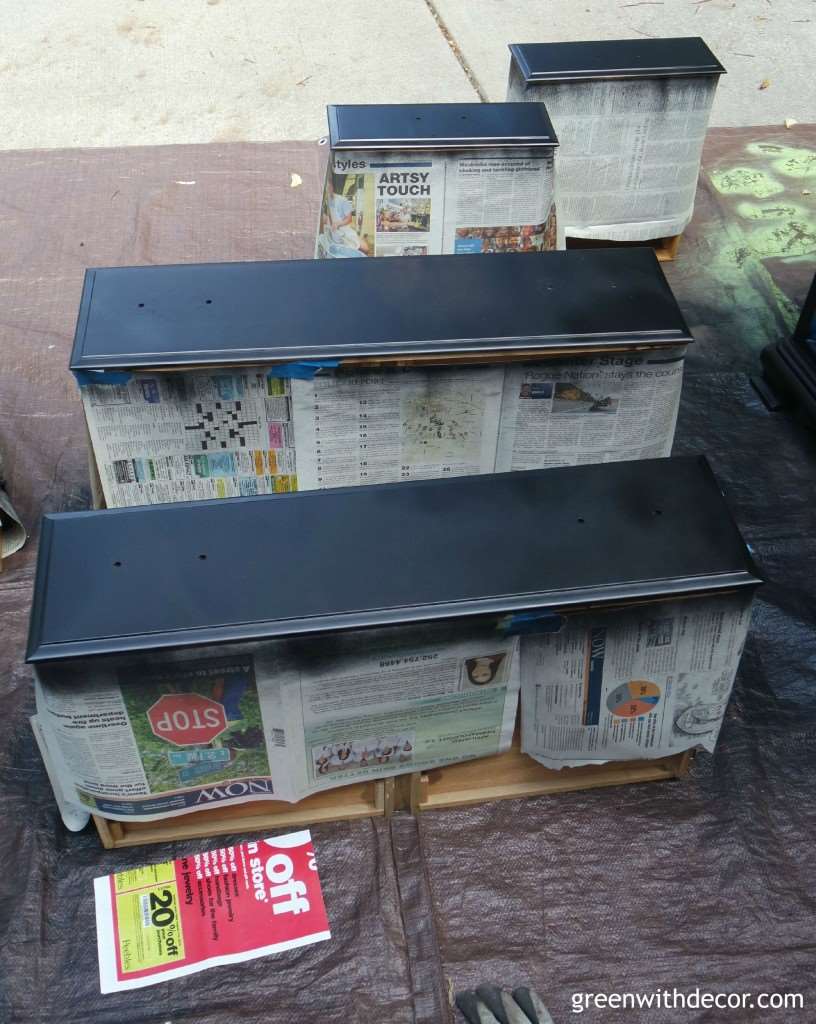
4. Let it dry.
The recommended amount of time you should wait between 1st and 2nd coats of paint varies by paint, so check your specific paint container for instructions.
If it doesn’t say, generally wait a few hours or overnight.
When you’re done with a coat of paint, you can dip your paint brush in paint, then wrap it in a damp paper towel and keep it in a plastic resealable bag in the fridge so you don’t have to wash your brush out after each coat.
5. Do a second coat of paint.
No matter what kind of paint you use, the difference between the 1st and 2nd coat of paint is almost always unbelievable. The 2nd coat often provides great, solid coverage.
6. Let it dry.
7. If needed, do a third coat of paint or touch up any places that need it.
And that’s how to paint furniture! Now for the finishing touches …
Adding a little something:
This part is completely optional! It just depends on what look you’re going for. There are a lot of choices here. These are 3 of my favorites:
Dry brushing:
Dry brushing is a pretty painting technique where you brush one color over another. It creates a unique look and is easy to do!
For more on dry brushing, check out my tutorial: How to dry brush.
Distressing:
You can distress a piece to give it a chippy, farmhouse look. You can use these flexible sanding sheets to really get into the nooks and crannies of a piece, or use a sanding block to distress along the edges.
For more on distressing, check out my tutorial: How to distress furniture.
Glaze:
You can also add glaze to painted pieces for a unique look. It’s perfect for pieces with a lot of intricate detail.
For more on using glaze, check out my tutorial: How to use furniture glaze.
Sealing furniture:
There are multiple options for sealing furniture.
Always check the specific instructions for the sealer you’re using to determine wait time between final coat of paint and when you can apply the sealer.
Wax:
If you’re using clay or chalky paint, waxing is the most common way to seal and protect a piece. This is my favorite wax.
You can see my tutorial on how to apply wax to furniture here.
Protect:
If you use Velvet Finishes paint, use their PROTECT to protect your piece.
You can see my tutorial on using PROTECT here.
Polycrylic:
You can also use Polycrylic to seal a piece.
You can see my tutorial on using Polycrylic in this post: How to stain wood.
There are also times where I don’t seal a piece. I realize this is not the recommended approach, but if it’s a piece that won’t see a lot of action (like a decorative table), you may not need it.
If you’re painting a chair you’ll be sitting on, a dresser you’ll be using, a desk you’ll be working at, etc., then you should do something to seal it and protect it.
Cure time also makes a difference in terms of how well a piece stands up to scratches and dents over time. Ideally, it’s best if you can leave a piece for up to 30 days before placing any decor on it / using it. This allows the paint to really cure to a hard finish.
(I know this can be hard for some pieces, but leave it in a basement or garage if you can so no one is tempted to touch it!)
Final steps:
Replace any hardware you took off back in the prep steps. Sometimes I reuse original hardware, and sometime it’s nice to replace hardware for an updated look.
Whew, this is a lot of info! I hope it’s helpful if you’ve been wondering how to paint furniture but were too afraid to dive in. Just do it!
It’s really fun and addicting once you start. As you paint more and more, it becomes easier and easier.
You really can’t screw it up. You can always sand and repaint a piece, so have fun with it! Pretty soon you’ll start reimagining every old piece you see with a fresh coat of paint.
It’s amazing what paint can do for an old piece. It’s such a fun way to get a unique look in your home and on a budget. What’s better than that?!
If you have any other questions on how to paint furniture, be sure to let me know. I’m always happy to help!
And if you’re looking for inspiration or examples of specific pieces or paints used, check out my furniture makeover archives.
Remember to bookmark or pin this post if you want to save it for later!
Pin it!
Want to read more posts like this?
Follow along: Get my emails | Facebook | Pinterest | Twitter | Instagram
Debbie says
I love it all!! I have several old pieces that really need some TLC and you have made it seem much simpler, for which I am grateful!! I have been terrified of starting a project. I am now going to give it a shot!!! Thank you so much for sharing!!!
GreenWithDecor says
Great to hear! Just dive in, it’s so much fun!