Read this step by step tutorial to learn how to use clay paint to give a beat-up piece a furniture makeover.
Disclosure: This post is sponsored by Country Chic Paint. All opinions, images and love of painting projects are 100% mine.
Does anyone else scroll through Facebook’s marketplace looking for furniture to makeover? I can’t be the only one.
We’ve been looking for a TV stand ever since we took the old painted chest we were going to use and moved it to the other corner of the living room.
When I came across this piece, I knew it would be perfect.
Do you see the potential, too?! I love finding old pieces like this.
I messaged the seller and basically ran out the door to go pick it up so someone else wouldn’t snatch it up first.
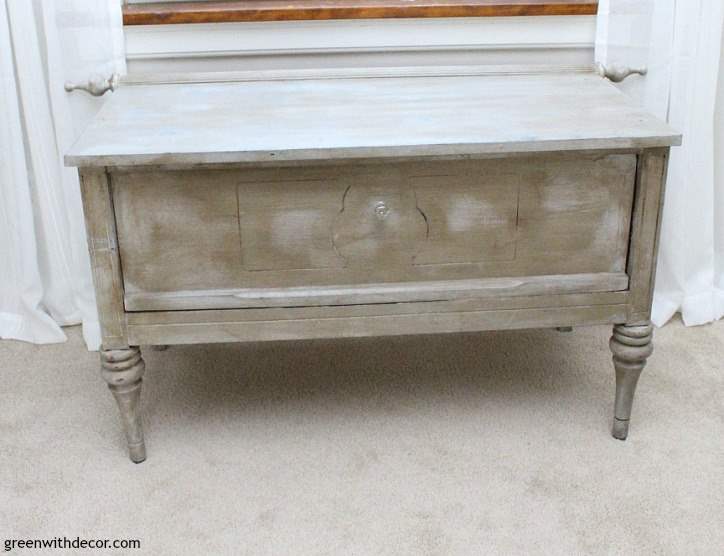
Here’s how the piece looks now:

Ignore the TV cords and cable boxes. The TV signal is so glitchy here I wasn’t going to risk moving them.
This little TV stand may just be one of my favorite pieces I’ve ever painted. It’s just so unique, I love it.
This post contains affiliate links. This means if you click the link and buy something, I may receive a small percentage of sales at no extra cost to you.
Supply list for a furniture makeover:
- Country Chic Paint, Vanilla Frosting
- Country Chic Paint’s Natural Wax
- Primer (optional)
- Drop cloth (or an old sheet)
- Wood filler
- Putty knife
- Safety glasses
- Dremel 200-1 rotary tool kit
- Paint brush
- Screwdriver
- Paint stir stick
- Sanding sponges
- Lint-free cloth
- Wax brush
- New hardware (optional) – our TV stand luckily came with a crystal knob similar to this one.
How to give furniture a makeover with clay paint:
1. Clean the piece.
This piece needed a good cleaning. It was dusty and dirty.
2. Remove the drawer and hardware.
Set the hardware aside. I usually replace hardware when I’m giving furniture a makeover so the whole piece has a new look, but this piece actually came with a cute little crystal knob.
3. Use wood filler to fill in any holes or divots.
Is it weird I actually really like using wood filler? It’s so easy to work with.
Just grab some with a putty knife (or your finger if it’s a small hole) and work it into the hole. Once it’s dry, use a sanding sponge to even it out.
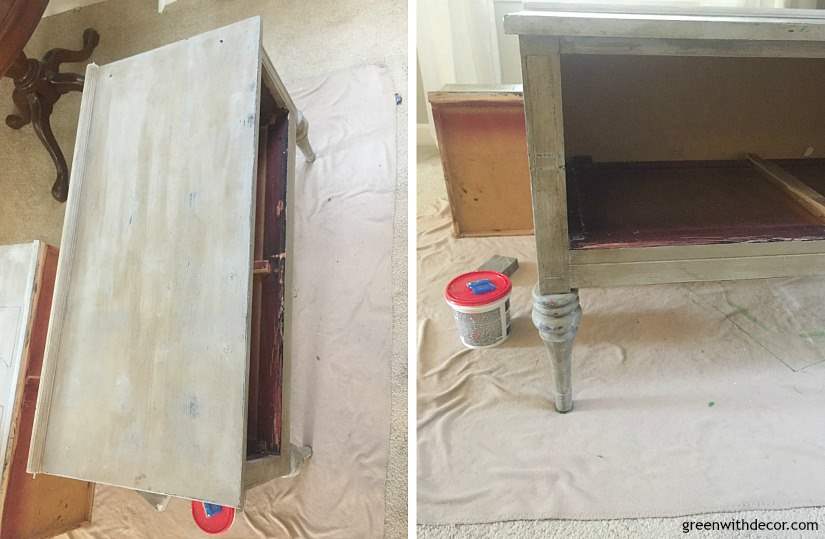
4. Remove any extra ‘knobs.’
This was a new step for me. I typically don’t cut off pieces of furniture, but this piece had two knobs sticking off either side in the back.
It almost looked like a curtain rod.
They actually didn’t look terrible, but they also looked kind of random, and we decided our new TV stand would look better without them.
I used my Dremel 200-1 to cut the pieces off (wear safety glasses to protect your eyes).
I tossed the knobs in my DIY stash. I’m not sure what or if I’ll use them for anything, but I feel like they could be a fun little add-on to some antique-looking project. Any ideas?
5. Prime the piece, if necessary.
I don’t usually prime pieces when I use clay paint because it covers so well, but lately I’ve had some random pieces that have made sense for primer.
I pretty much only use primer if I’m using light paint on a dark piece or if I’m painting over greasy paint or a really beat up piece.
This piece had a lot of different paint colors streaked across it and lots of bangs and bruises so I figured primer would give me a good even base to start with.
If your piece needs primer, stir it and then use a paint brush to apply the primer in the same direction as the wood grain of your piece.
6. Paint!
Finally, right?! I know it’s tempting to just dive right in, but all that prep work in the steps above really does make a difference in how your piece turns out.
I love Country Chic Paint’s clay paint and have done a lot of furniture makeovers with it. If you’re new around here, some of my most popular furniture makeovers are this desk makeover, this Queen Anne table makeover and these two-toned nightstand makeovers.
Make sure to shake and stir the paint well before using it.
Apply your paint in the same direction as the wood grain, and let it dry overnight.
Then apply a second coat. It’s always amazing the difference between the first and second coat.
Two coats is almost always enough, but I went with a third coat in most places on this piece for solid coverage.
7. Distress your piece.
I love these sanding sponges and talk about them basically every time I do a furniture makeover, but they’re just so much easier to handle then regular old sandpaper.
I talk a lot about distressing furniture for a chippy farmhouse look here so head over there if you want more detail. Basically, just start rubbing the sanding sponge back and forth along the edges of the piece until you like the look of it.
Start with light pressure and add more as you go. If you take off too much paint, no worries, just take a brush and repaint that part.
So basically you can’t mess this up, which is awesome, right?!
Our piece also had some trim detail on the front of the drawer. I didn’t sand it at first, but then you could barely even see it.
I took a sanding sponge and went around the edges of the trim. It’s not perfect, but I didn’t want it to be. I just kind of played around until you could see most of the trim and then popped the drawer back in.
8. Wax your dresser.
I mention this every time I talk about furniture makeovers lately, but really, a good wax brush makes all the difference. I bought the one from Country Chic Paint, and I love it.
I used Natural Wax to keep the look of the piece the same, because we all know I’m pretty obsessed with this Vanilla Frosting white paint color.
After your paint has dried for 24-48 hours, swirl your wax brush in the wax then apply the wax to your furniture piece in a circular motion. Use a clean, lint-free cloth to buff off any excess wax.
With wax, you need to reapply it every 6-12 months to keep your piece sealed. I’m usually one to learn toward the longer part of that. It all depends on how much you’re using the surface of the piece.
Since we plopped our TV on the stand (we put it on top of furniture pads so it won’t scratch the piece), we won’t really be moving anything around on the surface so it should stay pretty protected.
9. Put your new (or old) hardware on.
I am so glad we moved the original ‘TV stand’ dresser to the other side of the room so I was on the lookout for another piece, because I just love our new TV stand.
I love how the little legs turned out.
Are you a clay paint and furniture makeover addict yet? I swear it’s addicting once you get started.
You’ll be scrolling through Facebook’s marketplace looking for pieces to makeover just like me in no time!
Last week, when I shared this DIY throw pillow made from placemats, I said the living room was just about done after this TV stand makeover. I changed my mind, big surprise.
I love the light painted furniture look so much, I’m painting our black end table, too. With all the other now-white furniture, this little table is just looking too dark.
This room will be done eventually!
Meanwhile, you can see all of the other living room projects here:
- Coastal rustic modern design plan for the living room
- Agreeable Gray paint in the living room
- Wireless outlets to make life easier
- How to plan a gallery wall when you don’t know where to start
- How to distress a dresser for a chippy farmhouse look
- How to hang heavy wall decor when it doesn’t line up with studs
- Make a throw pillow from placemats
- An end table makeover with clay paint
- The coastal rustic living room reveal
Remember to bookmark or pin this post if you want to save it for later!
Pin it!
Want to read more posts like this?
Follow along: Get my emails | Facebook | Pinterest | Twitter | Instagram
Wendy says
Meg it looks great! I love the color. I have never used clay paint. Will definitely check it out.
GreenWithDecor says
Thanks, Wendy! I love clay paint!
Kelly says
This is beautiful! You did a great job keeping the charm of this unique old piece.
I’ve never used clay paint. How is it different from chalk paint.
GreenWithDecor says
Thanks, Kelly! I really love this piece. Clay paint by Country Chic Paint is similar to chalky paint but slightly different. It has great, full coverage. It also has a built-in primer which means less prep work. (Although sometimes I still use primer with it.) I’ve used clay paint on a lot of pieces and always love the matte, durable finish!
Tina Martin says
Hello Meg,
I read your blog and love the furniture that you refurbish. Do you have any advice about glazing or white washing travertine floor tiles? I have recently redone my bathroom and want to lighten my travertine floor tiles. I’d like to continue to see the marbling and design in each tile, but just want it to have a white hue instead of a tan/yellow hue. Any suggestions?
Thanks!
GreenWithDecor says
Hi Tina, thanks so much for reading! I haven’t done any work with travertine floor tiles so I’m not sure. I’m sorry I can’t be of more help!