Painting an end table is the perfect way to add a small pop of color to a living room without changing the whole color scheme of the room.
Disclosure: This post is sponsored by Country Chic Paint. All opinions, images and love of painting projects are 100% mine.
Remember when I talked about the living room plan a few months ago? I called it ‘coastal rustic modern’, and I’d say we’re sticking pretty closely to that design plan with a few fun changes. (You can see the living room design plan here if you want to see.)
I kept thinking we were just about done with this room, and then I would think of one more project. Like hanging crates as shelves, which led to me moving the farmhouse painted chest to the opposite side of the room to have something pretty underneath them, which meant we needed a new TV stand.
Then I found a couple of placemats in the clearance aisle I knew would be perfect as a DIY pillow.
Anyway, I really think today’s little end table furniture makeover is the last project in this room. Until we bust out Christmas decor next week anyway. 🙂
The table was black originally. You may remember we had this (and its twin table) in our family room in our Milwaukee house.
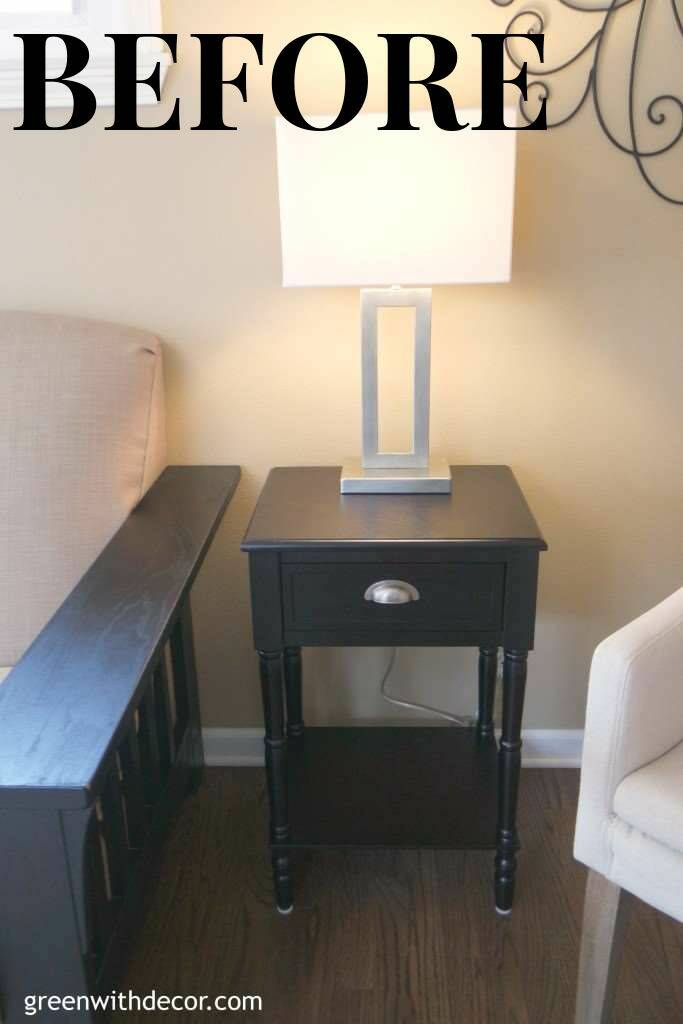
I’ve said this before, but I used to have a lot of black furniture. I’m more into lightening things up lately to create more of a beachy cozy feel.
So even though there was nothing wrong with the end table, I just felt like it was time for some paint.
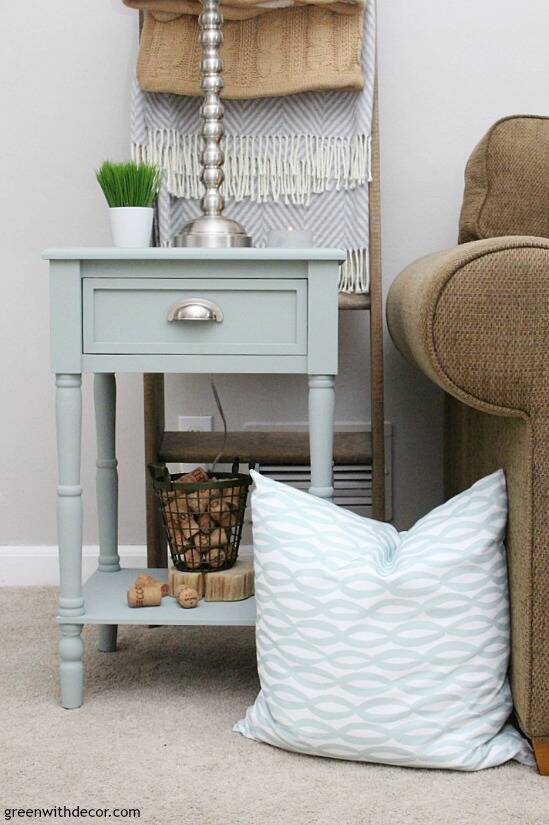
And now isn’t it pretty?!
This post contains affiliate links. This means if you click the link and buy something, I may receive a small percentage of sales at no extra cost to you.
I even forced myself to use a color besides white, because we all know I have a white paint (Vanilla Frosting by Country Chic Paint, specifically) obsession.
Just see this desk, this farmhouse dresser, this TV stand, this bookshelf, this foyer table, the list goes on and on.
I went with Country Chic Paint’s Dune Grass, a light beachy blue this time for a little pop of color next to our gray walls and dark couch. (If you want more of a true light blue, see this Queen Anne table I gave a makeover to with Country Chic Paint’s Icicle.)
Supply list for an end table makeover with clay paint:
- Country Chic Paint, Dune Grass
- Country Chic Paint’s Natural Wax
- Primer (optional)
- Drop cloth (or an old blanket)
- Paint brush – I used one of these
- Screwdriver
- Paint stir stick
- Lint-free cloth
- Wax brush
- New hardware (optional) – these are similar
How to give an end table a makeover with clay paint:
1. Take the hardware off.
I typically update the hardware of a piece when I’m painting it, but since this table was only a few years old, the hardware was pretty new so I’m keeping it.
2. Clean your table.
Get rid of any dust and be sure to give your piece a good wipe down so the paint has a clean surface to adhere to.
Give it a good sanding, too, if it has any shine to it.
3. Give the table a coat of primer. (optional)
You don’t need to use primer with Country Chic Paint, but since I was painting a lighter color onto a dark piece, I did a quick coat of primer.
It’ll save you a coat or two of clay paint at the end. (So you can use it for another project!)
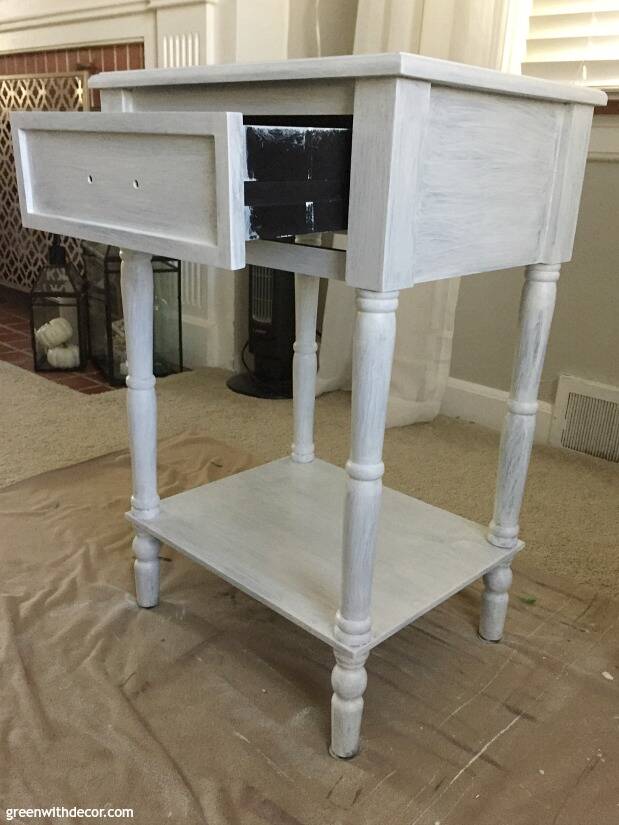
I usually take the drawers out of any table or dresser I’m painting to keep things easy, but this drawer was attached in the back, AKA not coming out easily, so I just left it and decided to paint around it.
I just moved it in and out (from underneath so I wasn’t touching wet paint) so I could paint the sides and the front of it without missing any spots.
4. Paint!
Shake and stir your paint before using it to be sure it’s mixed well.
Then apply a coat of paint, with the brush strokes going in the same direction as the wood grain.

This can get tricky on spindles, so I typically move my brush around the circle of the spindle (see the picture below) to make sure I’m getting paint in every crevice.
Then I go back over the spindle with vertical strokes for a clean even look on each spindle.
Let your first coat of paint dry overnight, then apply a second coat.
You can see how the first coat shows some brush strokes.
The second coat always provides such great coverage, I love seeing the difference between the first and second coats.
After you final coat, let your piece dry for 24-48 hours.
5. Distress your table. (optional)
If you’re going to distress your piece, do it before you apply and wax. For more details on distressing, see this chippy farmhouse dresser or this TV stand.
I decided to leave this table as is since we already have a couple of distressed pieces in our living room.
6. Seal your table with wax.
I lIKE Country Chic Paint’s Natural Wax because it protects whatever you painted while maintaining the original paint color.
Move the wax brush across your piece in a circular motion, being sure to cover the entire surface of your table since it will probably see the most action as people move drinks or decor pieces across it.
Wipe off any excess wax with a clean, lint-free rag.
Wax needs to be reapplied every 6-12 months. The top of the table will probably need another coat of wax before the legs since nothing will really be bumping into the legs.
Well except for Oakley. 🙂 She’s obsessed with that heat vent behind the table and likes to lay right in front of it now that fall weather has really arrived.
7. Put your hardware back on.
All done!
Dune Grass is officially up there as one of my favorite paint colors for furniture makeovers.
Actually, I think I say that about every piece I makeover with their paint, because it’s all gorgeous. You can see all of their paint colors here.
GET THE LOOK: Green basket | Ladder, similar here or here | Tan blanket | Couch | Aqua + white pillow | Blue + white pillow | Cream pillow | Boat artwork
I *think* the living room is officially done.
I’ll share the full coastal rustic living room reveal later this week, and then we can bust out the Christmas tree and start decorating, right?!
Have you finished any end table makeovers or other furniture painting lately?
You can follow along with our living room progress here:
- Coastal rustic modern design plan for the living room
- Agreeable Gray paint in the living room
- Wireless outlets to make life easier
- How to plan a gallery wall when you don’t know where to start
- How to distress a dresser for a chippy farmhouse look
- How to hang heavy wall decor when it doesn’t line up with studs
- Make a throw pillow from placemats
- The TV stand furniture makeover
- The coastal rustic living room reveal
Remember to bookmark or pin this post if you want to save it for later!
Pin it!
Want to read more posts like this?
Follow along: Get my emails | Facebook | Pinterest | Twitter | Instagram
Leave a Reply